Prüfpunkte
Deploy your app
/ 100
App Engine: Qwik Start - Python
GSP067

Overview
App Engine allows developers to focus on doing what they do best, writing code, and not what it runs on. Developers upload their apps to App Engine, and Google Cloud takes care of the rest. The notion of servers, virtual machines, and instances have been abstracted away, with App Engine providing all the compute necessary. Developers don't have to worry about operating systems, web servers, logging, monitoring, load-balancing, system administration, or scaling, as App Engine takes care of all that. Developers only need to focus on building solutions for their organizations or their users.
The App Engine standard environment provides application-hosting services supporting the following languages: Python, Java, PHP, Go, Node.js, and Ruby). The App Engine flexible environment provides even more flexibility by supporting custom runtimes, however it is out-of-scope for this lab.
App Engine is Google Cloud's original serverless runtime, and since its original launch in 2008, has been joined by:
- Cloud Functions, great for situations where you don't have an entire app, have broken up a larger, monolithic app into multiple microservices, or have short event-driven tasks that execute based on user activity.
- Cloud Run, the serverless container-hosting service similar to App Engine but more accurately reflects the state of software development today.
In this lab, you'll learn how to deploy a basic app to App Engine, but we invite you to also explore Cloud Functions and Cloud Run. App Engine makes it easy to build and deploy an application that runs reliably even under heavy load and with large amounts of data. (Cloud Functions and Cloud Run do the same.)
App Engine apps can access numerous additional Cloud or other Google services for use in their applications:
- NoSQL database: Cloud Datastore, Cloud Firestore, Cloud BigTable
- Relational database: Cloud SQL or Cloud AlloyDB, Cloud Spanner
- File/object storage: Cloud Storage, Cloud Filestore, Google Drive
-
Caching: Cloud Memorystore (Redis or
memcached) - Task execution: Cloud Tasks, Cloud Pub/Sub, Cloud Scheduler, Cloud Workflows
- User authentication: Cloud Identity Platform, Firebase Auth, Google Identity Services
Applications run in a secure, sandboxed environment, allowing App Engine standard environment to distribute requests across multiple servers, and scaling servers to meet traffic demands. Your application runs within its own secure, reliable environment that is independent of the hardware, operating system, or physical location of the server.
This hands-on lab shows you how to create a small App Engine application that displays a short message.
What you'll learn
In this lab you'll do the following with a Python app:
- Clone/download
- Test
- Update
- Test
- Deploy
Setup and requirement
Before you click the Start Lab button
Read these instructions. Labs are timed and you cannot pause them. The timer, which starts when you click Start Lab, shows how long Google Cloud resources will be made available to you.
This hands-on lab lets you do the lab activities yourself in a real cloud environment, not in a simulation or demo environment. It does so by giving you new, temporary credentials that you use to sign in and access Google Cloud for the duration of the lab.
To complete this lab, you need:
- Access to a standard internet browser (Chrome browser recommended).
- Time to complete the lab---remember, once you start, you cannot pause a lab.
How to start your lab and sign in to the Google Cloud console
-
Click the Start Lab button. If you need to pay for the lab, a pop-up opens for you to select your payment method. On the left is the Lab Details panel with the following:
- The Open Google Cloud console button
- Time remaining
- The temporary credentials that you must use for this lab
- Other information, if needed, to step through this lab
-
Click Open Google Cloud console (or right-click and select Open Link in Incognito Window if you are running the Chrome browser).
The lab spins up resources, and then opens another tab that shows the Sign in page.
Tip: Arrange the tabs in separate windows, side-by-side.
Note: If you see the Choose an account dialog, click Use Another Account. -
If necessary, copy the Username below and paste it into the Sign in dialog.
{{{user_0.username | "Username"}}} You can also find the Username in the Lab Details panel.
-
Click Next.
-
Copy the Password below and paste it into the Welcome dialog.
{{{user_0.password | "Password"}}} You can also find the Password in the Lab Details panel.
-
Click Next.
Important: You must use the credentials the lab provides you. Do not use your Google Cloud account credentials. Note: Using your own Google Cloud account for this lab may incur extra charges. -
Click through the subsequent pages:
- Accept the terms and conditions.
- Do not add recovery options or two-factor authentication (because this is a temporary account).
- Do not sign up for free trials.
After a few moments, the Google Cloud console opens in this tab.

Activate Cloud Shell
Cloud Shell is a virtual machine that is loaded with development tools. It offers a persistent 5GB home directory and runs on the Google Cloud. Cloud Shell provides command-line access to your Google Cloud resources.
- Click Activate Cloud Shell
at the top of the Google Cloud console.
When you are connected, you are already authenticated, and the project is set to your Project_ID,
gcloud is the command-line tool for Google Cloud. It comes pre-installed on Cloud Shell and supports tab-completion.
- (Optional) You can list the active account name with this command:
- Click Authorize.
Output:
- (Optional) You can list the project ID with this command:
Output:
gcloud, in Google Cloud, refer to the gcloud CLI overview guide.
Task 1. Enable Google App Engine Admin API
The App Engine Admin API enables developers to provision and manage their App Engine Applications.
- In the left Navigation menu, click APIs & Services > Library.
- Type "App Engine Admin API" in the search box.
- Click the App Engine Admin API card.
- Click Enable. If there is no prompt to enable the API, then it is already enabled and no action is needed.
Task 2. Download the Hello World app
There is a simple Hello World app for Python you can use to quickly get a feel for deploying an app to Google Cloud. Follow these steps to download Hello World to your Google Cloud instance.
- Enter the following command to copy the Hello World sample app repository to your Google Cloud instance:
- Go to the directory that contains the sample code:
Task 3. Test the application
Test the application using the Google Cloud development server (dev_appserver.py), which is included with the preinstalled App Engine SDK.
- From within your helloworld directory where the app's app.yaml configuration file is located, start the Google Cloud development server with the following command:
The development server is now running and listening for requests on port 8080.
-
View the results by clicking the Web preview (
) > Preview on port 8080.
You'll see this in a new browser window:

Task 4. Make a change
You can leave the development server running while you develop your application. The development server watches for changes in your source files and reloads them if necessary.
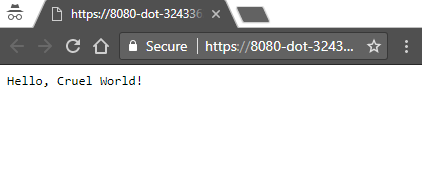
Let's try it. Leave the development server running. We'll open another command line window, then edit main.py to change "Hello World!" to "Hello, Cruel World!".
-
Click the (+) next to your Cloud Shell tab to open a new command line session.
-
Enter this command to go to the directory that contains the sample code:

- Enter the following to open main.py in nano to edit the content:
-
Change "Hello World!" to "Hello, Cruel World!".
-
Save the file with CTRL-S and exit with CTRL-X.
-
Reload the Hello World! Browser or click the Web Preview (
Task 5. Deploy your app
- To deploy your app to App Engine, run the following command from within the root directory of your application where the app.yaml file is located:
- Enter the number that represents your region:
- The App Engine application will then be created.
Example output:
- Enter Y when prompted to confirm the details and begin the deployment of service.
Example output:
Task 6. View your application
- To launch your browser enter the following command, then click on the link it provides:
Example output (note that your link will be different):
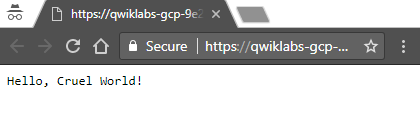
Your application is deployed and you can read the short message in your browser.
Click Check my progress to verify the objective.
Task 7. Test your knowledge
Test your knowledge about Google Cloud Platform by taking this quiz. (Select multiple correct answers if necessary.)
Congratulations!
Finish your quest
This self-paced lab is part of the Baseline: Deploy & Develop quest. A quest is a series of related labs that form a learning path. Completing this quest earns you a badge to recognize your achievement. You can make your badge or badges public and link to them in your online resume or social media account. Enroll in this quest or any quest that contains this lab and get immediate completion credit. See the Google Cloud Skills Boost catalog to see all available quests.
Take your next lab
This lab is also part of a series of labs called Qwik Starts. These labs are designed to give you a little taste of the many features available with Google Cloud. Search for "Qwik Starts" in the lab catalog to find the next lab you'd like to take!
Next steps /Learn more
- Lean more about an App Engine with An Overview Of App Engine
- Try something else with an App Engine with Building a Python 3 Flask app on App
Google Cloud training and certification
...helps you make the most of Google Cloud technologies. Our classes include technical skills and best practices to help you get up to speed quickly and continue your learning journey. We offer fundamental to advanced level training, with on-demand, live, and virtual options to suit your busy schedule. Certifications help you validate and prove your skill and expertise in Google Cloud technologies.
Manual Last Updated October 18, 2023
Lab Last Tested October 18, 2023
Copyright 2024 Google LLC All rights reserved. Google and the Google logo are trademarks of Google LLC. All other company and product names may be trademarks of the respective companies with which they are associated.