Checkpoints
Create development VPC manually
/ 10
Create production VPC manually
/ 10
Create bastion host
/ 10
Create and configure Cloud SQL Instance
/ 10
Create Kubernetes cluster
/ 10
Prepare the Kubernetes cluster
/ 20
Create a WordPress deployment
/ 10
Enable monitoring
/ 10
Provide access for an additional engineer
/ 10
Develop your Google Cloud Network: Challenge Lab
- GSP321
- Introduction
- Setup
- Challenge scenario
- Task 1. Create development VPC manually
- Task 2. Create production VPC manually
- Task 3. Create bastion host
- Task 4. Create and configure Cloud SQL Instance
- Task 5. Create Kubernetes cluster
- Task 6. Prepare the Kubernetes cluster
- Task 7. Create a WordPress deployment
- Task 8. Enable monitoring
- Task 9. Provide access for an additional engineer
- Congratulations!
GSP321

Introduction
In a challenge lab you’re given a scenario and a set of tasks. Instead of following step-by-step instructions, you will use the skills learned from the labs in the course to figure out how to complete the tasks on your own! An automated scoring system (shown on this page) will provide feedback on whether you have completed your tasks correctly.
When you take a challenge lab, you will not be taught new Google Cloud concepts. You are expected to extend your learned skills, like changing default values and reading and researching error messages to fix your own mistakes.
To score 100% you must successfully complete all tasks within the time period!
This lab is recommended for students who have completed the labs in the Develop your Google Cloud Network skill badge. Are you up for the challenge?
Setup
Before you click the Start Lab button
Read these instructions. Labs are timed and you cannot pause them. The timer, which starts when you click Start Lab, shows how long Google Cloud resources will be made available to you.
This hands-on lab lets you do the lab activities yourself in a real cloud environment, not in a simulation or demo environment. It does so by giving you new, temporary credentials that you use to sign in and access Google Cloud for the duration of the lab.
To complete this lab, you need:
- Access to a standard internet browser (Chrome browser recommended).
- Time to complete the lab---remember, once you start, you cannot pause a lab.
Challenge scenario
As a cloud engineer at Jooli Inc. and recently trained with Google Cloud and Kubernetes, you have been asked to help a new team (Griffin) set up their environment. The team has asked for your help and has done some work, but needs you to complete the work.
You are expected to have the skills and knowledge for these tasks so don’t expect step-by-step guides.
You need to complete the following tasks:
- Create a development VPC with three subnets manually
- Create a production VPC with three subnets manually
- Create a bastion that is connected to both VPCs
- Create a development Cloud SQL Instance and connect and prepare the WordPress environment
- Create a Kubernetes cluster in the development VPC for WordPress
- Prepare the Kubernetes cluster for the WordPress environment
- Create a WordPress deployment using the supplied configuration
- Enable monitoring of the cluster
- Provide access for an additional engineer
Some Jooli Inc. standards you should follow:
- Create all resources in the
region and zone, unless otherwise directed. - Use the project VPCs.
- Naming is normally team-resource, e.g. an instance could be named kraken-webserver1.
- Allocate cost effective resource sizes. Projects are monitored and excessive resource use will result in the containing project's termination (and possibly yours), so beware. This is the guidance the monitoring team is willing to share: unless directed, use
e2-medium.
Your challenge
You need to help the team with some of their initial work on a new project. They plan to use WordPress and need you to set up a development environment. Some of the work was already done for you, but other parts require your expert skills.
As soon as you sit down at your desk and open your new laptop you receive the following request to complete these tasks. Good luck!
Environment
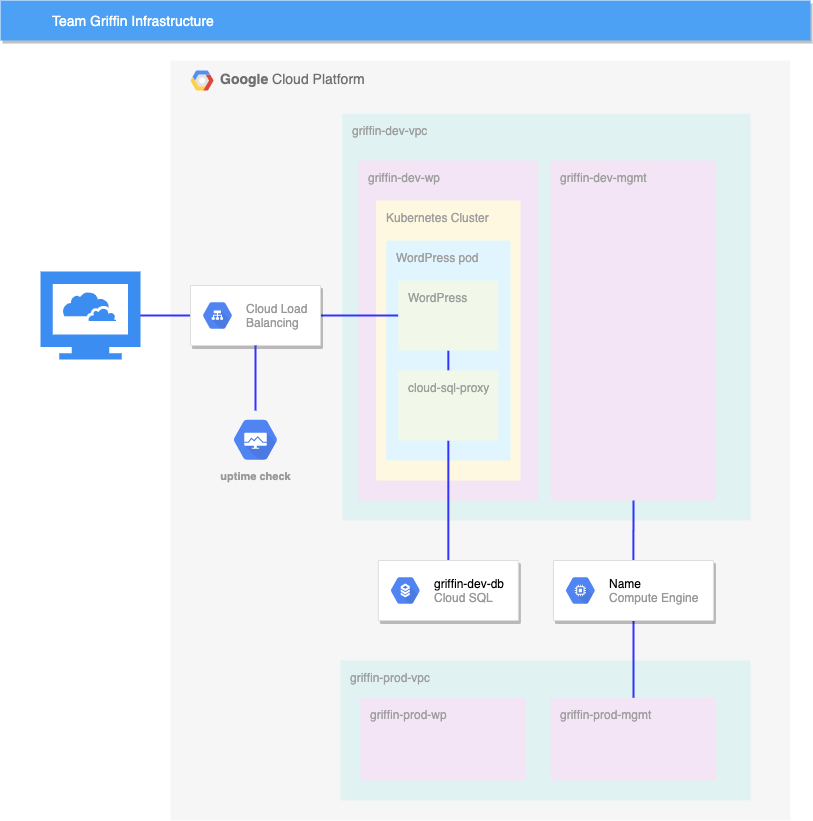
Task 1. Create development VPC manually
-
Create a VPC called
griffin-dev-vpcwith the following subnets only:-
griffin-dev-wp- IP address block:
192.168.16.0/20
- IP address block:
-
griffin-dev-mgmt- IP address block:
192.168.32.0/20
- IP address block:
-
Click Check my progress to verify the objective.
Task 2. Create production VPC manually
-
Create a VPC called
griffin-prod-vpcwith the following subnets only:-
griffin-prod-wp- IP address block:
192.168.48.0/20
- IP address block:
-
griffin-prod-mgmt- IP address block:
192.168.64.0/20
- IP address block:
-
Click Check my progress to verify the objective.
Task 3. Create bastion host
- Create a bastion host with two network interfaces, one connected to
griffin-dev-mgmtand the other connected togriffin-prod-mgmt. Make sure you can SSH to the host.
Click Check my progress to verify the objective.
Task 4. Create and configure Cloud SQL Instance
- Create a MySQL Cloud SQL Instance called
griffin-dev-dbin. - Connect to the instance and run the following SQL commands to prepare the WordPress environment:
These SQL statements create the worpdress database and create a user with access to the wordpress database.
You will use the username and password in task 6.
Click Check my progress to verify the objective.
Task 5. Create Kubernetes cluster
- Create a 2 node cluster (e2-standard-4) called
griffin-dev, in thegriffin-dev-wpsubnet, and in zone.
Click Check my progress to verify the objective.
Task 6. Prepare the Kubernetes cluster
- From Cloud Shell copy all files from
gs://cloud-training/gsp321/wp-k8s.
The WordPress server needs to access the MySQL database using the username and password you created in task 4.
-
You do this by setting the values as secrets. WordPress also needs to store its working files outside the container, so you need to create a volume.
-
Add the following secrets and volume to the cluster using
wp-env.yaml. -
Make sure you configure the username to
wp_userand password tostormwind_rulesbefore creating the configuration.
You also need to provide a key for a service account that was already set up. This service account provides access to the database for a sidecar container.
- Use the command below to create the key, and then add the key to the Kubernetes environment:
Click Check my progress to verify the objective.
Task 7. Create a WordPress deployment
Now that you have provisioned the MySQL database, and set up the secrets and volume, you can create the deployment using wp-deployment.yaml.
-
Before you create the deployment you need to edit
wp-deployment.yaml. -
Replace YOUR_SQL_INSTANCE with griffin-dev-db's Instance connection name.
-
Get the Instance connection name from your Cloud SQL instance.
-
After you create your WordPress deployment, create the service with
wp-service.yaml. -
Once the Load Balancer is created, you can visit the site and ensure you see the WordPress site installer.
At this point the dev team will take over and complete the install and you move on to the next task.
Click Check my progress to verify the objective.
Task 8. Enable monitoring
- Create an uptime check for your WordPress development site.
Click Check my progress to verify the objective.
Task 9. Provide access for an additional engineer
- You have an additional engineer starting and you want to ensure they have access to the project. Grant them the editor role to the project.
The second user account for the lab represents the additional engineer.
Click Check my progress to verify the objective.
Congratulations!
Next steps / Learn more
This skill badge is part of Google’s Cloud Engineer learning path. If you have already completed the other skill badges in this learning path, search the Google Cloud Skills Boost catalog for other skill badges in which you can enroll.
Google Cloud training and certification
...helps you make the most of Google Cloud technologies. Our classes include technical skills and best practices to help you get up to speed quickly and continue your learning journey. We offer fundamental to advanced level training, with on-demand, live, and virtual options to suit your busy schedule. Certifications help you validate and prove your skill and expertise in Google Cloud technologies.
Manual Last Updated April 2, 2024
Lab Last Tested December 4, 2023
Copyright 2024 Google LLC All rights reserved. Google and the Google logo are trademarks of Google LLC. All other company and product names may be trademarks of the respective companies with which they are associated.