Prüfpunkte
Set up the Striim software
/ 30
Set up Connector/J
/ 30
Create a Cloud Spanner access key
/ 40
Online Data Migration to Cloud Spanner using Striim
This lab was developed with our partner, Striim. Your personal information may be shared with Striim, the lab sponsor, if you have opted-in to receive product updates, announcements, and offers in your Account Profile.
GSP703

Overview
In this lab you will learn how to migrate a Cloud SQL for MySQL database to Cloud Spanner using Google Cloud's Data Migration Partner, Striim.
Striim is a comprehensive streaming ETL platform that enables online data migrations and continuous streaming replication from on-premises and cloud data sources to Google Cloud data services through a graphical drag and drop interface. The following figure shows Striim's high level architecture.
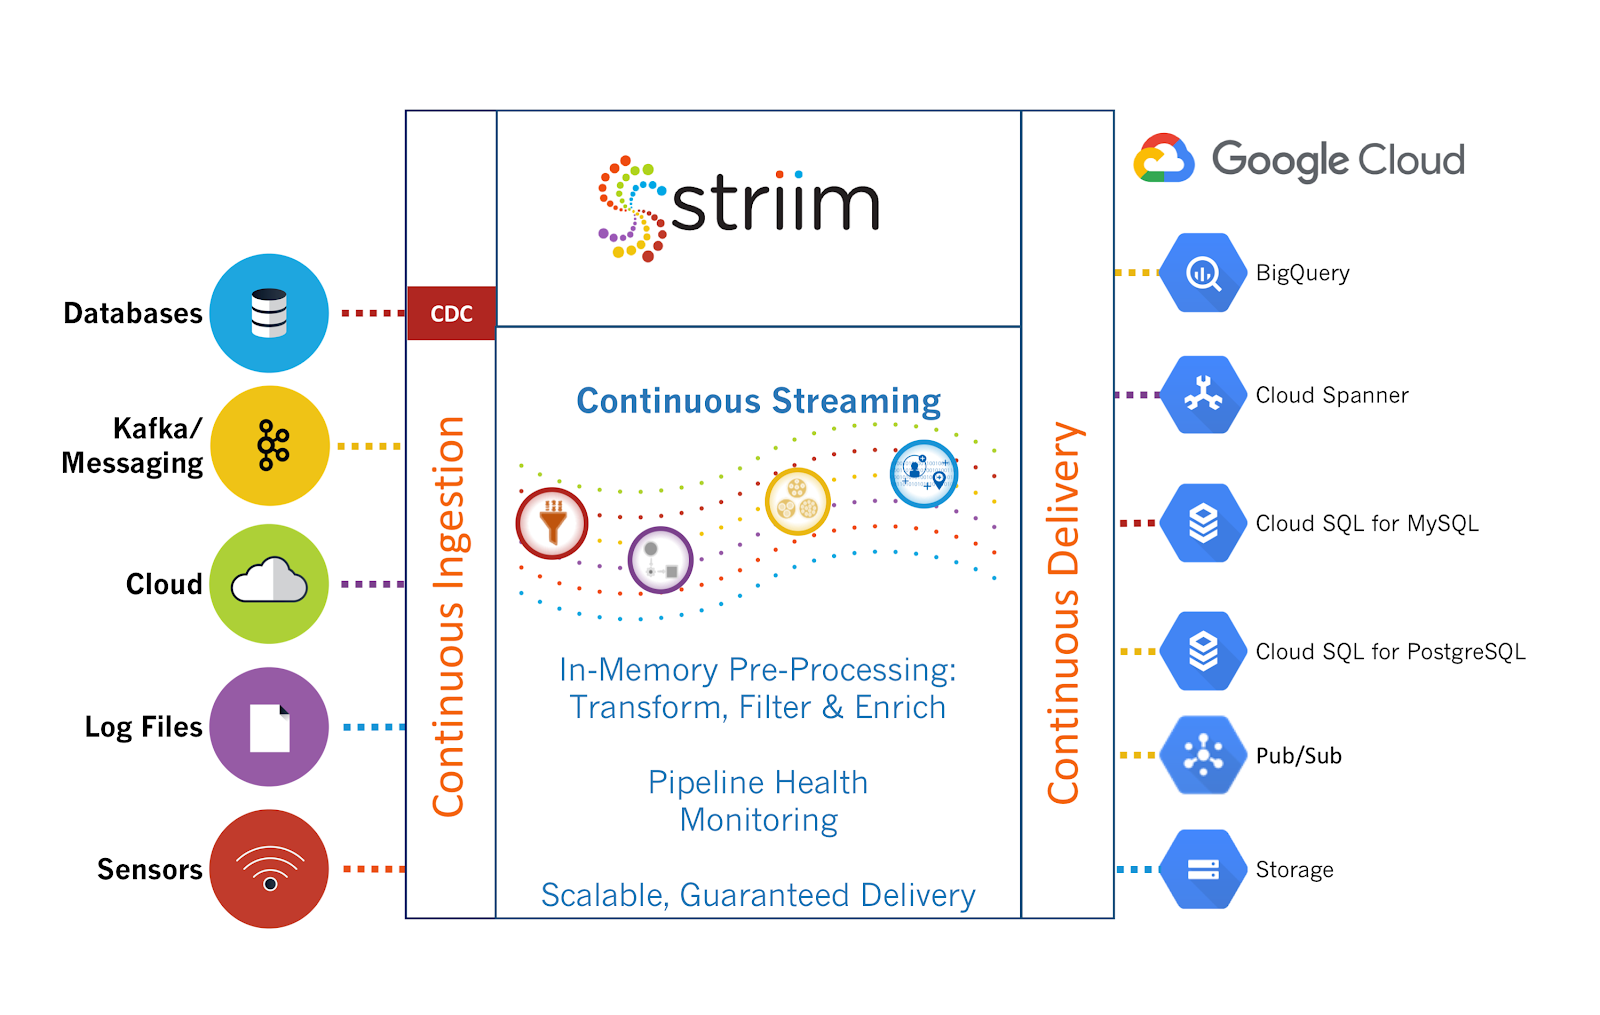

The figure shows the various services that you will use and create as well as the data flow from Cloud SQL for MySQL to Cloud Spanner via Striim that you will implement.
What you will learn
In this hands-on-lab you learn how to:
- Access and use an existing Cloud SQL for MySQL database.
- Access and use an existing Cloud Spanner database.
- Deploy Striim through the Google Cloud Marketplace and set it up.
- Use Striim to read from a source Cloud SQL for MySQL database.
- Use Striim to continuously replicate from Cloud SQL for MySQL to Cloud Spanner.
Setup and requirements
Before you click the Start Lab button
Read these instructions. Labs are timed and you cannot pause them. The timer, which starts when you click Start Lab, shows how long Google Cloud resources will be made available to you.
This hands-on lab lets you do the lab activities yourself in a real cloud environment, not in a simulation or demo environment. It does so by giving you new, temporary credentials that you use to sign in and access Google Cloud for the duration of the lab.
To complete this lab, you need:
- Access to a standard internet browser (Chrome browser recommended).
- Time to complete the lab---remember, once you start, you cannot pause a lab.
How to start your lab and sign in to the Google Cloud console
-
Click the Start Lab button. If you need to pay for the lab, a pop-up opens for you to select your payment method. On the left is the Lab Details panel with the following:
- The Open Google Cloud console button
- Time remaining
- The temporary credentials that you must use for this lab
- Other information, if needed, to step through this lab
-
Click Open Google Cloud console (or right-click and select Open Link in Incognito Window if you are running the Chrome browser).
The lab spins up resources, and then opens another tab that shows the Sign in page.
Tip: Arrange the tabs in separate windows, side-by-side.
Note: If you see the Choose an account dialog, click Use Another Account. -
If necessary, copy the Username below and paste it into the Sign in dialog.
{{{user_0.username | "Username"}}} You can also find the Username in the Lab Details panel.
-
Click Next.
-
Copy the Password below and paste it into the Welcome dialog.
{{{user_0.password | "Password"}}} You can also find the Password in the Lab Details panel.
-
Click Next.
Important: You must use the credentials the lab provides you. Do not use your Google Cloud account credentials. Note: Using your own Google Cloud account for this lab may incur extra charges. -
Click through the subsequent pages:
- Accept the terms and conditions.
- Do not add recovery options or two-factor authentication (because this is a temporary account).
- Do not sign up for free trials.
After a few moments, the Google Cloud console opens in this tab.

Activate Cloud Shell
Cloud Shell is a virtual machine that is loaded with development tools. It offers a persistent 5GB home directory and runs on the Google Cloud. Cloud Shell provides command-line access to your Google Cloud resources.
- Click Activate Cloud Shell
at the top of the Google Cloud console.
When you are connected, you are already authenticated, and the project is set to your Project_ID,
gcloud is the command-line tool for Google Cloud. It comes pre-installed on Cloud Shell and supports tab-completion.
- (Optional) You can list the active account name with this command:
- Click Authorize.
Output:
- (Optional) You can list the project ID with this command:
Output:
gcloud, in Google Cloud, refer to the gcloud CLI overview guide.
Before you begin
In order to work on the database migration some initial configuration is required:
- In Cloud Shell, set the default compute zone you wish to deploy your database and compute resources in. For more information, please see Geography and Regions. For the purposes of this lab you will use
.
- Verify that MySQL has been setup. Execute the following commands:
- Next, with the local variables you just made, connect via executing the following command. It will prompt you for a password, which is the CSQL_USER_PWD you just created,
striim-usr-password.
- Once you're in, start with these commands:
- Then, load some transactions into it at the
mysql>prompt:
-
Verify that Cloud Spanner instance has been setup with a database and table defined. In the Google Cloud console, select Navigation menu > Spanner from the left pane.
-
Click on the instance
striim-spanner-demo, and then click on the databasestriimdemo. Check that the table orders is present. -
Click on the table orders, and then the tab DATA. The table should be empty.
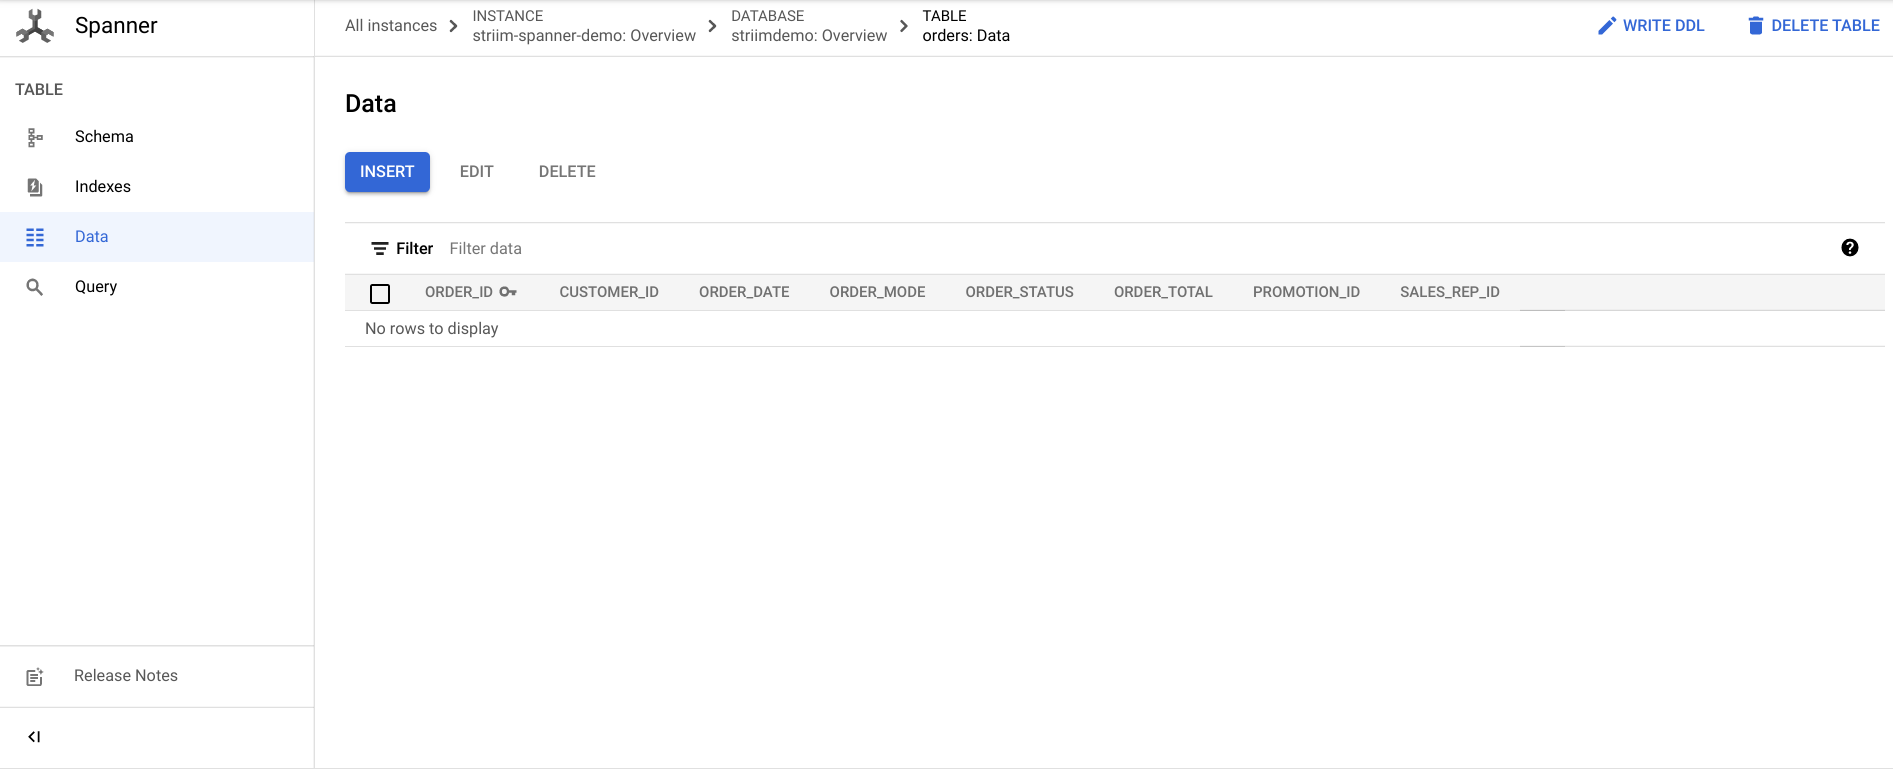
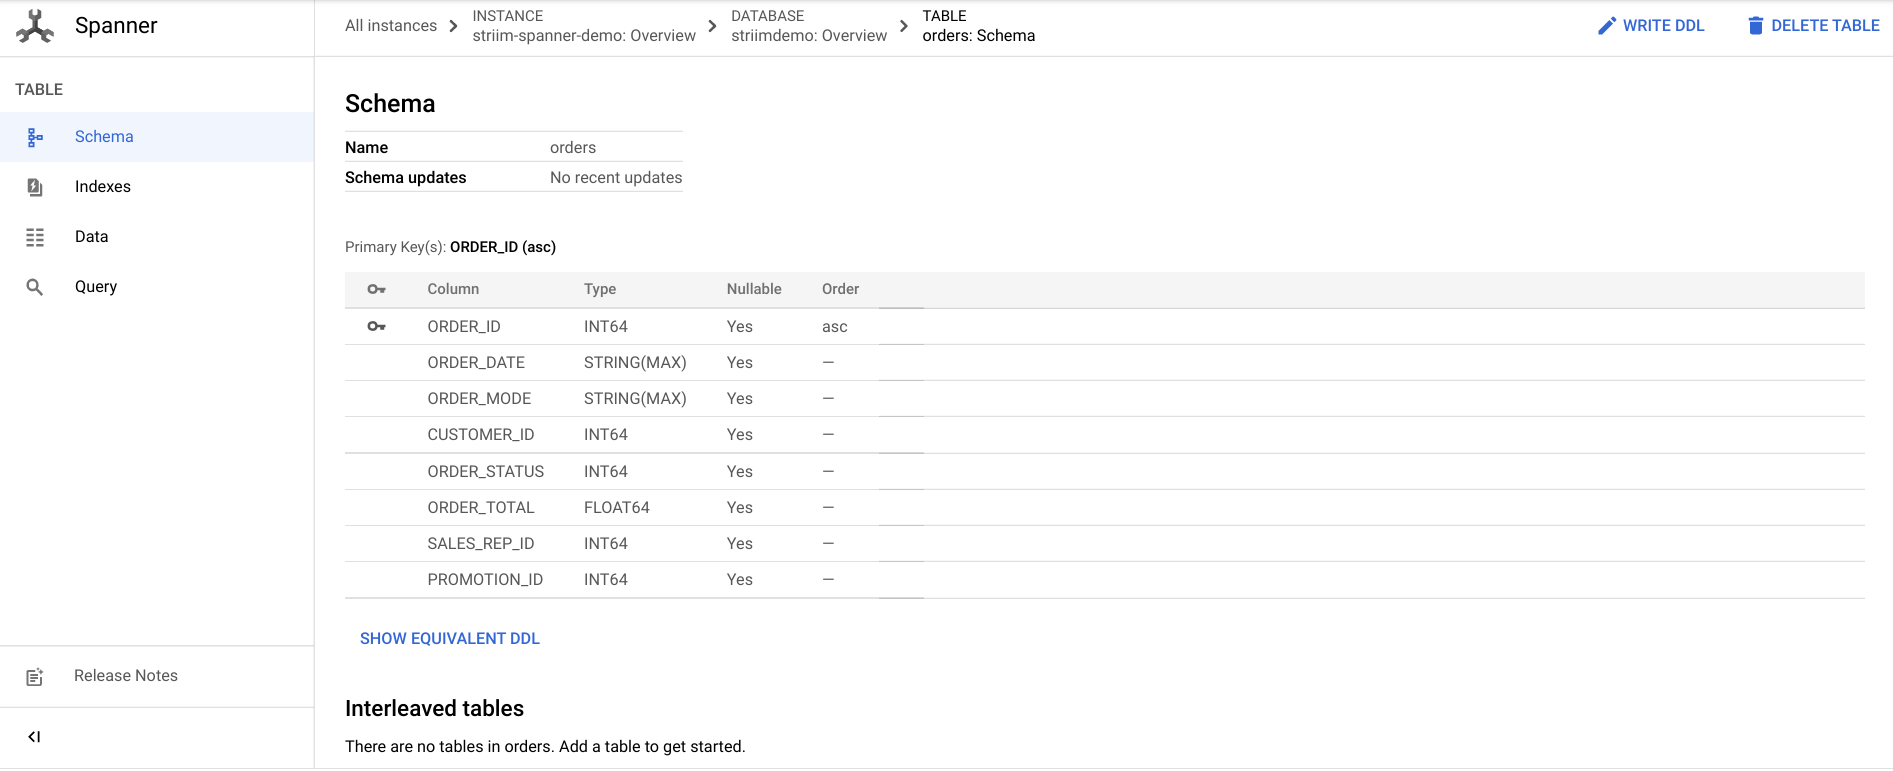
- Click on the SCHEMA and you should see that the schema has been defined.
Task 1. Set up the Striim software
Next, set up an instance of the Striim server through the Google Cloud Marketplace.
- Navigate to the Striim offering on the Google Cloud Marketplace. If a list of Google Cloud projects is displayed then select the Project ID of this lab.
Open Striim in the marketplace
Alternatively you can search in the Marketplace using the direct link.
-
Click the button marked Get Started.
-
Check the box to agree to the Terms and agreements and click Agree.
-
Click Deploy. You will be presented with configuration options for the Striim server.
-
Change the zone to
. -
Choose whether to authorize information sharing with Striim.
-
Leave all other settings as is, and click the Deploy button.
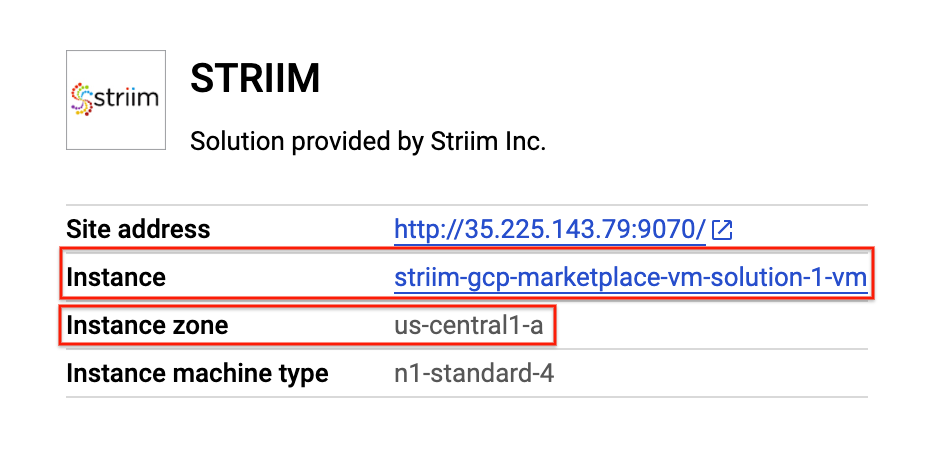
You will be redirected to Deployment Manager page, once the solution is provisioned, the deployment details will show.
- Take note of the name of the VM ("Instance" in the example screenshot below) and the zone it is deployed in ("Instance zone").
- If you didn't already exit from the
mysql>prompt, typeexitto go back to Cloud Shell. Once you're back in, execute this command replacing the VM name[STRIIM VM NAME]and Zone[STRIIM VM ZONE]from the deployment details pane:
- Now in order to allow Striim to communicate with Cloud SQL, you need to add the Striim server's IP address to allow it to connect. Execute the following command and acknowledge that you want to continue with
Ywhen prompted:
-
In the Deployment Manager page, click Visit the site. This will open up the Striim configuration wizard in a new browser tab. If there is a redirect notice, you can safely ignore it and click through the link provided.
-
Accept the EULA by clicking Accept Striim EULA and Continue.
-
Configure your Striim installation:
| Property | Value (type value or select option as specified) |
|---|---|
| First name | Example |
| Last name | User |
user@example.com |
|
| Company Name | Example |
| Cluster name | my_cluster |
| Admin password | my_admin_password |
| Sys user password | my_cluster_password |
| Striim Key Store password | my_cluster_password |
Be sure to note the cluster name and the cluster and administrator passwords, as you will be using them later in this lab.
-
Click Save and Continue.
-
In the next screen will ask for license details. Leave the field empty and click Save and Continue.
-
Click Launch and then click the green Log In button.
-
Log in using the
adminuser and the administrator passwordmy_admin_password. This will take you to the Striim administrator console (screen shown below), and you are now ready to connect to MySQL.
Click Check my progress to verify the objective.
Task 2. Set up Connector/J
You will now follow the Striim online documentation and use the MySQL Connector/J to connect Striim to your Cloud SQL instance.
-
In the Deployment Manager page for your Striim instance, click the SSH button located next to the blue Visit the site button. This will open up a new window and will automatically SSH into the virtual machine.
-
Download Connector/J to the VM and unpack it:
- Copy the file to the Striim library path, allow it to be executable, and change ownership of it:
Click Check my progress to verify the objective.
- Run the following commands to create the user directory and give the user permissions to access it:
- You now need to restart the Striim server to recognize the new library. Do this in the same SSH session by running the following:
- Go back to the browser window for the Striim administration console, refresh the window, and log in using the
adminuser and password. The administration console will take a few minutes to refresh after the restart. If the administration console does not reload on the first try, keep refreshing until the administration console comes up.
If the administration console does not come up, use the site address, but with port 9080 instead of 9070, i.e. http://[IP_ADDRESS]:9080/
admin user is a built-in user that must be used in order for login to succeed at the Striim administration console.Task 3. Create a Cloud Spanner access key
Striim requires an access key so that it can connect to Cloud Spanner. Here are the required steps you need to do:
- Create a service account for Striim to use to connect to Cloud Spanner. Run the below command in the Cloud Shell:
This will create a key called striim-spanner-key.json in your home path.
Now you need to move the key you just created to the Striim VM.
-
Identify the name of the virtual machine in which Striim is deployed on by either going to the deployment details page in the Deployment Manager, or by using gcloud compute instances list command in the Cloud Console. Now that you have the name of the Striim VM, continue with the instructions below.
-
Copy the JSON file to the Striim server with the following command:
It might be that this causes an SSH key to be generated (in this case you have to provide a passphrase).
- Confirm when promoted to continue with
Yand leave the passphrase field empty.
- Now, move the JSON file on the Striim VM to the /opt/striim directory using this command:
You are now ready to create a Striim application!
Click Check my progress to verify the objective.
Task 4. Create an online database migration
An online database migration moves data from a source database (either on-premises or hosted on a cloud provider) to a target database in Google Cloud. The source database remains fully accessible by the business application and with minimal performance impact on the source database during this time.
In an online migration, an initial bulk load is performed, and a continuous capture of changes is also being run. You then synchronize the two databases to ensure that data isn't lost. Typically both databases will be retained for long periods of time to test and verify that the application and users are not impacted by switching to a new cloud database.
Start by creating an initial bulk load.
-
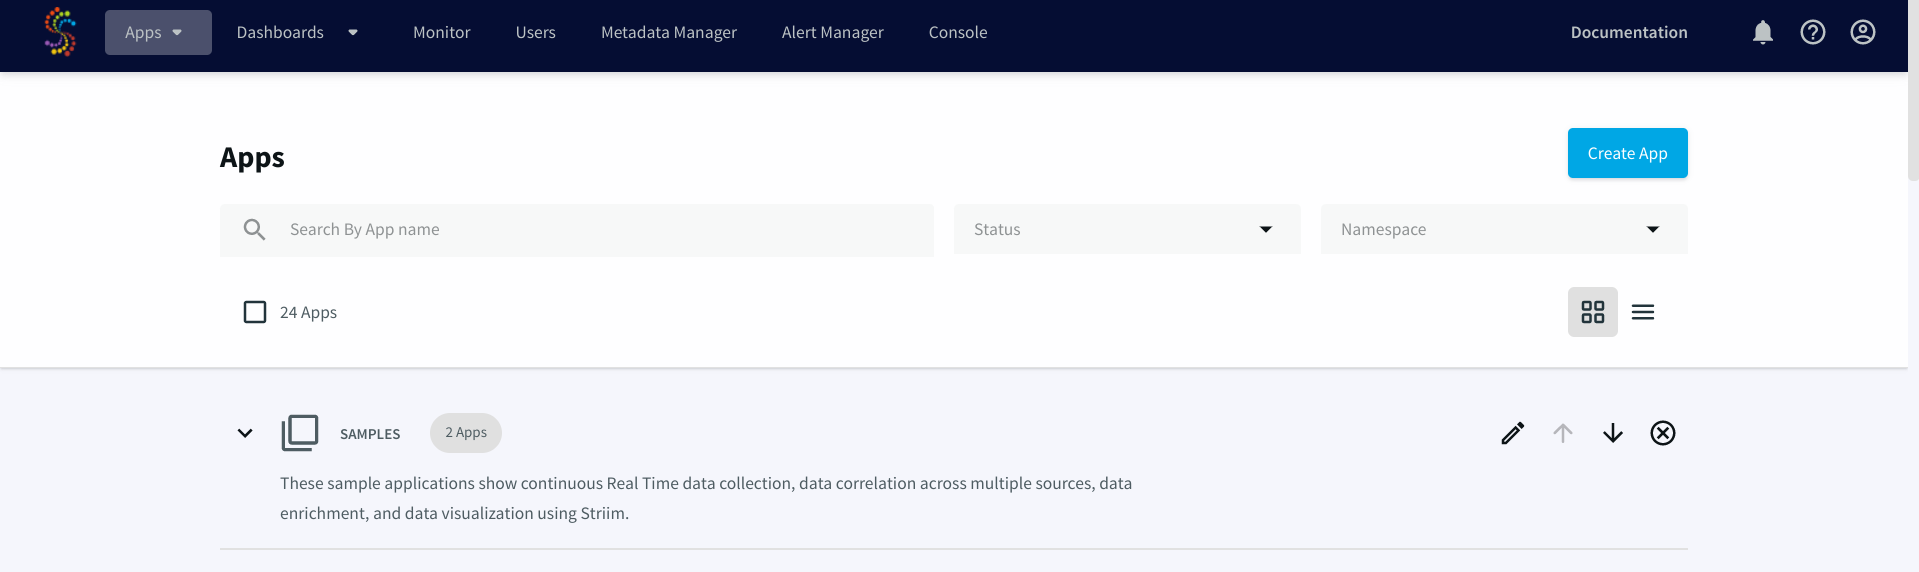
In the Striim Web UI, click Apps pane.
-
Click the Create App button on the upper right hand side of the page.
There are multiple ways to create applications in Striim.
-
Click Start From Scratch.
-
Name the application something that is easily remembered. This lab will use
demo_online. -
Below the application name, you can choose a namespace. These are logical groupings that help you organize applications. Use the default
adminnamespace. Click Save.
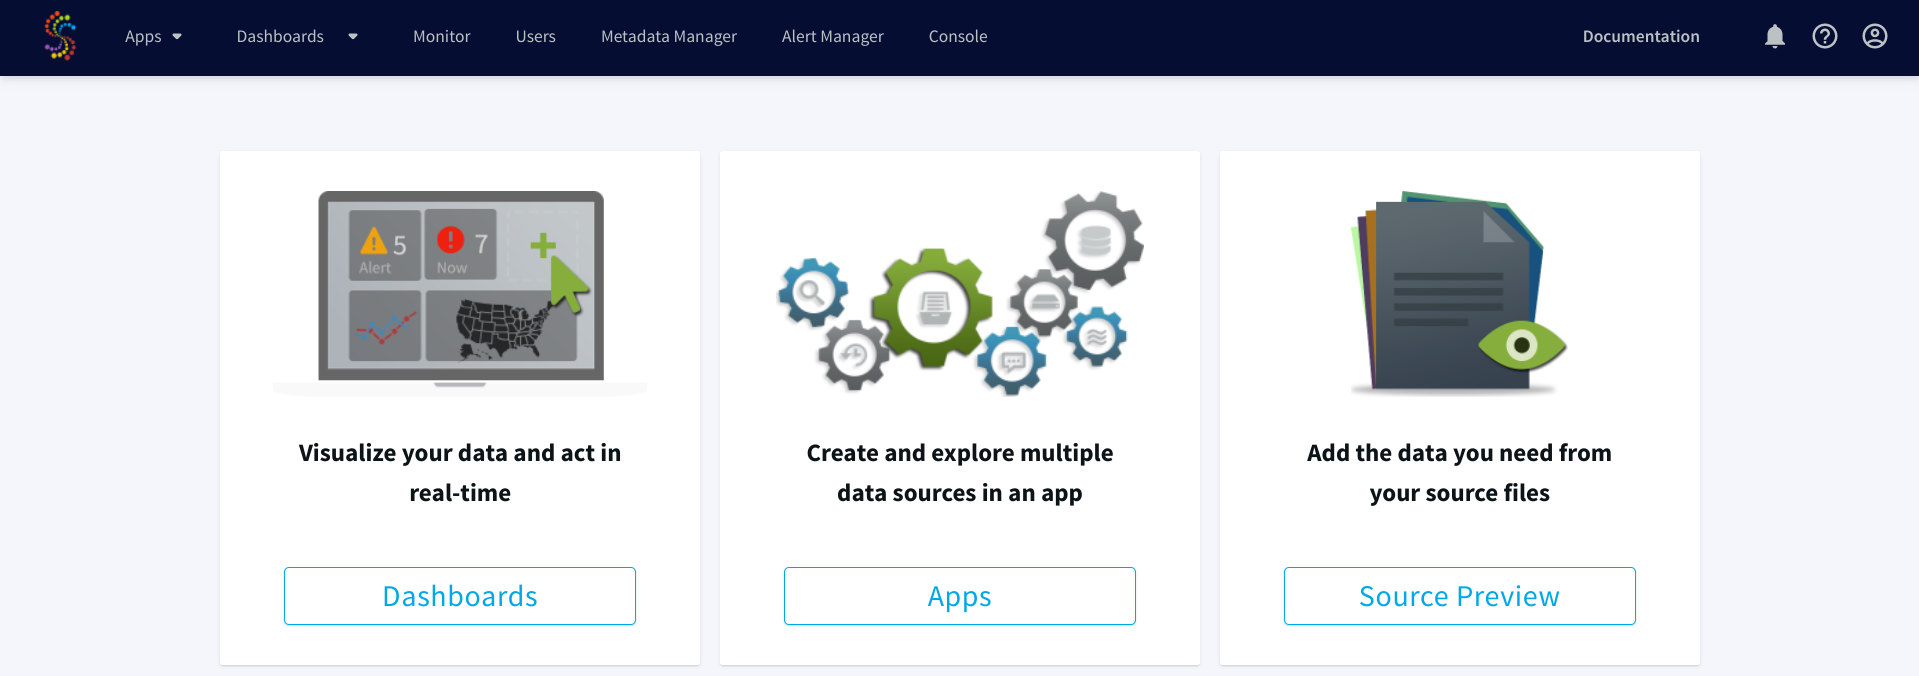
You'll be greeted by the Flow Designer page. All of the out of the box connectors that you need to create streaming data applications are in the left hand menu bar.
-
To do a one time bulk initial load of data, use the Database Reader.
-
Drag and drop the Database tile from the Sources pane to the application canvas in the middle.
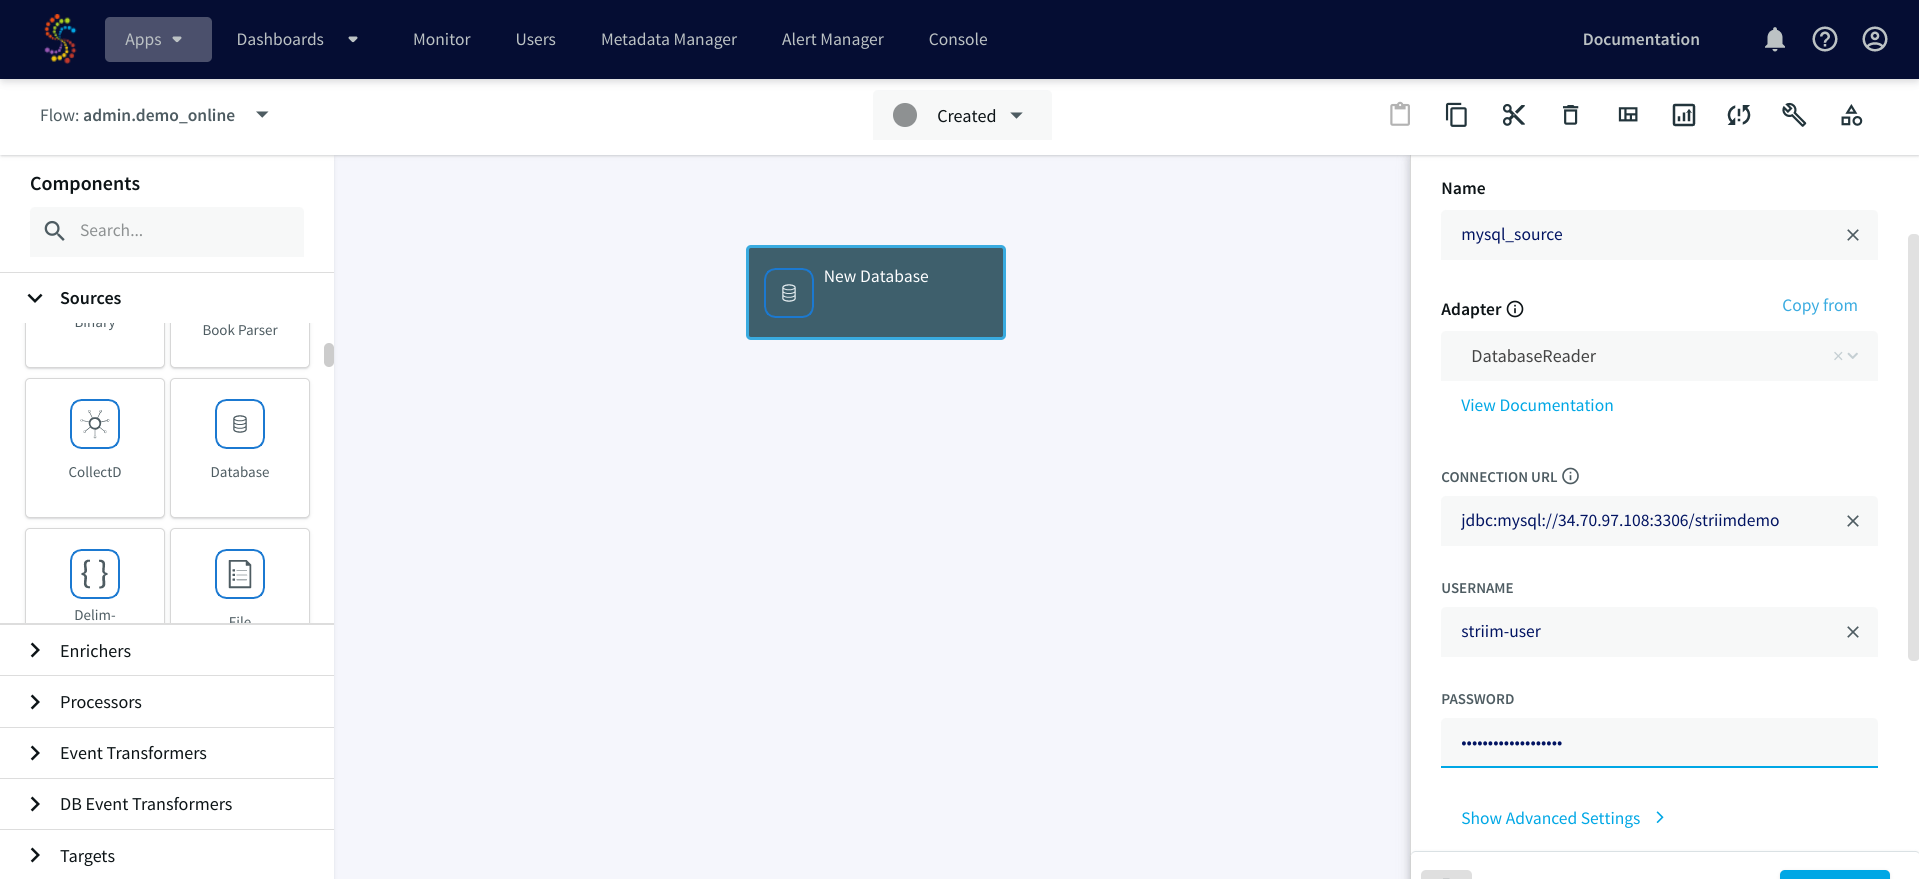
- Enter all of your connection properties on the right New Source.
| Property | Value (type value or select option as specified) |
|---|---|
| Name | mysql_source |
| Connection URL | jdbc:mysql://[PRIMARY_ADDRESS]:3306/striimdemo |
| Username | striim-user |
| Password | striim-usr-password |
[PRIMARY_ADDRESS] is the IP address of SQL instance. The IP address can be found through Cloud Shell with the command gcloud sql instances list.
- Click the Show Advanced Settings link to see more configuration properties.
| Property | Value (type value or select option as specified) |
|---|---|
| Tables | striimdemo.ORDERS |
| Output to > New output | stream_CloudSQLMySQLInitLoad |
- Click Save.
Now do a quick test to see if the configuration settings are correct, and confirm that Striim can successfully connect to MySQL.
- In the middle of the page there is a button marked Created with a drop down arrow next to it. Click the button, and select Deploy App.
In the Deployment window, this is where you specify that you want to run certain pieces of your application on certain parts of your deployment topology. You'll typically use this if you're running a lightweight forwarding agent on-premises deployed next to your source, pushing data over specific ports to the Striim server running in the cloud.
-
Since you're using a simple deployment topology, select the default option and click Deploy.
-
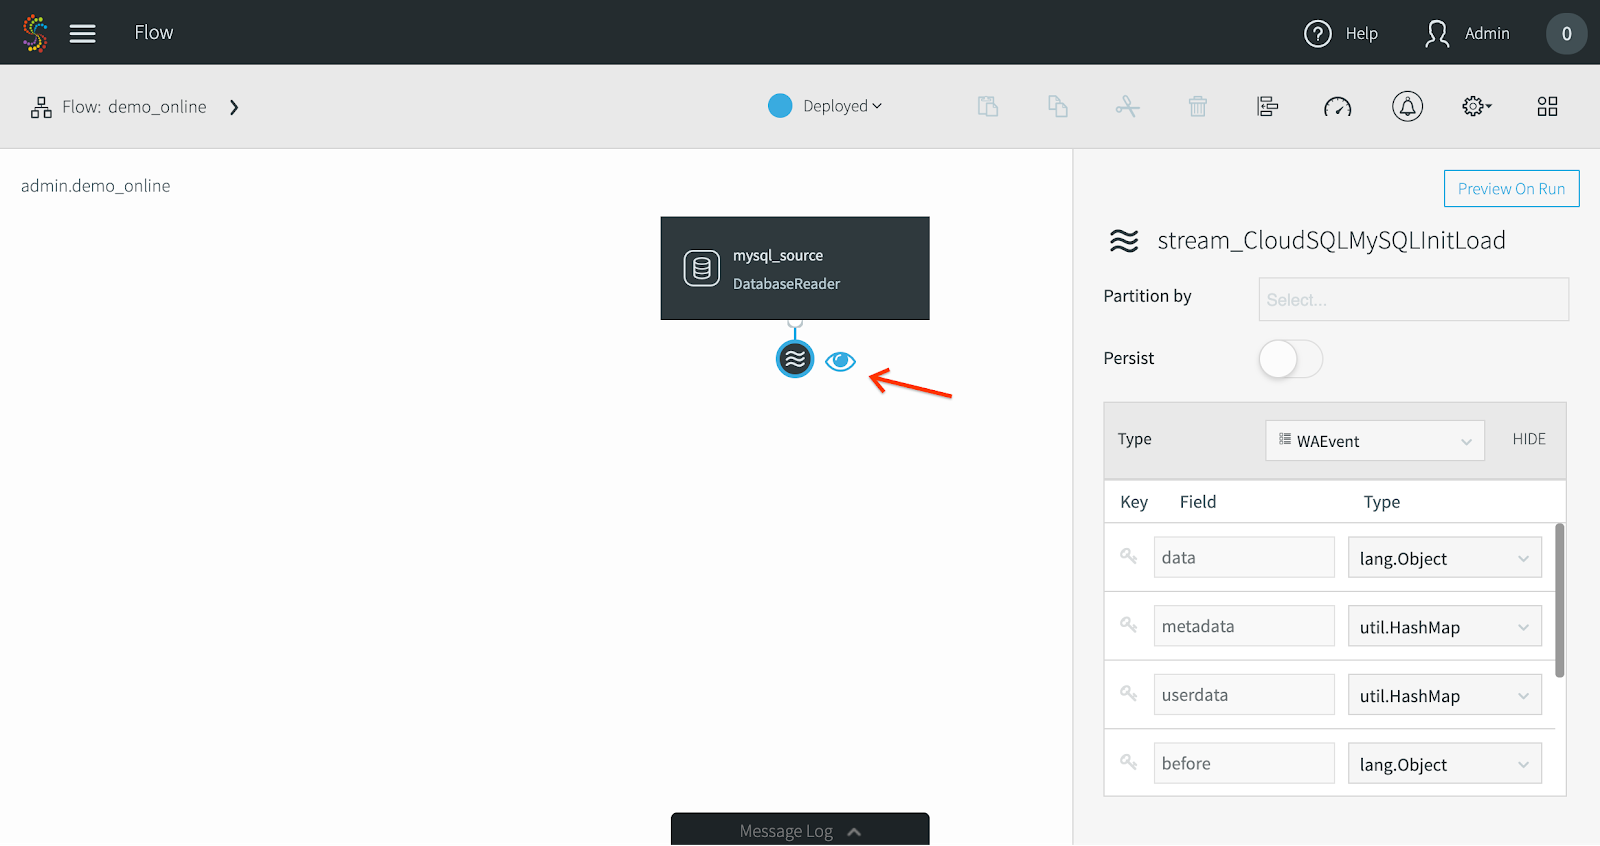
Click the wave icon beneath your Database Reader component, and then click the eye icon next to it to preview your data as it flows through the Striim pipeline.
- Go back up to the top menu bar, click Deployed, and then click Start App.
You should now see the Striim application running, and data flowing through the pipeline. If there are any errors, it means that there is an issue connecting to the source database since there is only a source component in the pipeline. If you see your application successfully run but no data flows through, typically that means that you don't have any existing data in your database.
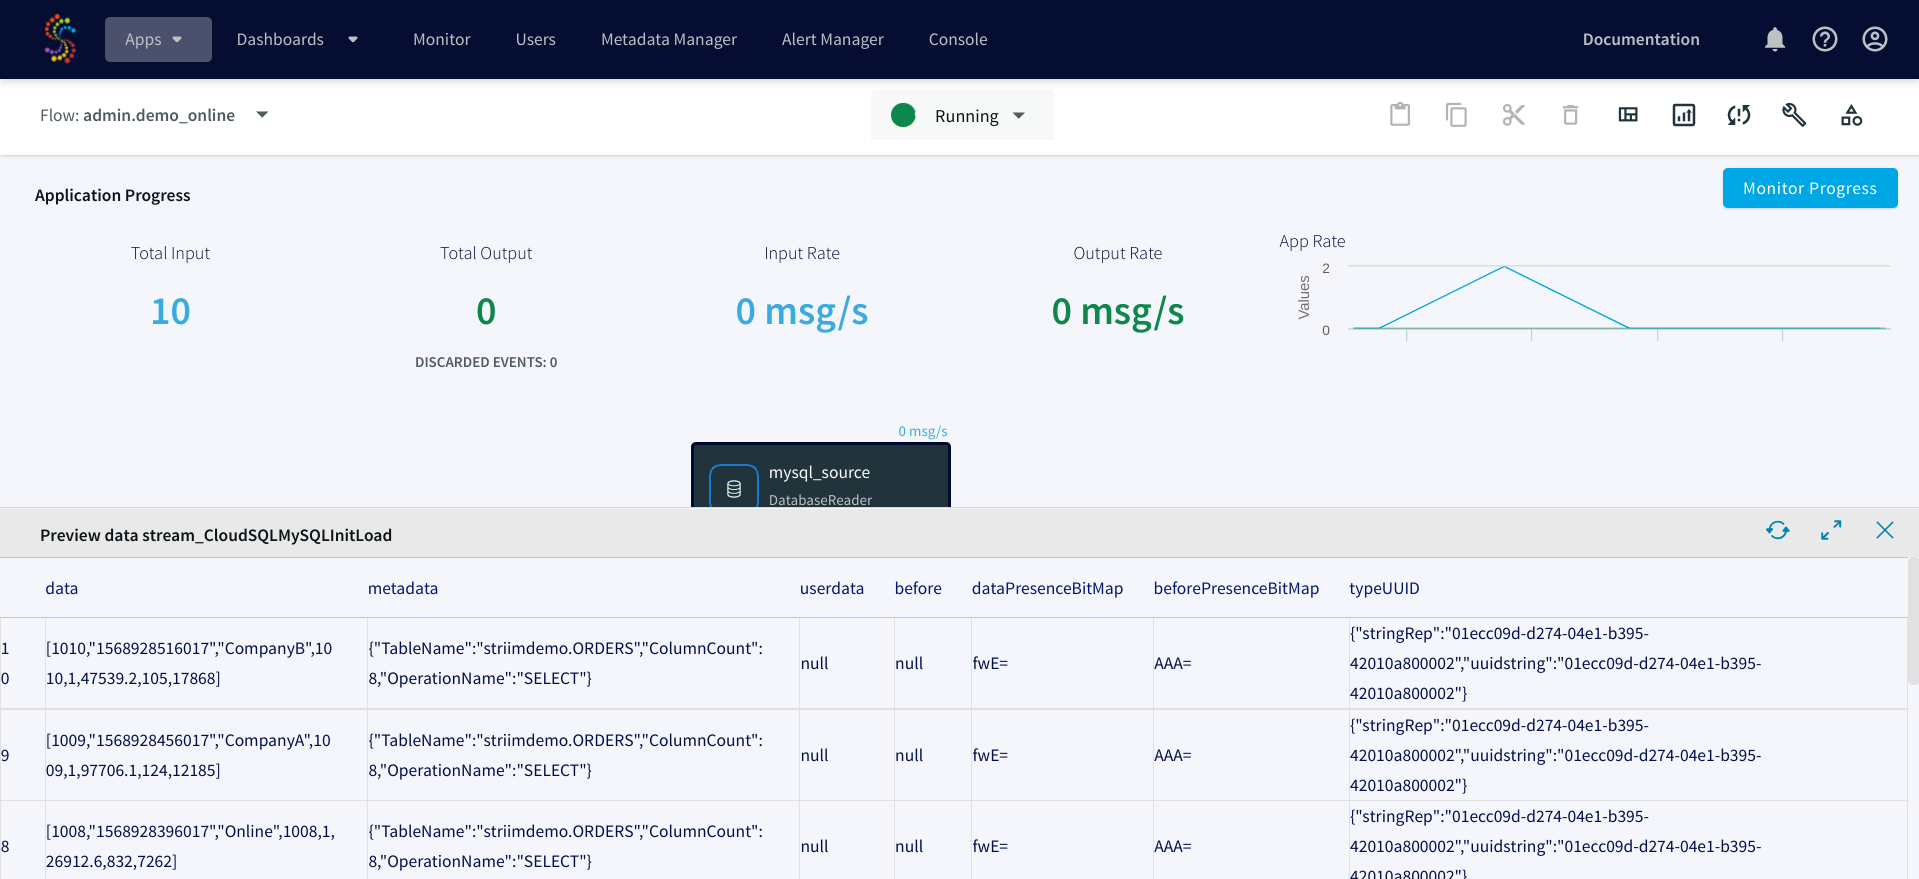
You've successfully connected to your source database and tested that it can read data.
-
Click Running on the top menu bar, and then select Stop App.
-
Click Stopped, and then select Undeploy App. You are now ready to connect to Cloud Spanner.
-
Click the wave button under the DatabaseReader. This time, a + button will appear. Click it, and then select Connect next Target component.
-
Name this target object CloudSpannerInitialLoadTarget, and then search for "Spanner" under the Adapter field. Select SpannerWriter.
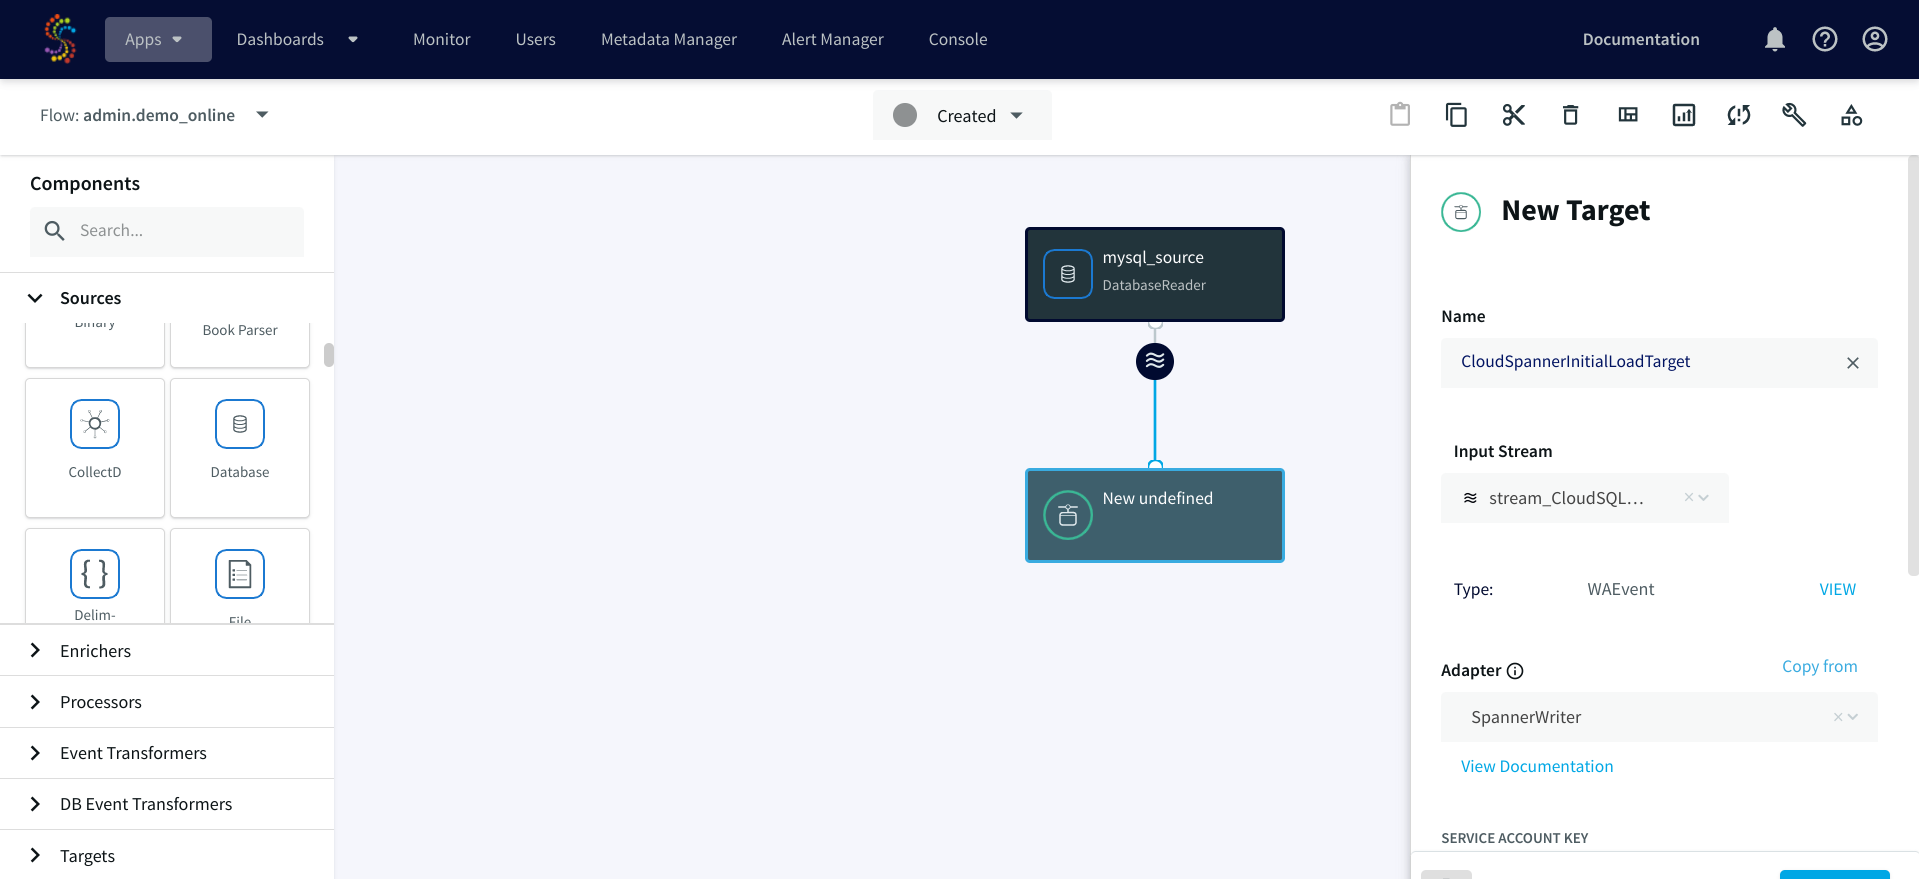
- Enter the rest of the connection properties.
| Property | Value (type value or select option as specified) |
|---|---|
| Service Account Key | /opt/striim/striim-spanner-key.json |
| InstanceID | striim-spanner-demo |
| Tables | striimdemo.ORDERS,striimdemo.orders |
gcloud spanner instances list in Cloud Shell to check.srcSchema1.srcTable1,tgtSchema1.tgtTable1; srcSchema2.srcTable2,tgtSchema2.tgtTable2.-
Click Save.
-
Click Deploy App from the Created drop down.
-
Select the default option and click Deploy.
-
Click Deployed, and then click Start App.
-
In the Cloud Console, navigate to Spanner, and then to your
striimdemodatabase. -
Click Spanner Studio on the left pane.
-
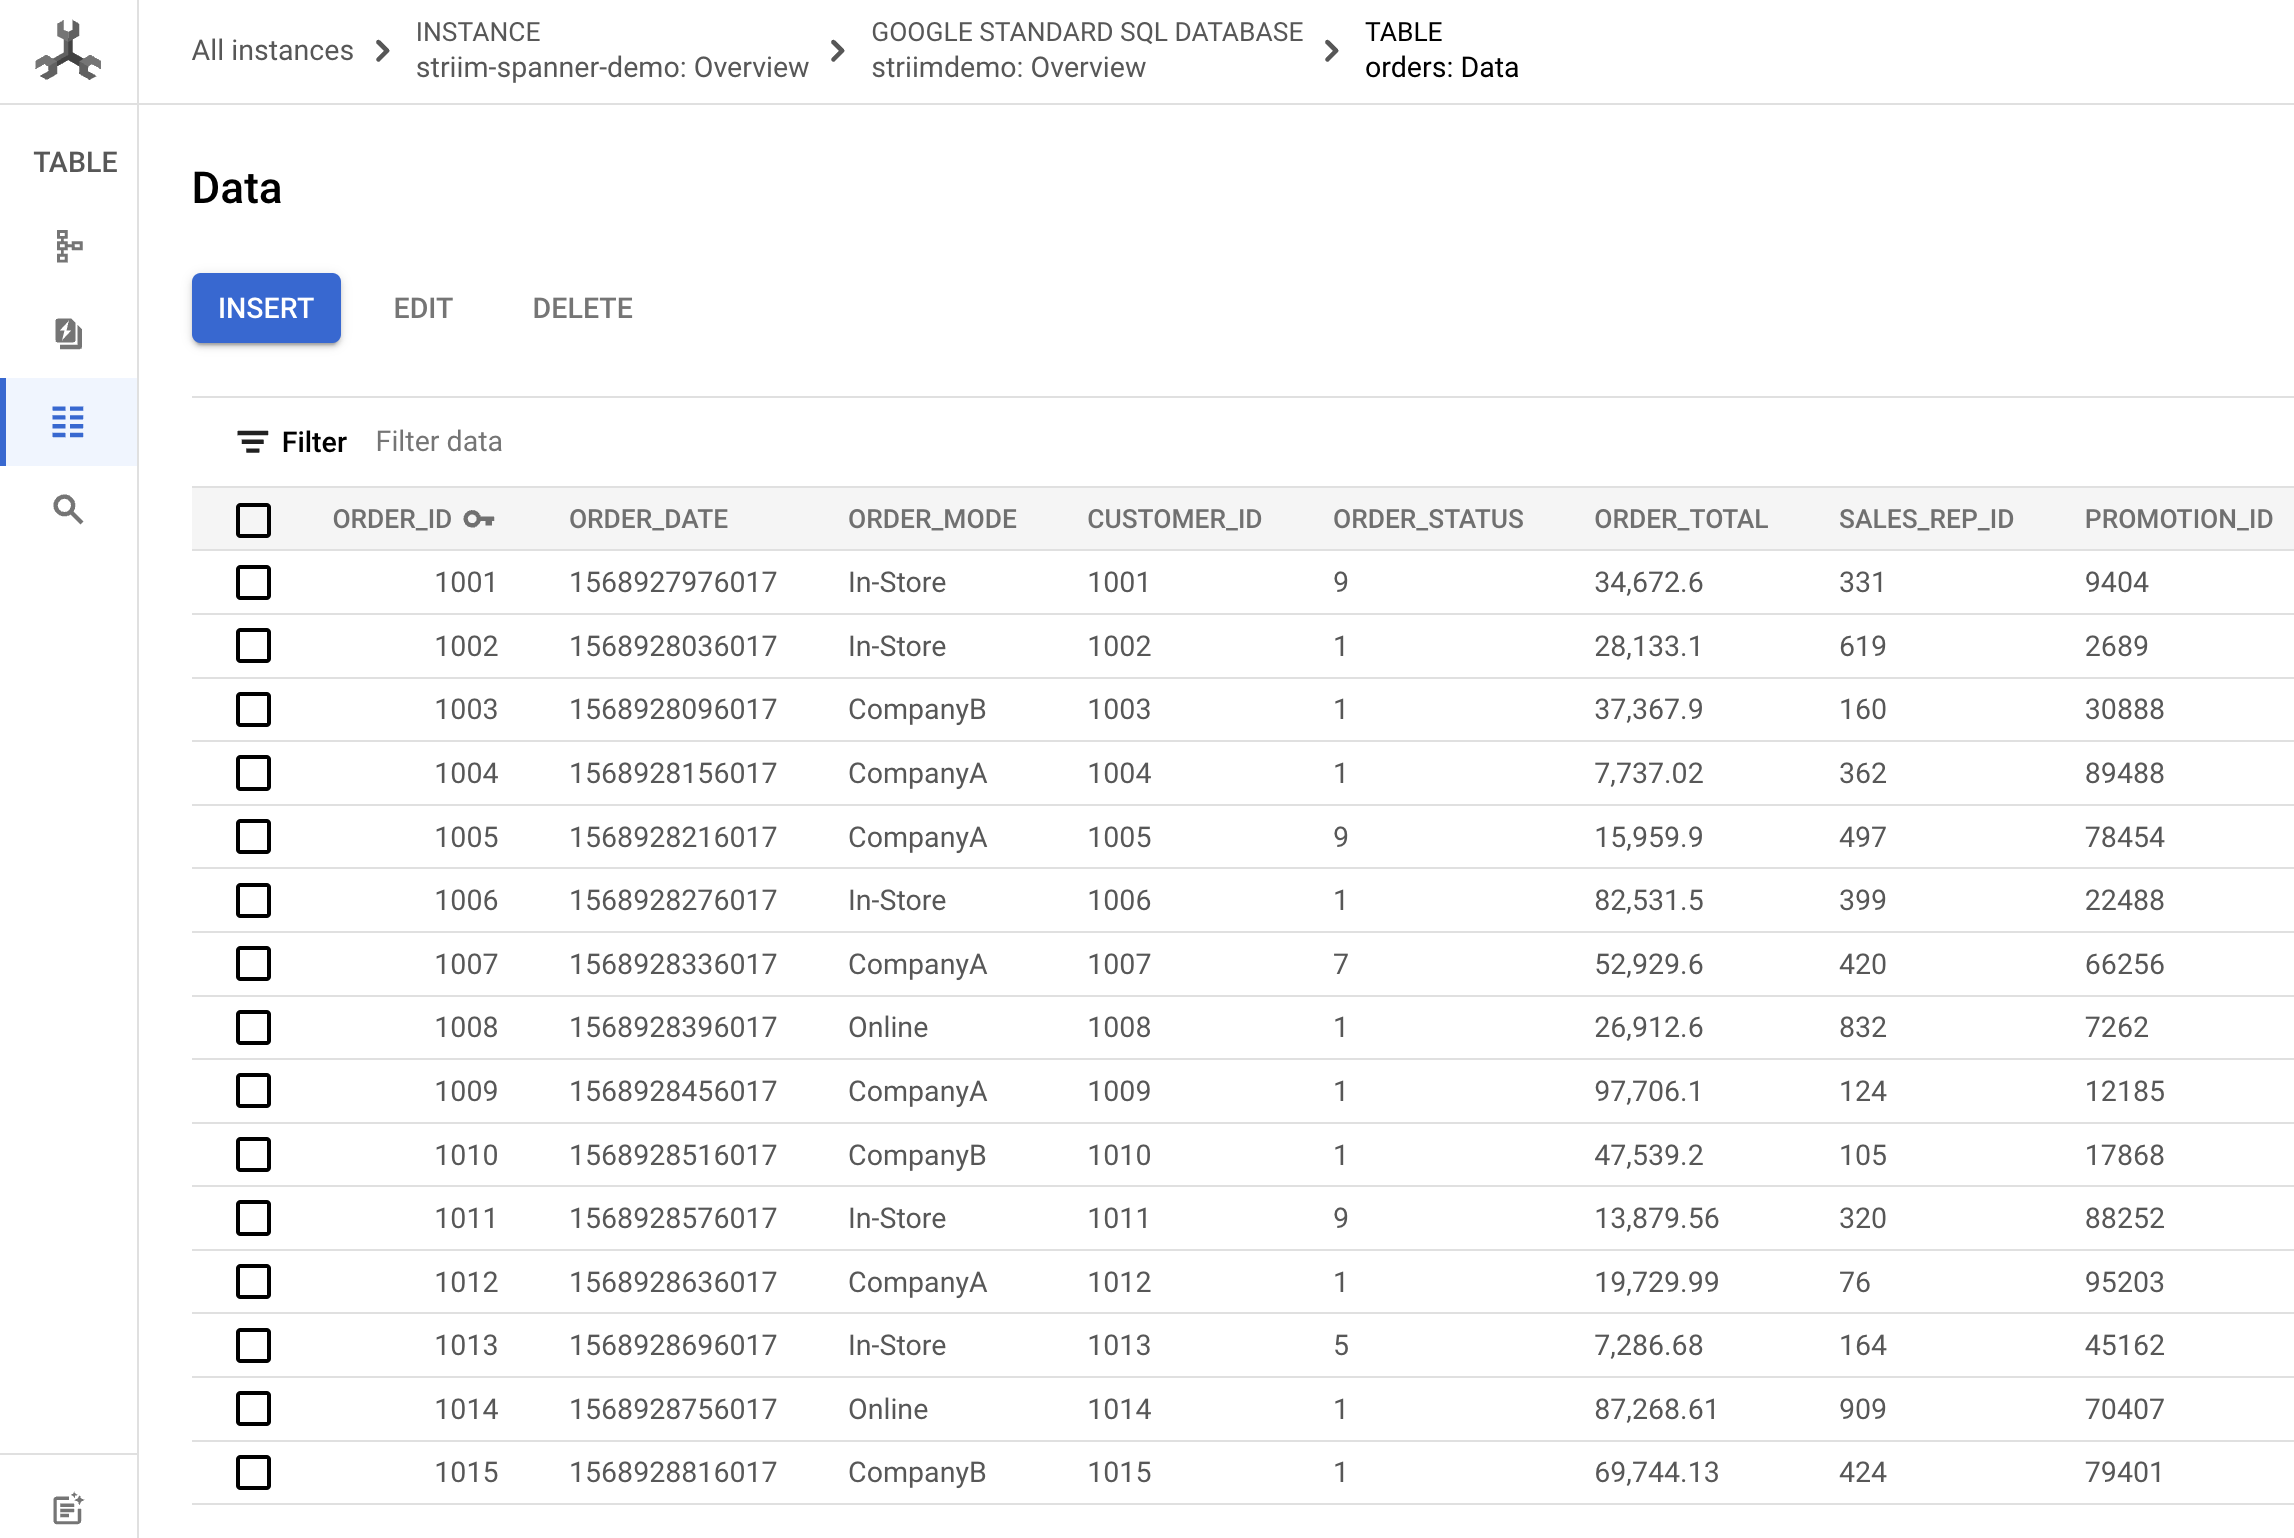
In the Editor window, run the query
SELECT * from ordersand the replicated data should return.
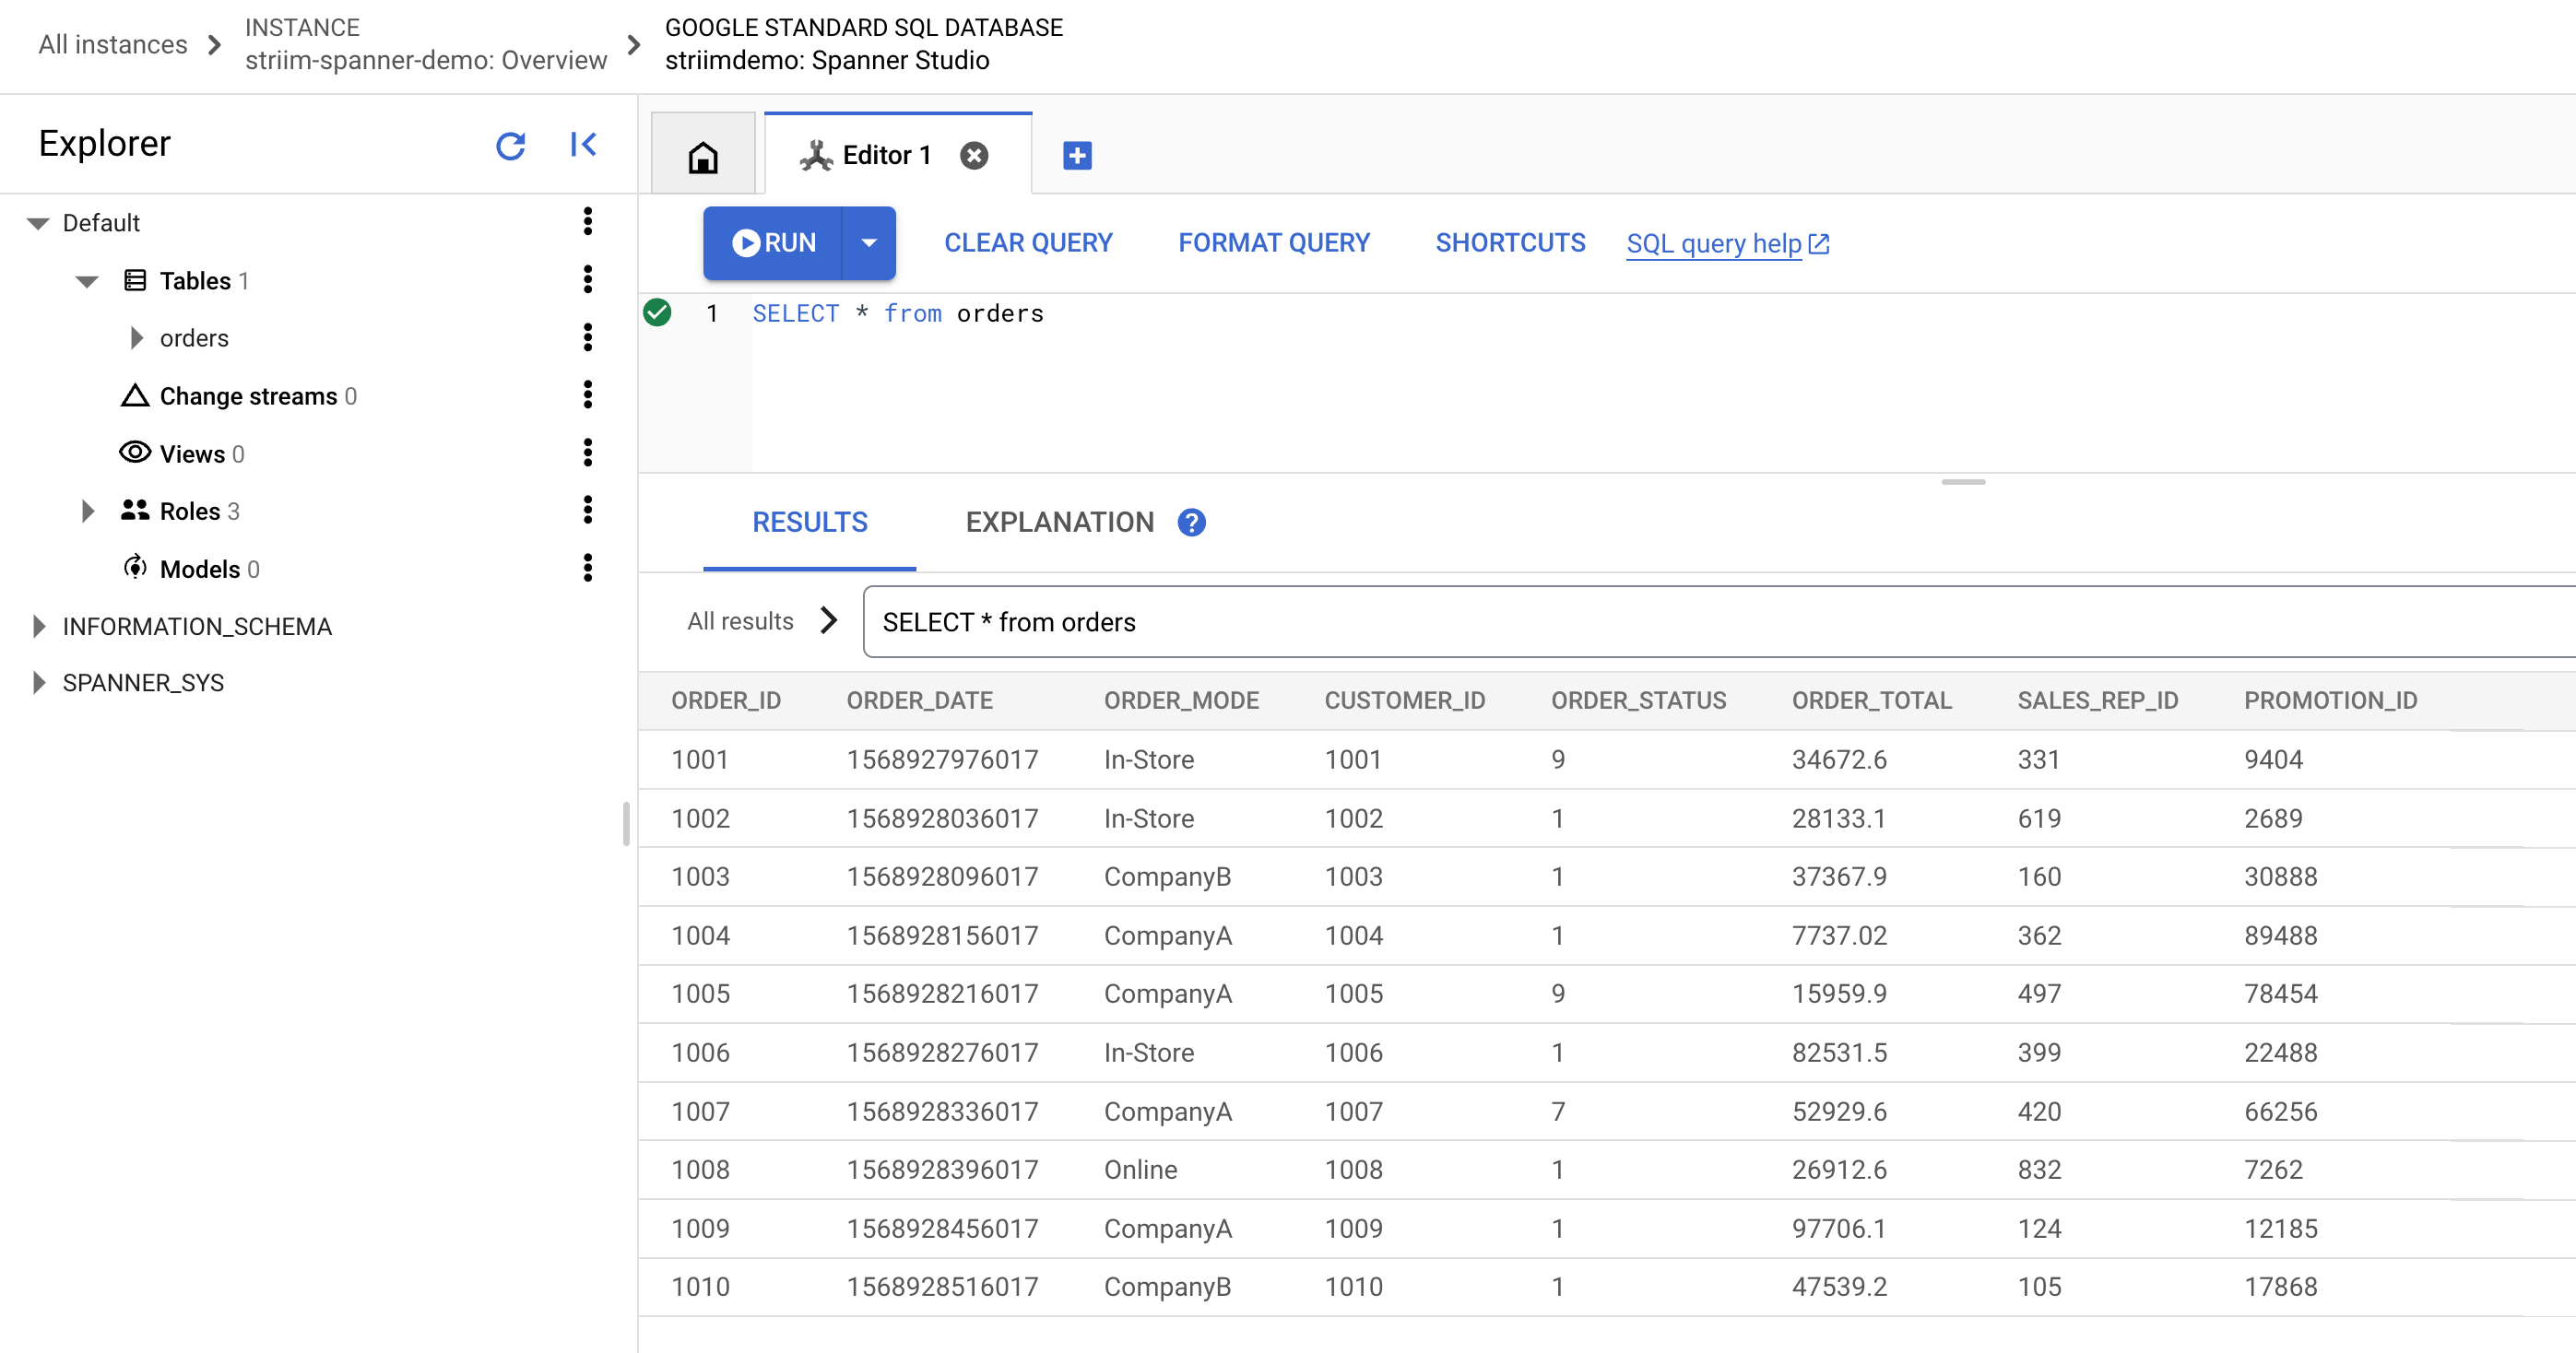
You have successfully set up your Striim environment and pipeline to perform a batch load.
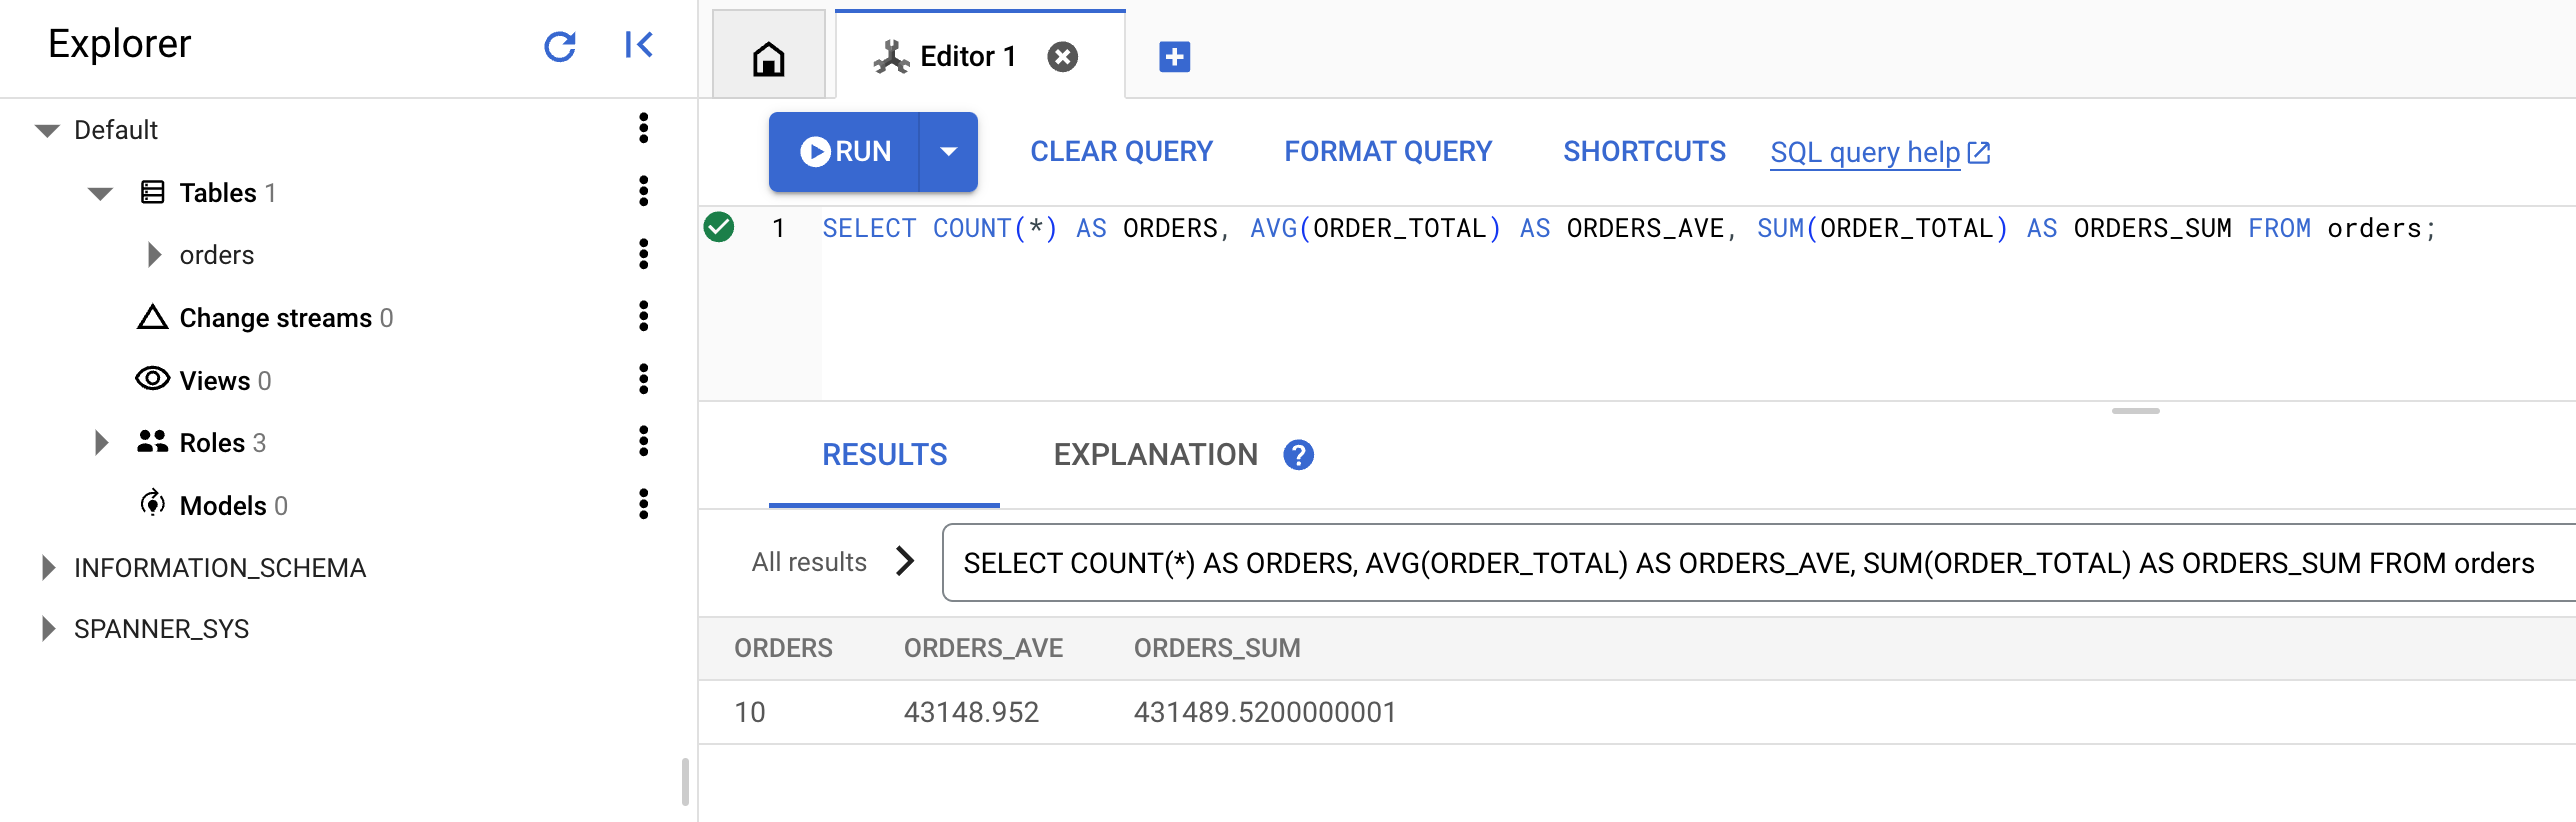
- Since you're working with Cloud Spanner, run the following analytical query to verify that your data arrived properly:
This query will find the average and total size of the orders. They should be 43148.952 and 431489.52 respectively.
Task 5. Create a continuous Cloud SQL for MySQL to Cloud Spanner data pipeline
With an initial one time bulk load in place, you still set up a continuous replication pipeline. It will look very similar to the bulk pipeline that you just created, but with a different source object.
- Click the Striim logo in the upper left of the screen to bring up the main menu. Click on Home to bring you back to the main page, click Apps, and then click the Create App button in the upper right corner to create a new app.
-
Click Start from Scratch, and then name it
MySQLToCloudSpanner_cdc. Leave the namespace as it is:admin. -
Click Save.
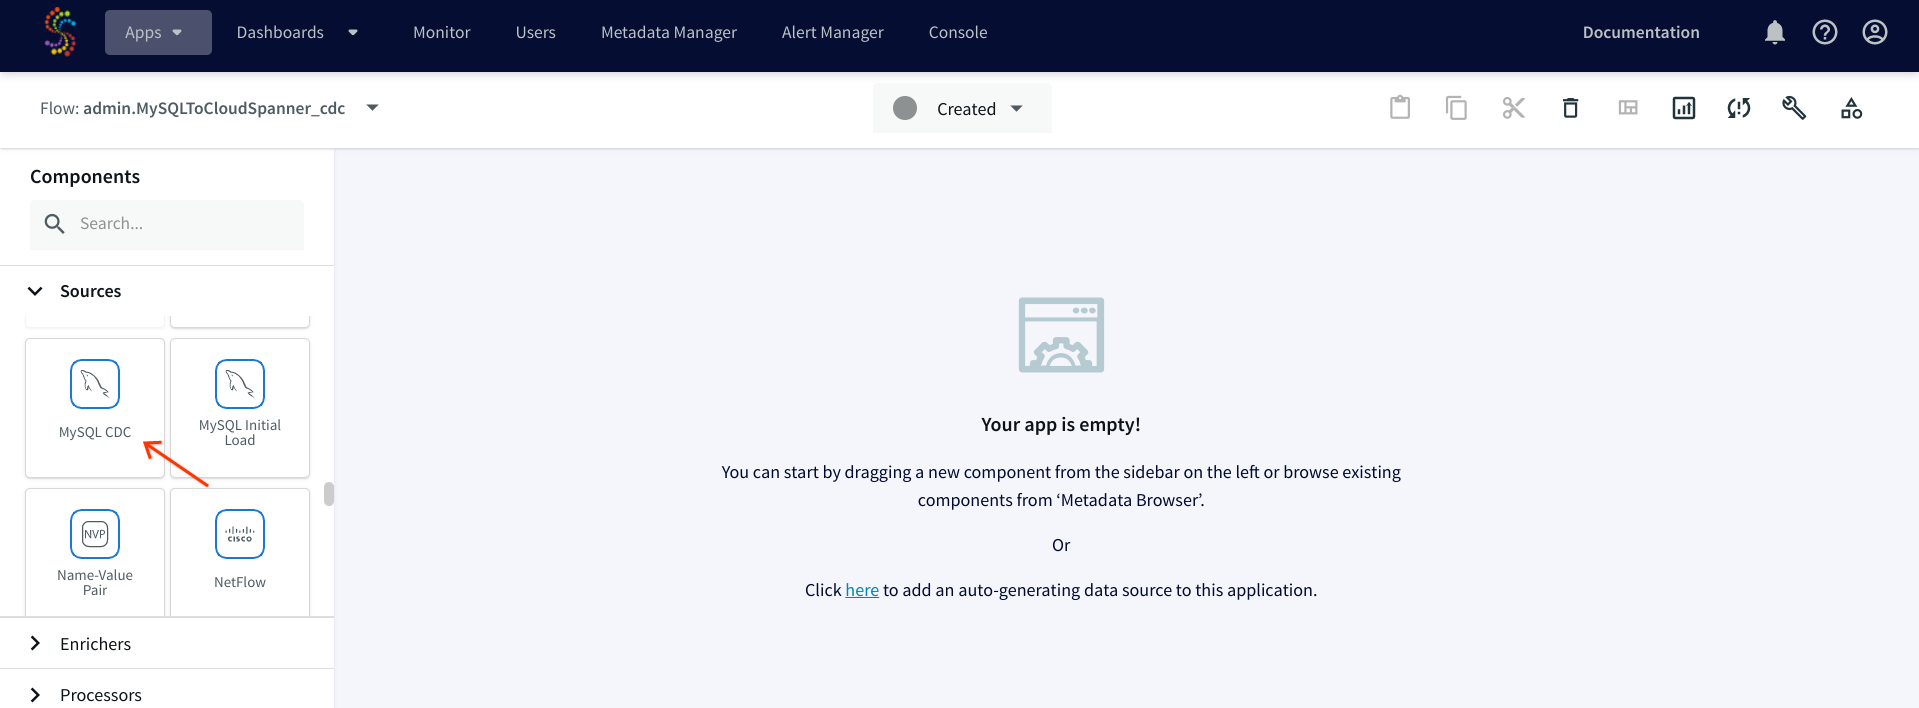
-
This time, instead of choosing a DatabaseReader source, choose a MySQL CDC reader.
- Enter all of your connection properties on the right New Source.
| Property | Value (type value or select option as specified) |
|---|---|
| Name | spanner_source |
| Connection URL | jdbc:mysql://[PRIMARY_ADDRESS]:3306/striimdemo |
| Username | striim-user |
| Password | striim-usr-password |
| Tables | striimdemo.ORDERS |
| Output to > New output | tgt_MySQLCDCSpanner |
[PRIMARY_ADDRESS] is the IP address of SQL instance. The IP address can be found through Cloud Shell with the command gcloud sql instances list.
-
Click Save.
-
Click the wave button under the Spanner_Source. This time, a + button will appear. Click it, and then select Connect next Target component.
-
Name this target object
tgt_CDC_SPANNERand then search for "Spanner" under the Adapter field. Select SpannerWriter. -
Enter the rest of the connection properties.
| Property | Value (type value or select option as specified) |
|---|---|
| Service Account Key | /opt/striim/striim-spanner-key.json |
| InstanceID | striim-spanner-demo |
| Tables | striimdemo.ORDERS,striimdemo.orders |
-
Click Save.
-
Now, click Deploy App from the Created drop down.
-
Select the default option and click Deploy.
-
Click Deployed, and then click Start App.
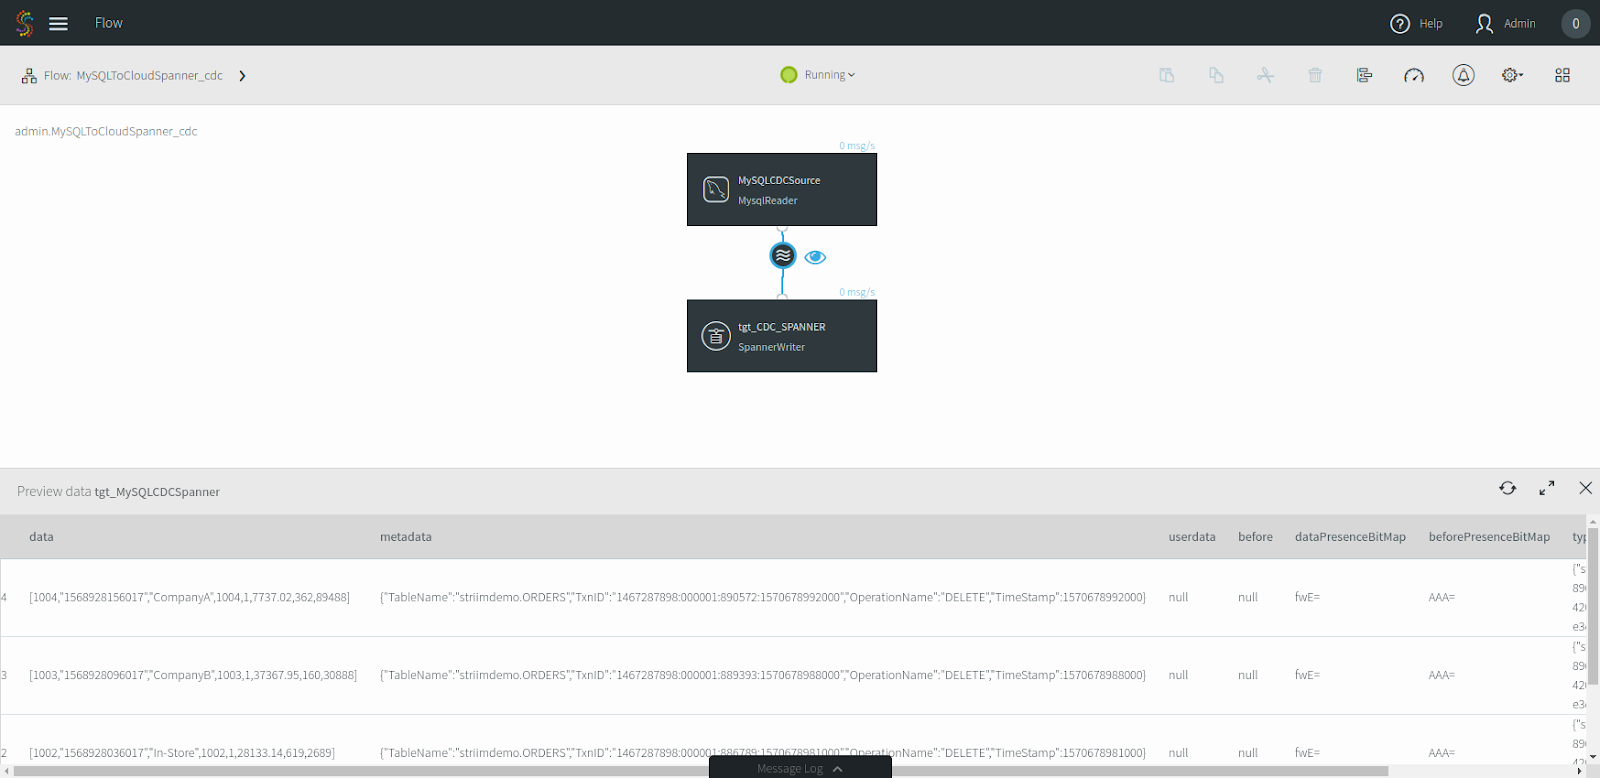
-
Click the wave icon, and then the eye icon next to it to look at the data.
-
Go back to Cloud Shell and run the following command to connect your MySQL instance:
-
It will prompt you for a password, enter
striim-usr-password. -
In the
striimdemodatabase, execute the following commands to add some more data:
- Go back to the Striim console. You should start to see the transactions flow through!
- Take a look at the table in Cloud Spanner by either querying it with the
gcloudtool in Cloud Shell, or by navigating to the table in the Cloud Console, and you will see that the data has successfully replicated to the target.
-
In the Cloud Console, navigate to Cloud Spanner, and then to your
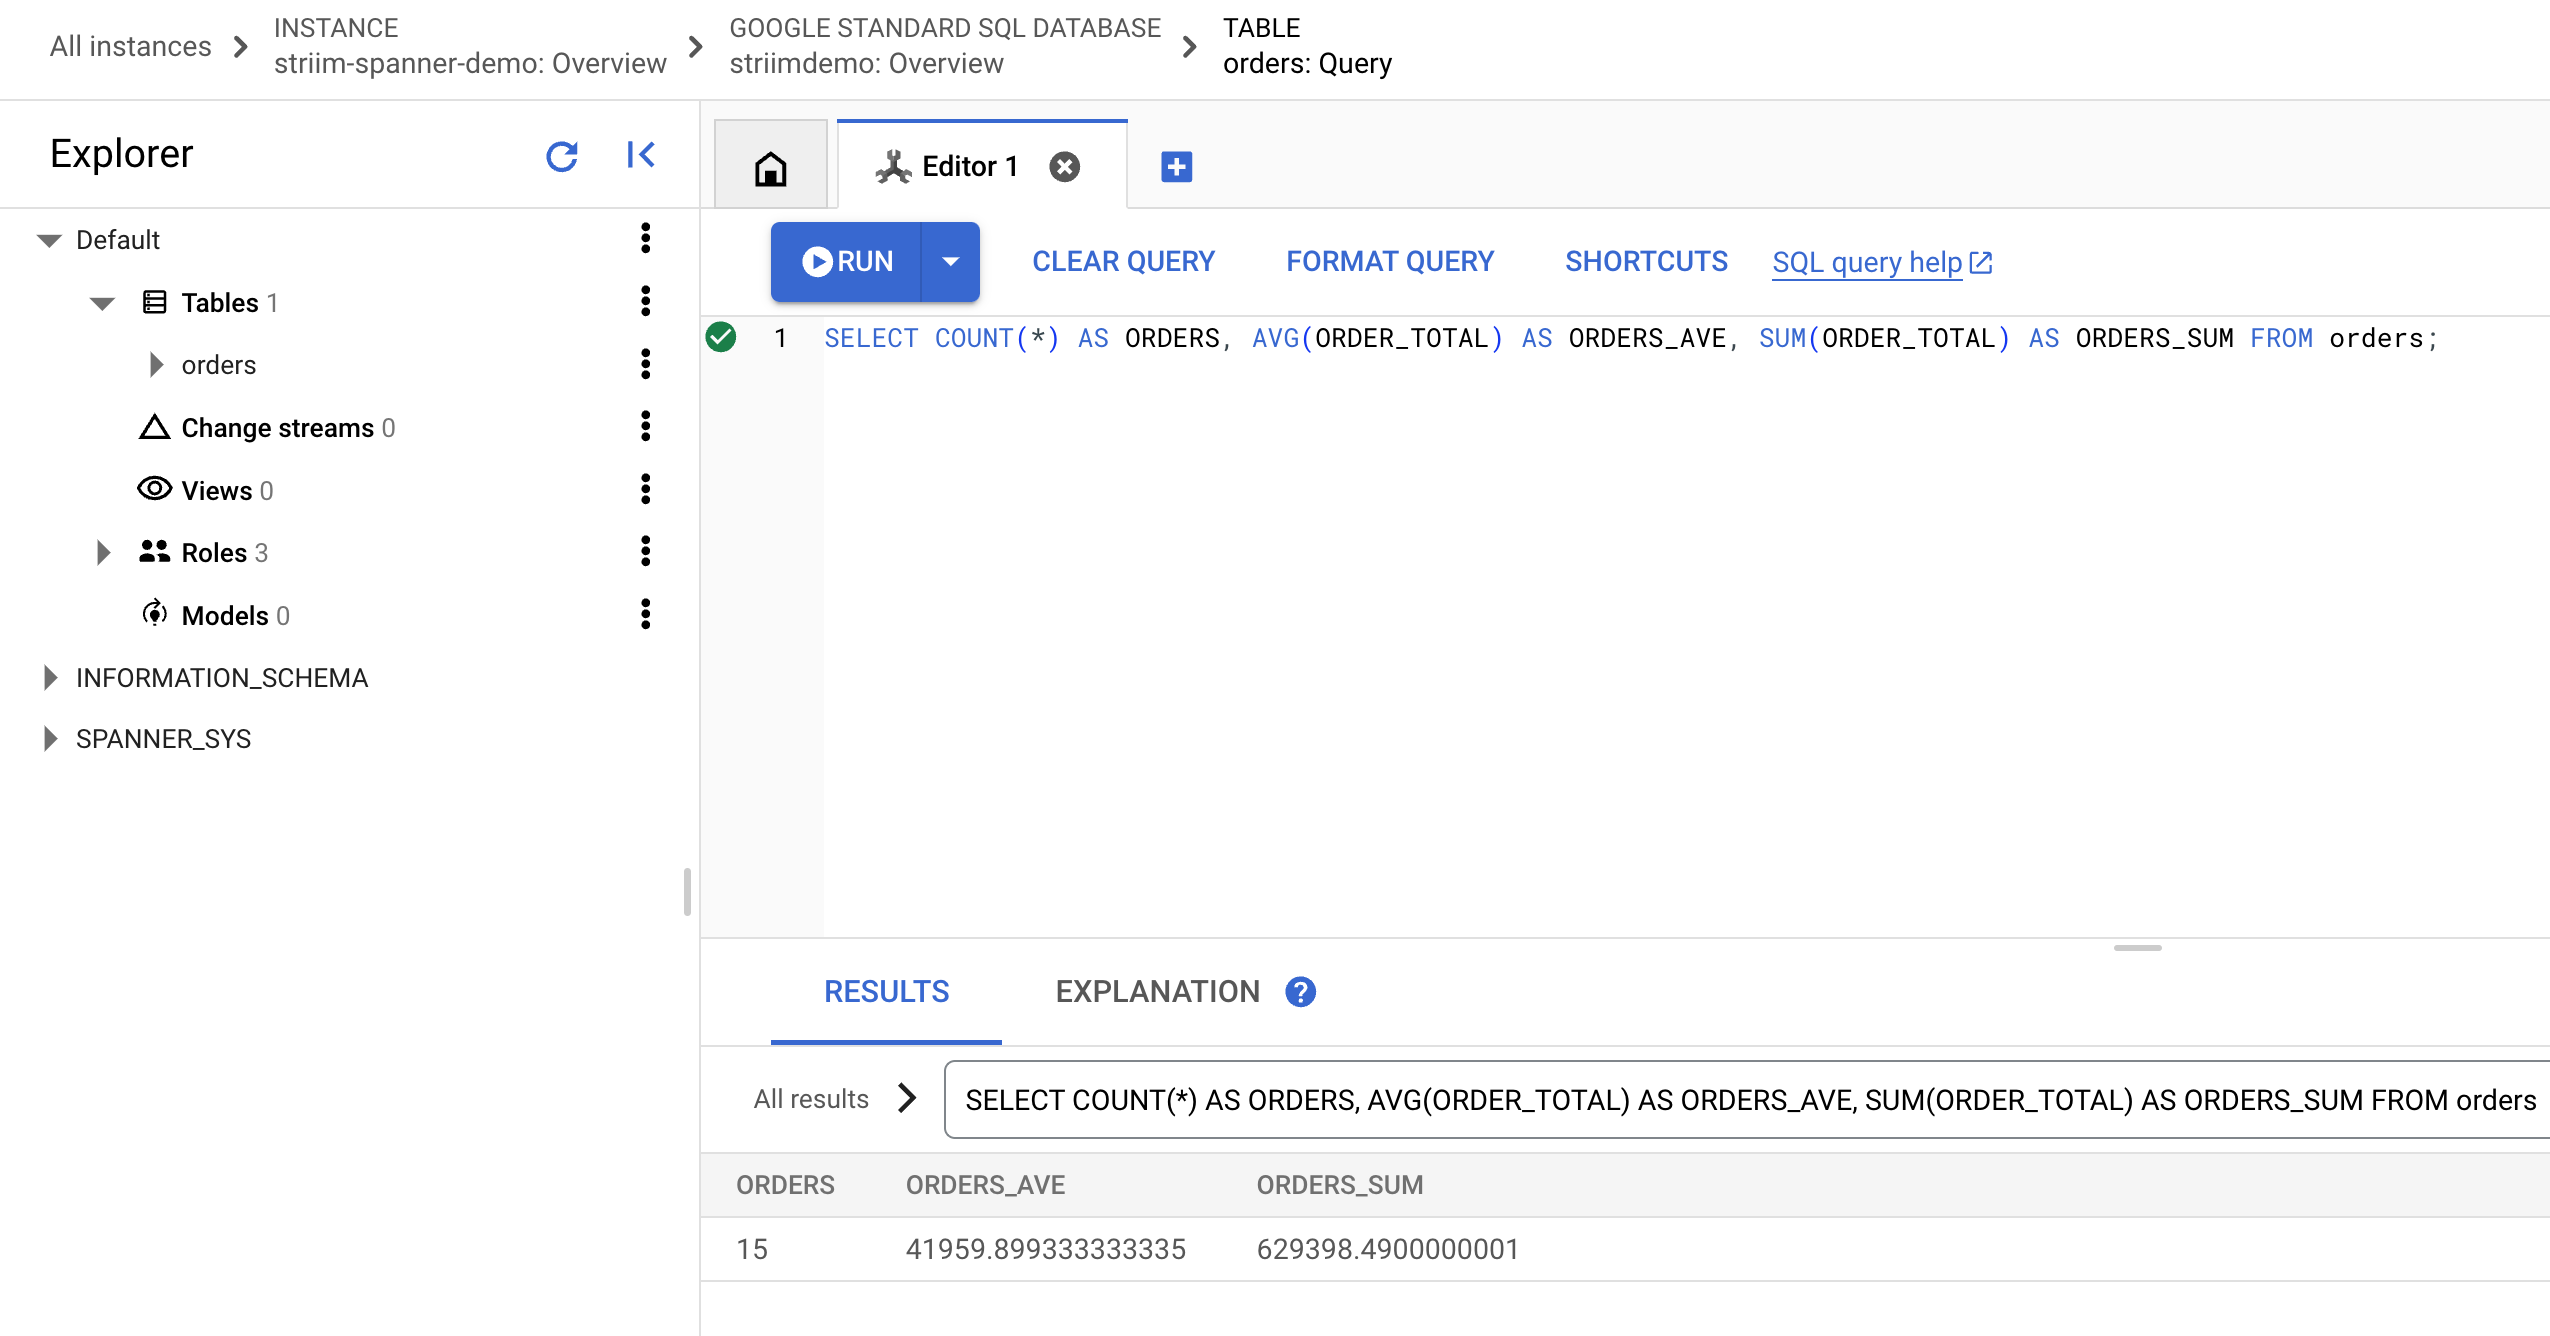
striimdemodataset. -
In Spanner Studio, run one final query to verify that your data arrived properly. This finds the average order size as well as the total order sum. It should be
41959.899333333335and629398.4900000001after the CDC pipeline, respectively.
Congratulations!
You have successfully set up a streaming pipeline from Cloud SQL for MySQL to Cloud Spanner using Striim, Google Cloud's Data Migration Partner.
Next steps / Learn more
- Find Striim on the Google Cloud Marketplace.
- If you'd like to learn more about Striim, visit the website or schedule a demo with a Striim technologist.
- Subscribe to the Striim blog.
Google Cloud training and certification
...helps you make the most of Google Cloud technologies. Our classes include technical skills and best practices to help you get up to speed quickly and continue your learning journey. We offer fundamental to advanced level training, with on-demand, live, and virtual options to suit your busy schedule. Certifications help you validate and prove your skill and expertise in Google Cloud technologies.
Last Tested Date December 5, 2023
Last Updated Date December 5, 2023
Copyright 2024 Google LLC All rights reserved. Google and the Google logo are trademarks of Google LLC. All other company and product names may be trademarks of the respective companies with which they are associated.