Prüfpunkte
Create a dataset
/ 30
Copy a public New York taxi table to your dataset
/ 30
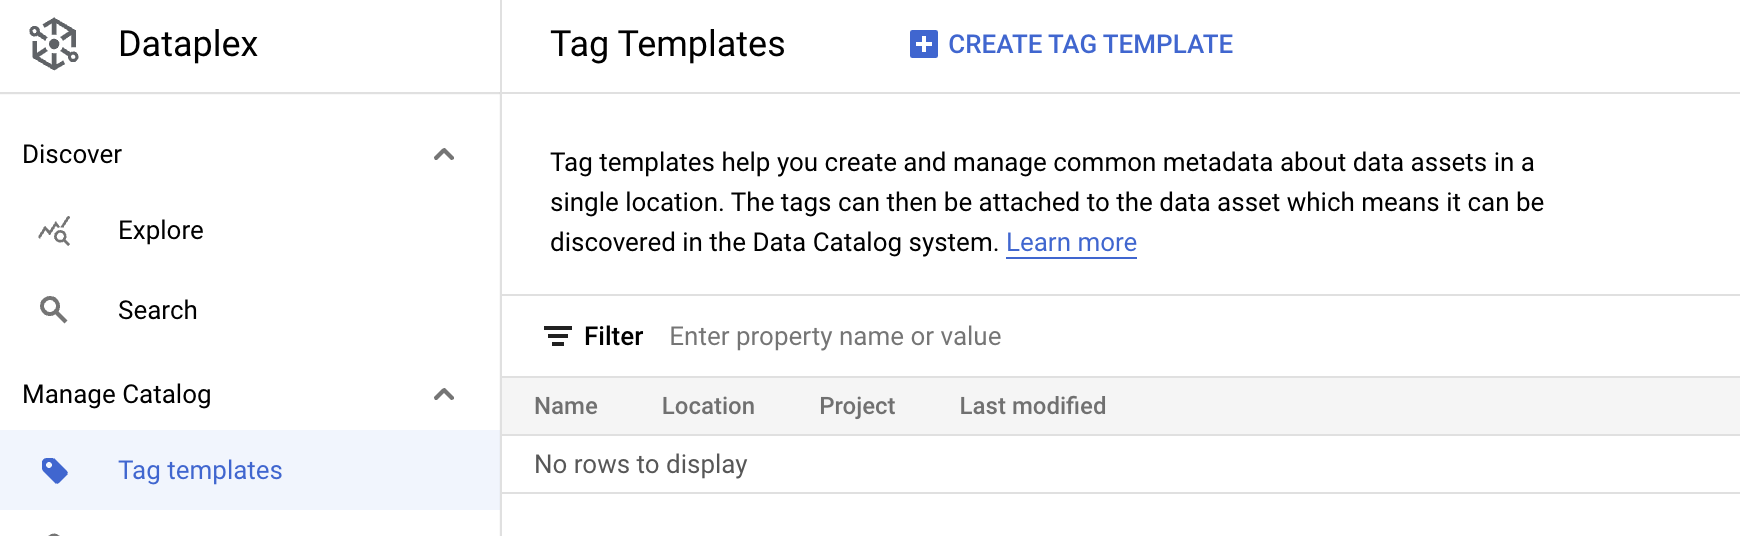
Create a tag template
/ 20
Attach tag to your table
/ 20
Data Catalog: Qwik Start
GSP729

Overview
Data Catalog is a fully managed, scalable metadata management service within Dataplex.
It offers a simple and easy-to-use search interface for data discovery, a flexible and powerful cataloging system for capturing both technical and business metadata, and a strong security and compliance foundation with Cloud Data Loss Prevention (DLP) and Cloud Identity and Access Management (IAM) integrations.
BigQuery is an enterprise data warehouse that enables super-fast SQL queries using the processing power of Google's infrastructure.
Simply move your data into BigQuery and let us handle the hard work. You can control access to both the project and your data based on your business needs, such as giving others the ability to view or query your data.
Using Data Catalog
There are two main ways you interact with Data Catalog:
- Searching for data assets that you have access to.
- Tagging assets with metadata.
Data Catalog use case
Imagine you are a data engineer in your company. It is your job to ensure all datasets can be easily discovered and used by colleagues, such as data scientists or business analysts. When a new dataset comes in, you annotate it with important information—this could be whether or not it contains PII data, who owns the dataset, how many rows the dataset contains, etc.
You can annotate this information by adding tags to your dataset and tables. Data Catalog allows you to create tag templates to let you define what kind of attributes you want to tag. This allows you to easily access, map, and discover pertinent information from your datasets and tables.
What you will learn
In this lab, you will learn how to:
- Enable the Data Catalog API so that you can use this service in your Google Cloud project.
- Create a dataset with BigQuery.
- Copy a public New York Taxi table to your dataset.
- Create a Data Catalog tag template.
- Tag your newly created table with the newly created tags.
Prerequisites
Setup and requirements
Before you click the Start Lab button
Read these instructions. Labs are timed and you cannot pause them. The timer, which starts when you click Start Lab, shows how long Google Cloud resources will be made available to you.
This hands-on lab lets you do the lab activities yourself in a real cloud environment, not in a simulation or demo environment. It does so by giving you new, temporary credentials that you use to sign in and access Google Cloud for the duration of the lab.
To complete this lab, you need:
- Access to a standard internet browser (Chrome browser recommended).
- Time to complete the lab---remember, once you start, you cannot pause a lab.
How to start your lab and sign in to the Google Cloud console
-
Click the Start Lab button. If you need to pay for the lab, a pop-up opens for you to select your payment method. On the left is the Lab Details panel with the following:
- The Open Google Cloud console button
- Time remaining
- The temporary credentials that you must use for this lab
- Other information, if needed, to step through this lab
-
Click Open Google Cloud console (or right-click and select Open Link in Incognito Window if you are running the Chrome browser).
The lab spins up resources, and then opens another tab that shows the Sign in page.
Tip: Arrange the tabs in separate windows, side-by-side.
Note: If you see the Choose an account dialog, click Use Another Account. -
If necessary, copy the Username below and paste it into the Sign in dialog.
{{{user_0.username | "Username"}}} You can also find the Username in the Lab Details panel.
-
Click Next.
-
Copy the Password below and paste it into the Welcome dialog.
{{{user_0.password | "Password"}}} You can also find the Password in the Lab Details panel.
-
Click Next.
Important: You must use the credentials the lab provides you. Do not use your Google Cloud account credentials. Note: Using your own Google Cloud account for this lab may incur extra charges. -
Click through the subsequent pages:
- Accept the terms and conditions.
- Do not add recovery options or two-factor authentication (because this is a temporary account).
- Do not sign up for free trials.
After a few moments, the Google Cloud console opens in this tab.

Activate Cloud Shell
Cloud Shell is a virtual machine that is loaded with development tools. It offers a persistent 5GB home directory and runs on the Google Cloud. Cloud Shell provides command-line access to your Google Cloud resources.
- Click Activate Cloud Shell
at the top of the Google Cloud console.
When you are connected, you are already authenticated, and the project is set to your Project_ID,
gcloud is the command-line tool for Google Cloud. It comes pre-installed on Cloud Shell and supports tab-completion.
- (Optional) You can list the active account name with this command:
- Click Authorize.
Output:
- (Optional) You can list the project ID with this command:
Output:
gcloud, in Google Cloud, refer to the gcloud CLI overview guide.
Task 1. Enable the Data Catalog API
-
From the navigation menu, select APIs and Services > Library.
-
In the search bar, enter in
Data Catalogand select the first result. -
Then click Enable.
If you run into the following error after trying to enable the Data Catalog API:
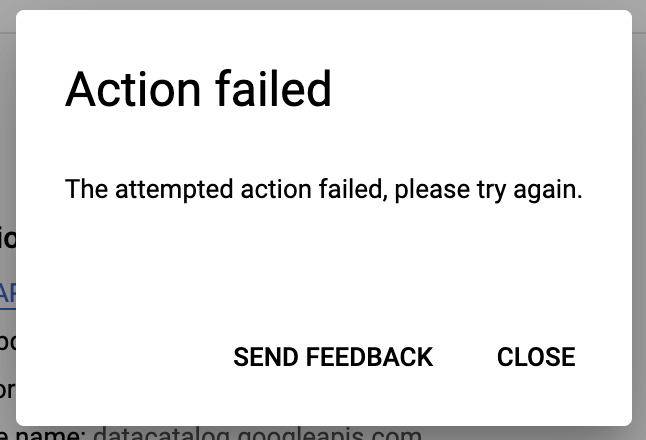
- Click Close.
- Refresh your browser tab.
- Click Enable again.
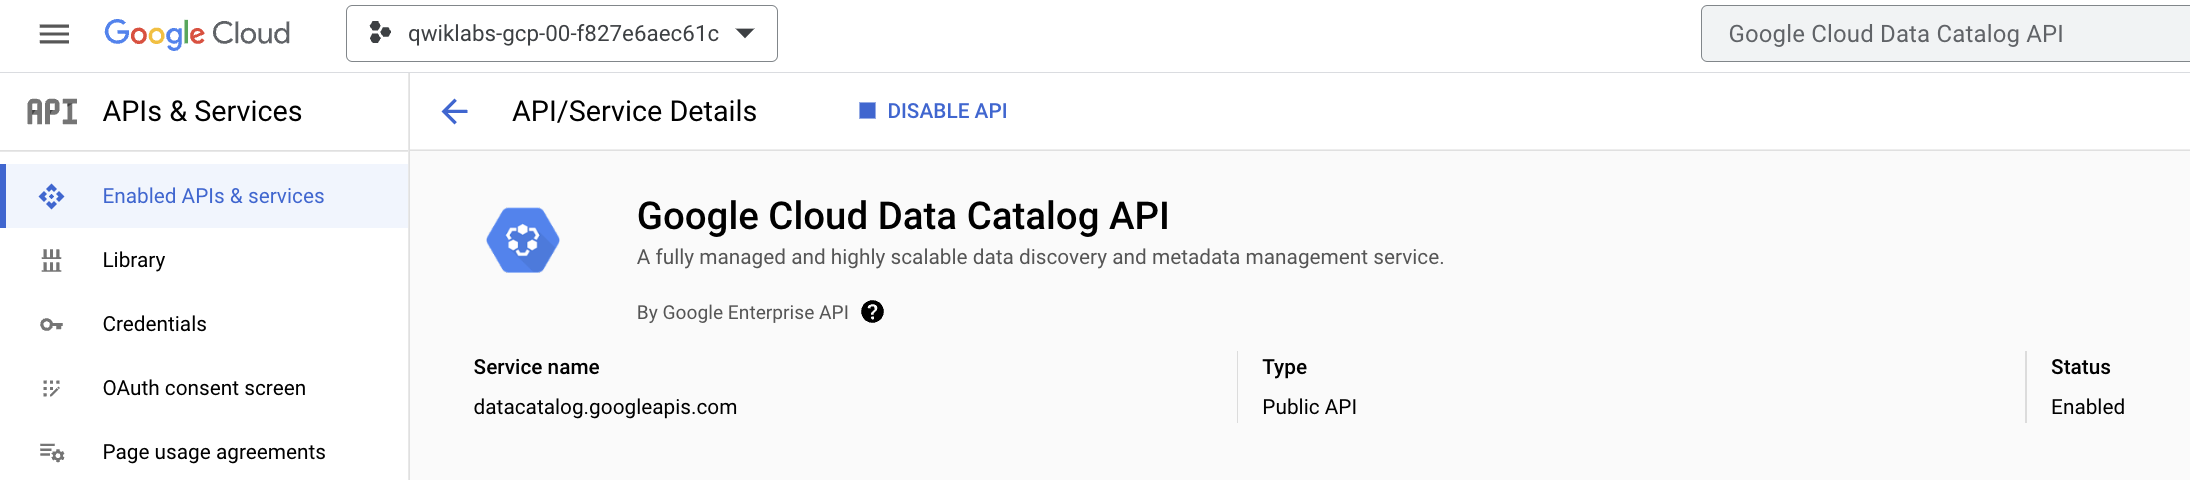
The Data Catalog API should be successfully enabled:
Open the BigQuery console
- In the Google Cloud Console, select Navigation menu > BigQuery.
The Welcome to BigQuery in the Cloud Console message box opens. This message box provides a link to the quickstart guide and the release notes.
- Click Done.
The BigQuery console opens.
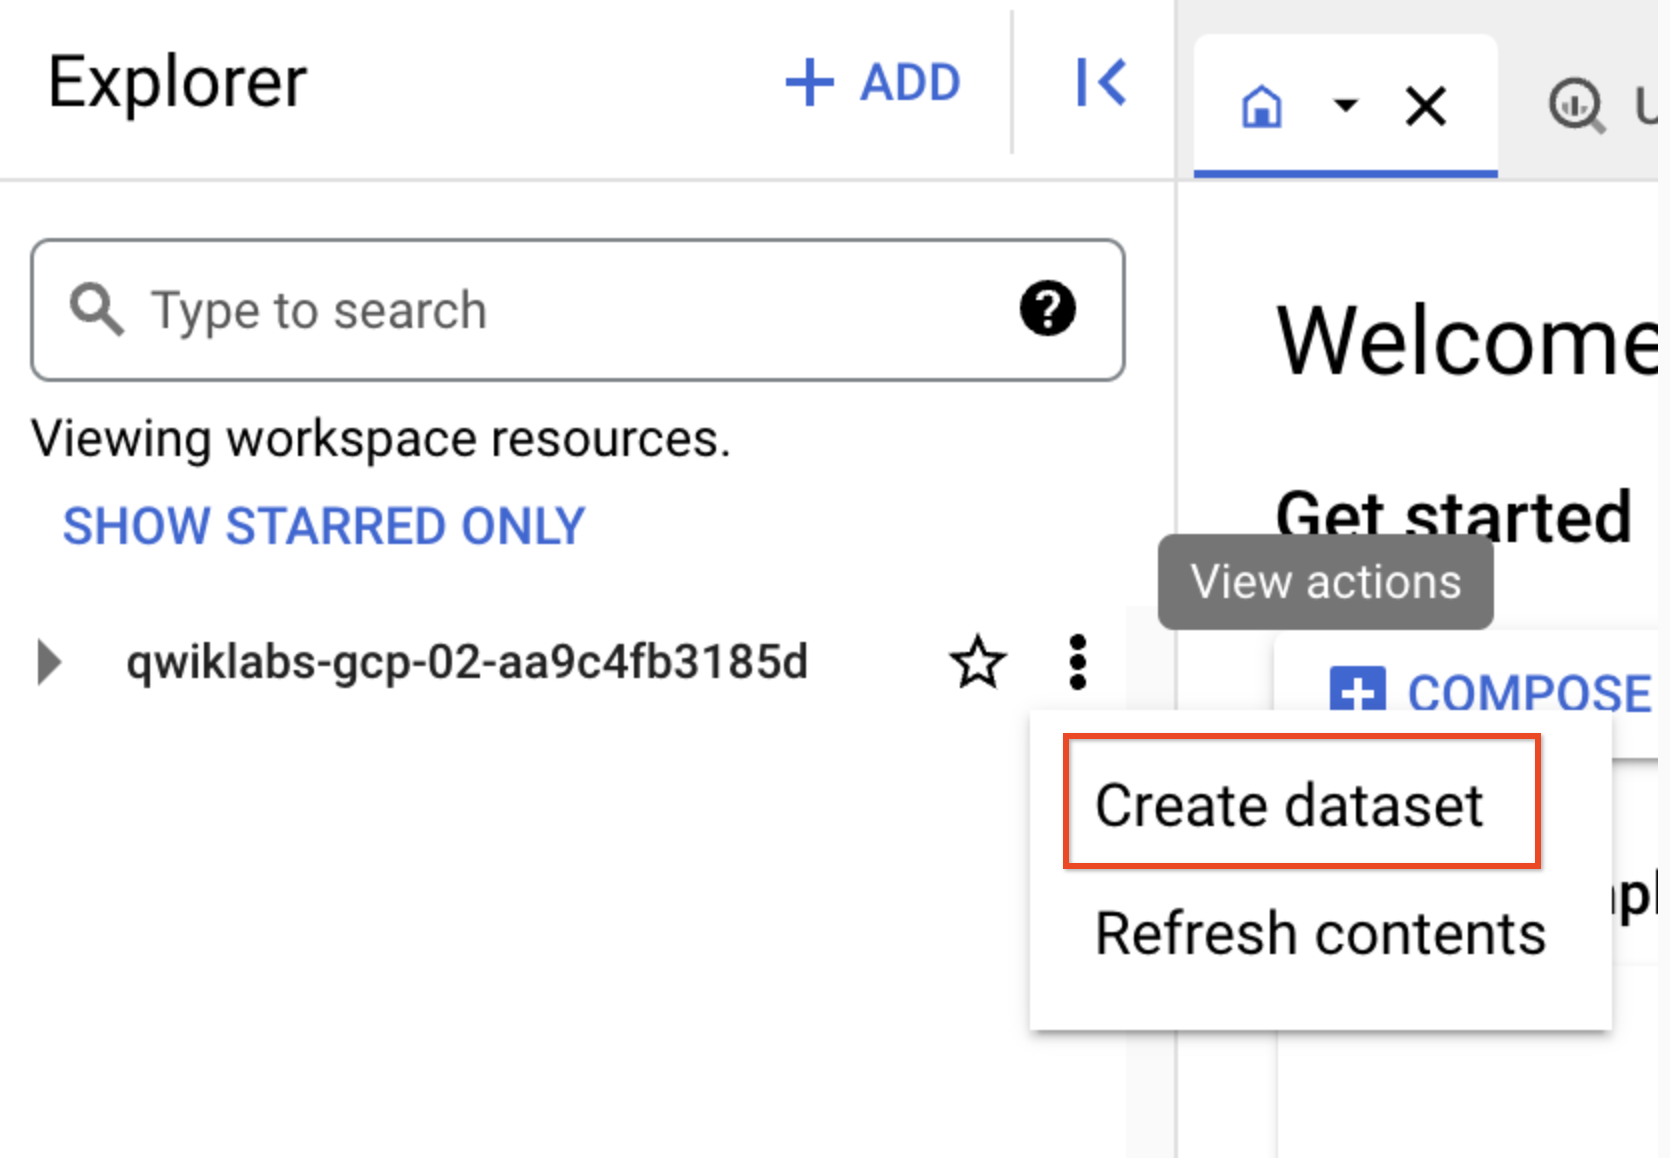
Task 2. Create a dataset
- In the left navigation pane of BigQuery, click on view actions next to your project id, then click CREATE DATASET.
- In the Create Dataset dialog:
-
For Dataset ID, enter
demo_dataset -
For Data location, select
us (multiple regions in United States).
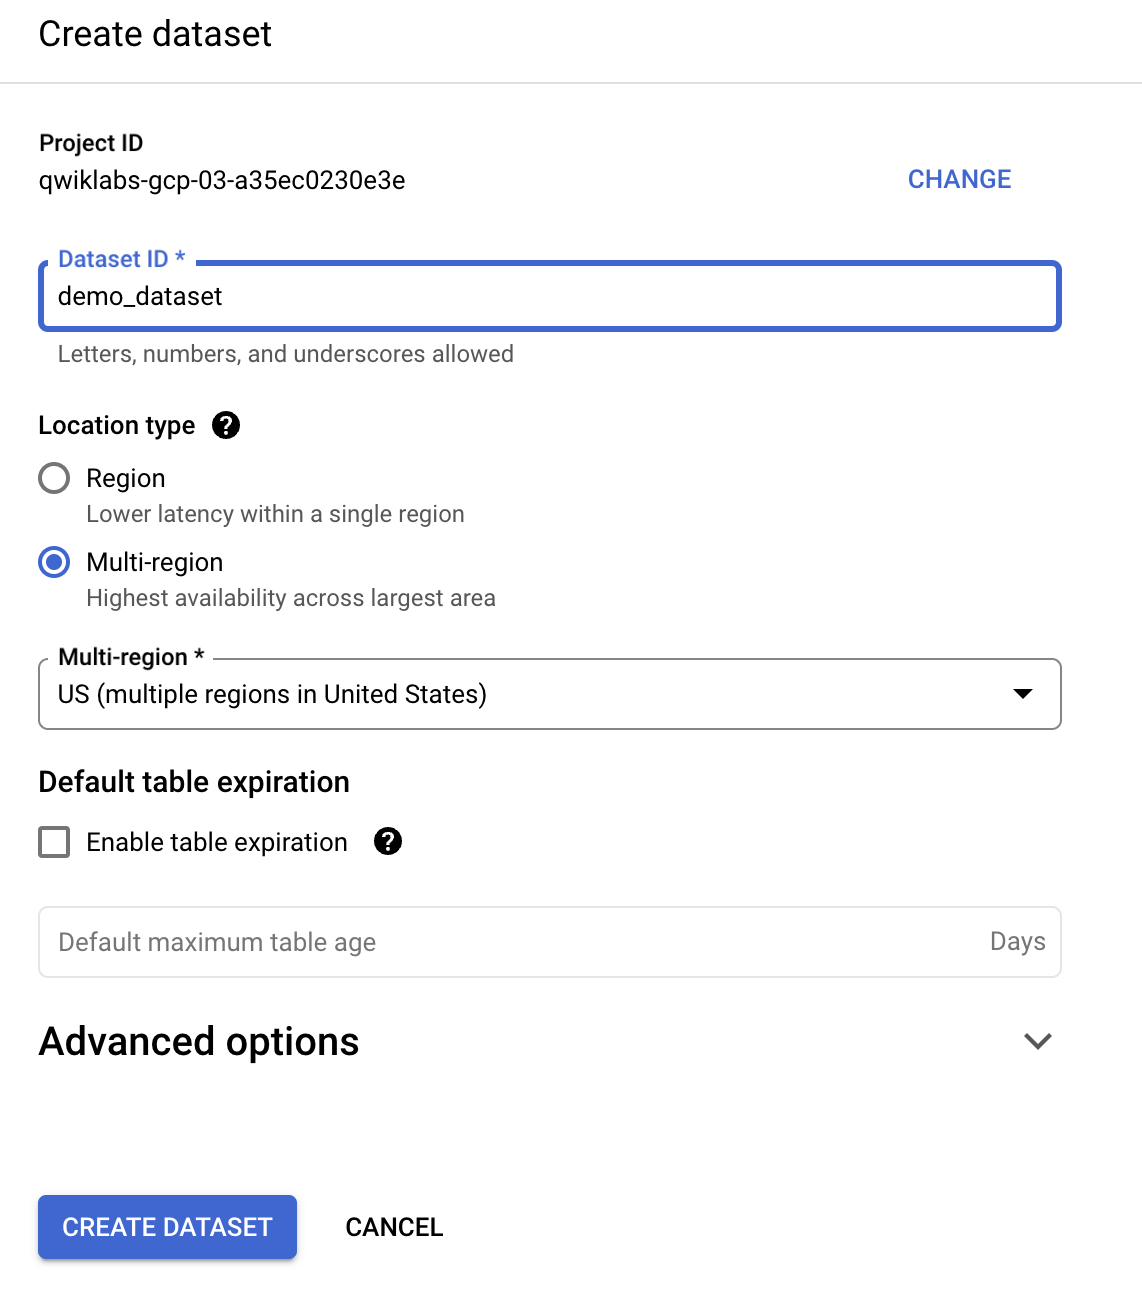
- Then click Create dataset.
Click Check my progress to verify the objective.
Task 3. Copy a public New York Taxi table to your dataset.
-
From the left-hand panel, click + ADD > Public datasets.
-
In the search bar, enter in NYC TLC Trips and click on the result that appears:

For this lab, you will be using a table from this dataset which contains NYC yellow cab trip data from 2018.
-
Click out of the side panel to close it as soon as you're ready to continue.
-
Copy the
tlc_yellow_trips_2018table by running this command in your Cloud Shell panel:
The previous command used the bq command line tool to copy the public table into your project and organized it in the demo_dataset you created earlier.
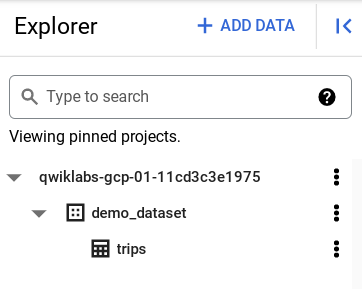
- Refresh your
BigQuerybrowser page.
- Confirm that the trips table is listed in your
demo_dataset.
You will add Data Catalog tags to the table in the next section.
Click Check my progress to verify the objective.
Task 4. Create a Data Catalog tag template
Create a tag template from the Data Catalog UI.
- Open the Navigation menu and click on Data Catalog > Tag Templates. Then click + CREATE TAG TEMPLATE:
- Fill in the template form to define a "Demo Tag Template".
- Template display name: Demo Tag Template
- Template ID: demo_tag_template
-
Location:
Next, create four tag attributes (also called tag "fields").
- Click Add a Field.
Create four attributes with the values listed below. Note that the "source" attribute defines a required tag attribute. You can use lower case letters and underscores to define attribute names:
- Field display name: Source of data asset
- Field ID: source_of_data_asset
- Make this field required: Checked
- Type: String
-
Click Done.
-
Now click Add a Field and enter in:
- Field display name: Number of rows in data asset
- Field ID: number_of_rows_in_data_asset
- Make this field required: Not checked
- Type: Double
-
Click Done.
-
Then click Add a Field and enter in:
- Field display name: Has PII
- Field ID: has_pii
- Make this field required: Not checked
- Type: Boolean
-
Click Done.
-
Then click Add a Field and enter in:
- Field display name: PII type
- Field ID: pii_type
- Make this field required: Not checked
- Type: Enumerated
- Add 3 values to this attribute:
- Social Security Number
- None
- Then click Done.
The completed tag template form should list the four tag attributes:
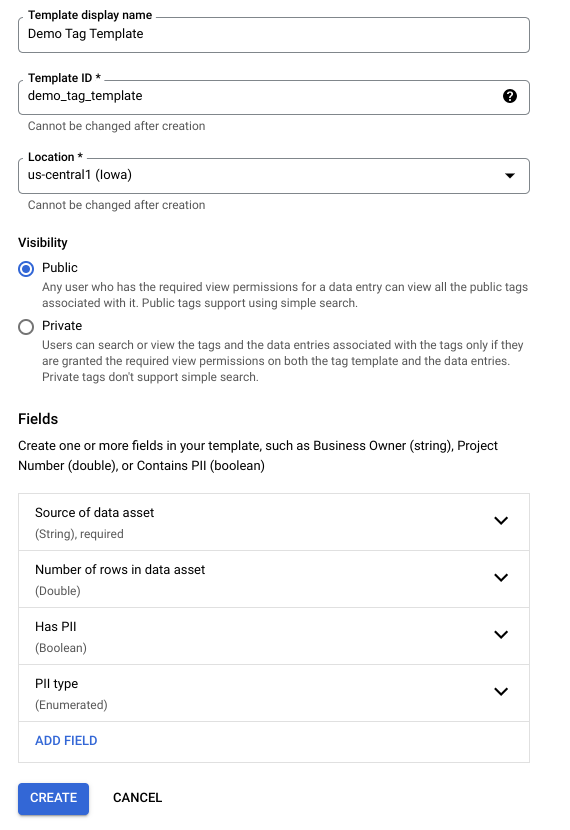
- Click CREATE.
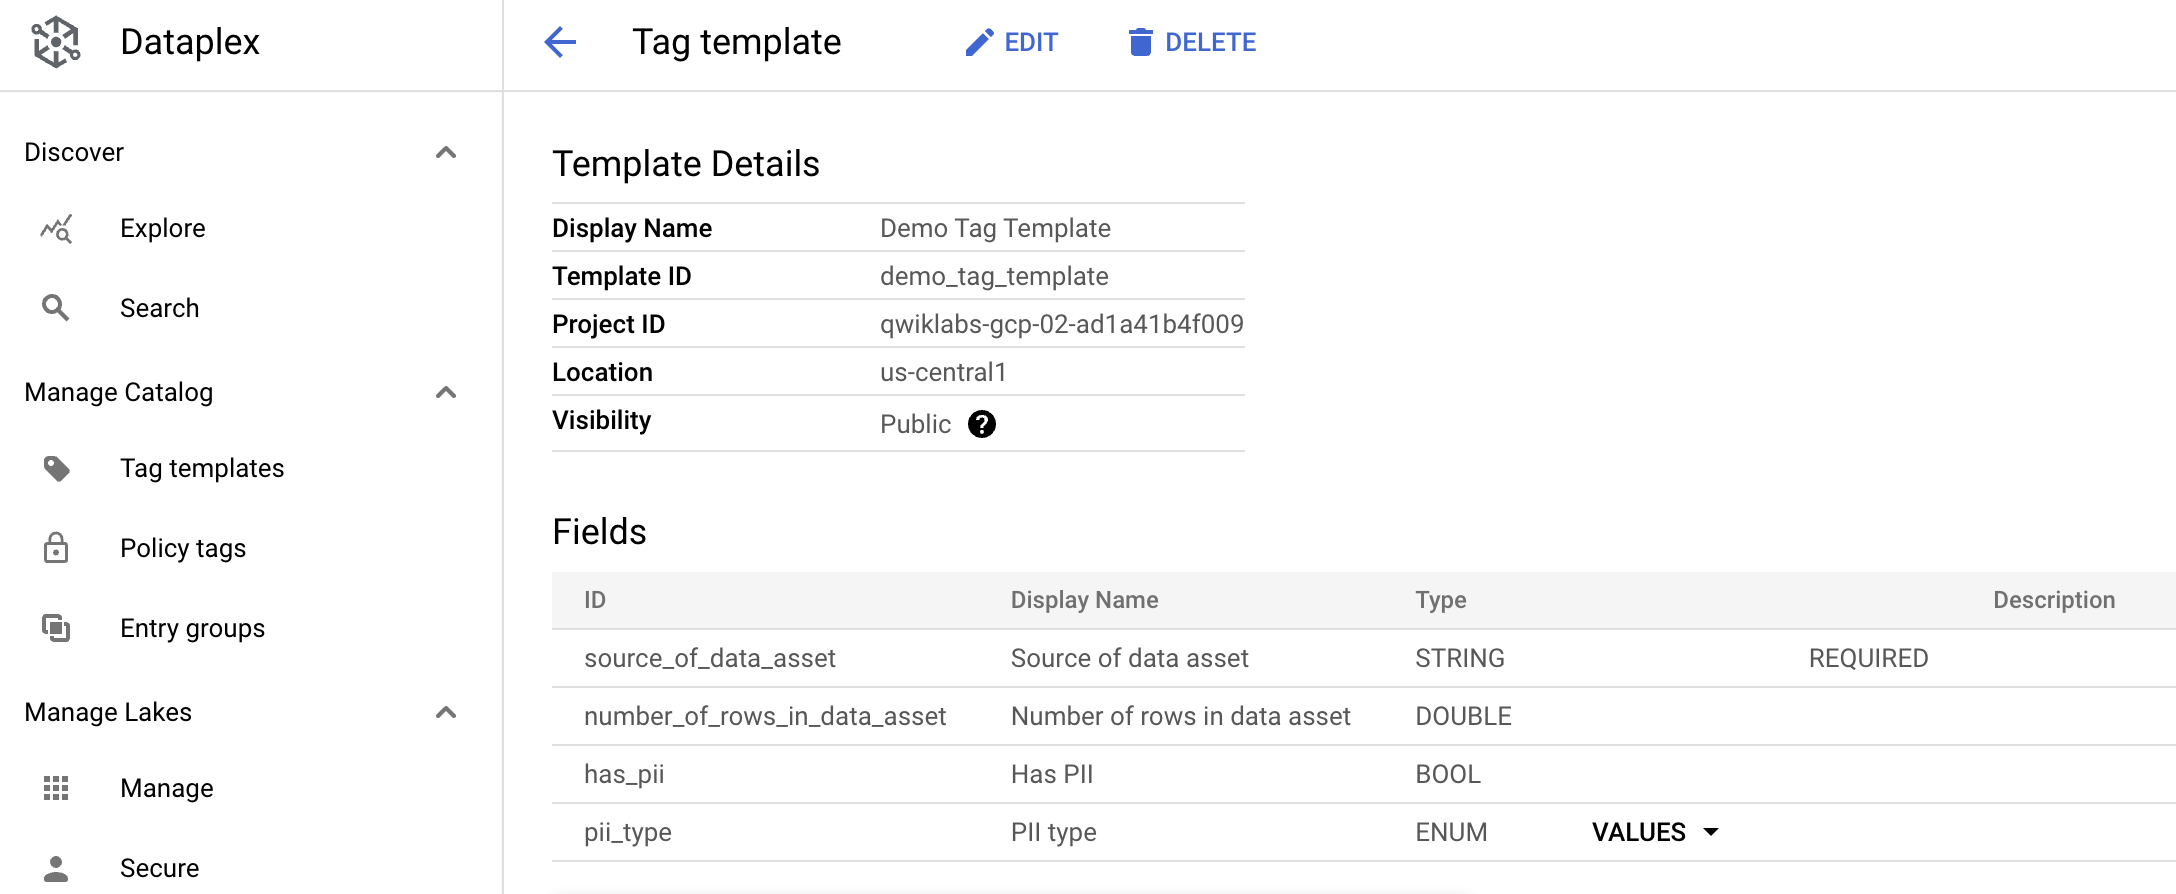
The Data Catalog Tag template page displays template details and attributes:
Click Check my progress to verify the objective.
Task 5. Tag your table with the newly created tags
-
To attach a tag to a table in your dataset, click on the Data Catalog icon in the top left corner.
-
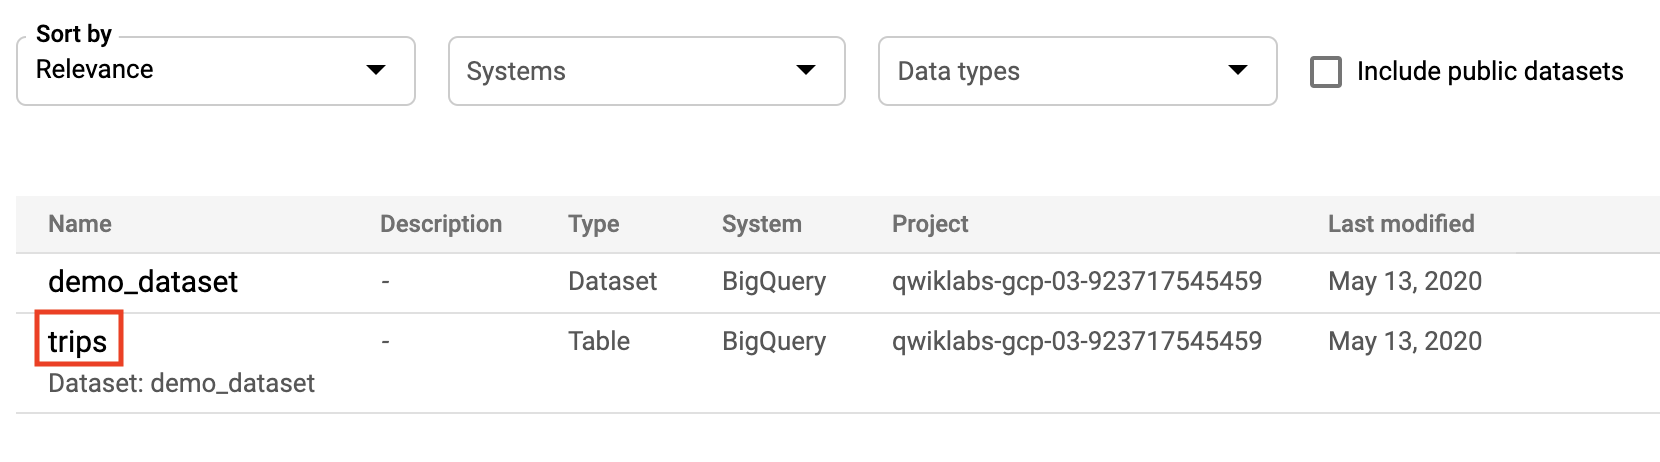
In Left pane, select Search and type
demo_datasetin the Search box. -
Click Search:

The demo_dataset and the trips table that you copied into the dataset are displayed in the search results.
- Open the trips table by clicking on the name:
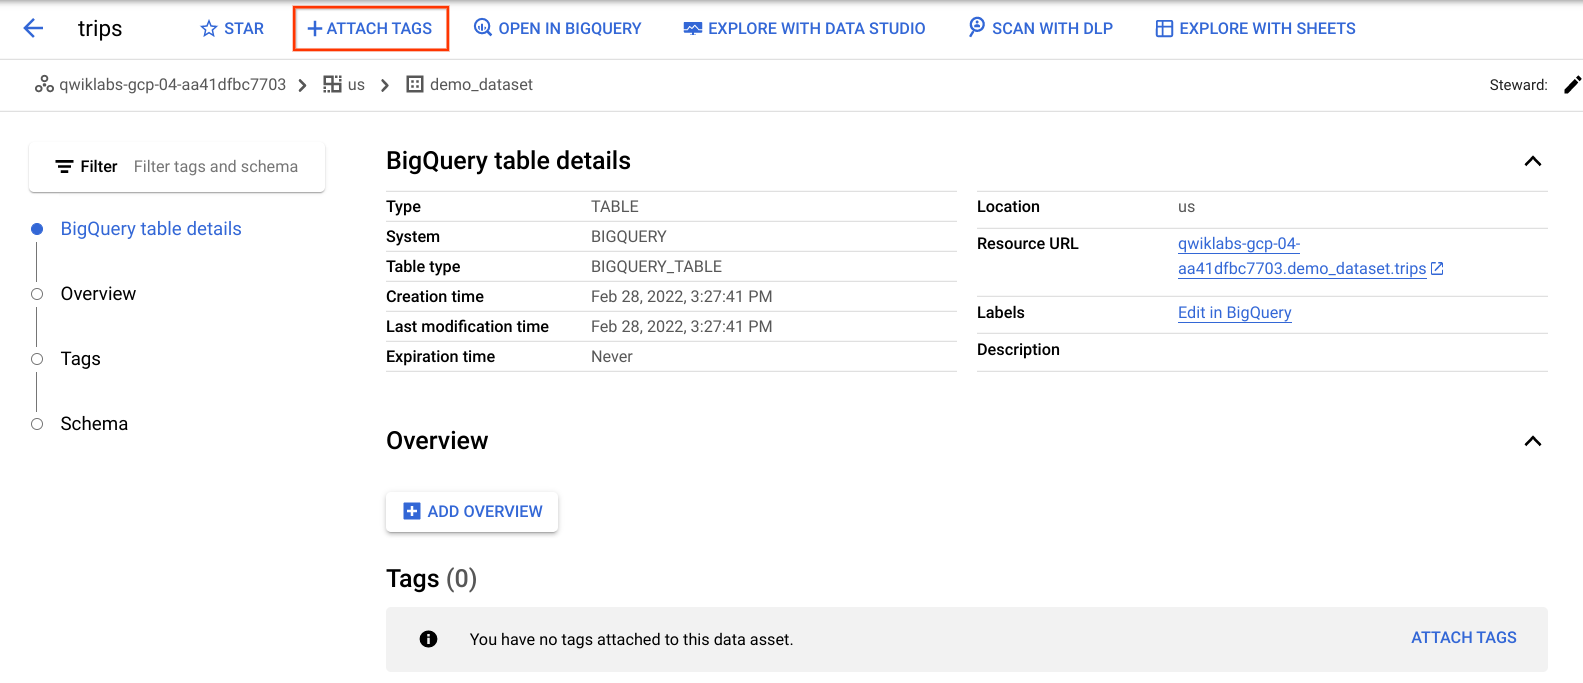
The Entry details page opens.
- Click ATTACH TAGS.
-
From the Attach Tags dialog, under "Choose what to tag" select
tripstable, and click ok. -
select the Demo Tag Template for tag templates.
-
Next, insert or select the following values for each tag attribute:
- source_of_data_asset: tlc_yellow_trips_2018
- pii_type: NONE
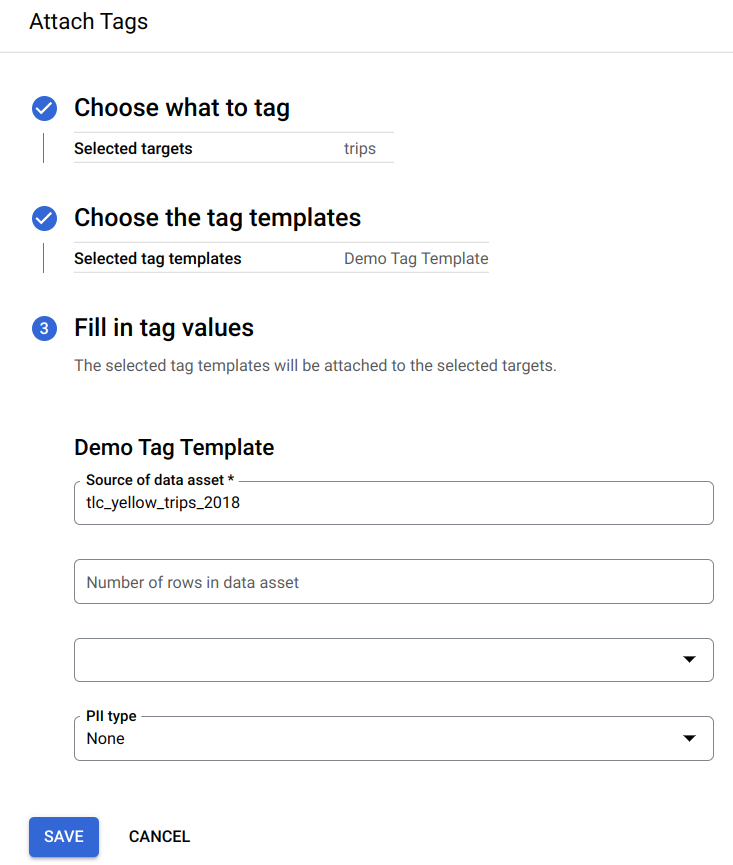
-
Click Save.
-
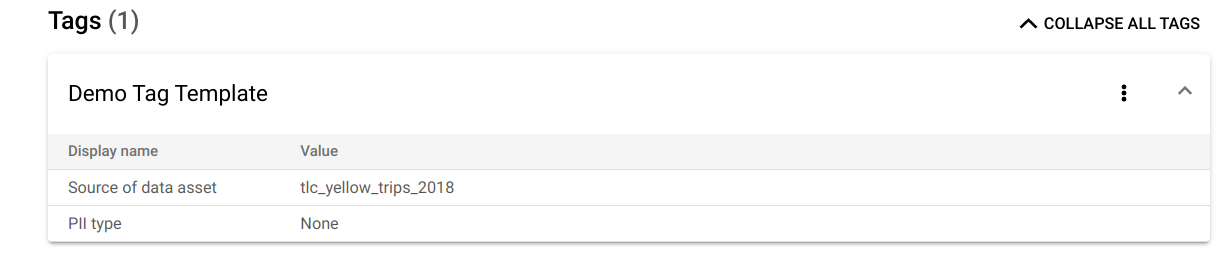
Click on
Demo Tag Templateto view the tag attributes listed on the Entry details page.
Click Check my progress to verify the objective.
Congratulations!
Great job! You learned how to successfully attach a tag to a table with Data Catalog.
Finish your quest
This self-paced lab is part of the BigQuery for Marketing Analysts and Data Catalog Fundamentals quests. A quest is a series of related labs that form a learning path. Completing a quest earns you a badge to recognize your achievement. You can make your badge or badges public and link to them in your online resume or social media account. Enroll in any quest that contains this lab and get immediate completion credit. See the Google Cloud Skills Boost catalog to see all available quests.
What was covered
In this lab, you learned how to:
- Enable the Data Catalog API.
- Create a dataset.
- Copy a public New York Taxi table to your dataset.
- Create a tag template and attach the tag to your table.
Next steps / learn more
- Read the Data Catalog Overview
- Learn How to search with Data Catalog
- Browse the Overview of APIs and Client Libraries
End your lab
When you have completed your lab, click End Lab. Your account and the resources you've used are removed from the lab platform.
You will be given an opportunity to rate the lab experience. Select the applicable number of stars, type a comment, and then click Submit.
The number of stars indicates the following:
- 1 star = Very dissatisfied
- 2 stars = Dissatisfied
- 3 stars = Neutral
- 4 stars = Satisfied
- 5 stars = Very satisfied
You can close the dialog box if you don't want to provide feedback.
For feedback, suggestions, or corrections, please use the Support tab.
Google Cloud training and certification
...helps you make the most of Google Cloud technologies. Our classes include technical skills and best practices to help you get up to speed quickly and continue your learning journey. We offer fundamental to advanced level training, with on-demand, live, and virtual options to suit your busy schedule. Certifications help you validate and prove your skill and expertise in Google Cloud technologies.
Manual Last Updated September 20, 2023
Lab Last Tested September 20, 2023
Copyright 2024 Google LLC All rights reserved. Google and the Google logo are trademarks of Google LLC. All other company and product names may be trademarks of the respective companies with which they are associated.