Checkpoint
Enrichment with ksqlDB
/ 40
Create streams and tables in ksqlDB CLI
/ 60
Confluent: Developing a Streaming Microservices Application
This lab was developed with our partner, Confluent. Your personal information may be shared with Confluent, the lab sponsor, if you have opted-in to receive product updates, announcements, and offers in your Account Profile.
GSP741

Overview
This lab is based on a small microservices ecosystem, showcasing an order management workflow, such as one might find in retail and online shopping. It is built using Kafka Streams, whereby business events that describe the order management workflow propagate through this ecosystem. The blog post Building a Microservices Ecosystem with Kafka Streams and ksqlDB outlines the approach used in the lab.
Objectives
In this lab, you will:
- Persist events into Kafka by producing records that represent customer orders
- Write a service that validates customer orders
- Write a service that joins streaming order information with streaming payment information and data from a customer database
- Define one set of criteria to filter records in a stream based on some criteria
- Create a session window to define five-minute windows for processing
- Create a state store for the Inventory Service
- Create one persistent query that enriches the orders stream with customer information using a stream-table join
Setup and requirements
Before you click the Start Lab button
Read these instructions. Labs are timed and you cannot pause them. The timer, which starts when you click Start Lab, shows how long Google Cloud resources will be made available to you.
This hands-on lab lets you do the lab activities yourself in a real cloud environment, not in a simulation or demo environment. It does so by giving you new, temporary credentials that you use to sign in and access Google Cloud for the duration of the lab.
To complete this lab, you need:
- Access to a standard internet browser (Chrome browser recommended).
- Time to complete the lab---remember, once you start, you cannot pause a lab.
How to start your lab and sign in to the Google Cloud console
-
Click the Start Lab button. If you need to pay for the lab, a pop-up opens for you to select your payment method. On the left is the Lab Details panel with the following:
- The Open Google Cloud console button
- Time remaining
- The temporary credentials that you must use for this lab
- Other information, if needed, to step through this lab
-
Click Open Google Cloud console (or right-click and select Open Link in Incognito Window if you are running the Chrome browser).
The lab spins up resources, and then opens another tab that shows the Sign in page.
Tip: Arrange the tabs in separate windows, side-by-side.
Note: If you see the Choose an account dialog, click Use Another Account. -
If necessary, copy the Username below and paste it into the Sign in dialog.
{{{user_0.username | "Username"}}} You can also find the Username in the Lab Details panel.
-
Click Next.
-
Copy the Password below and paste it into the Welcome dialog.
{{{user_0.password | "Password"}}} You can also find the Password in the Lab Details panel.
-
Click Next.
Important: You must use the credentials the lab provides you. Do not use your Google Cloud account credentials. Note: Using your own Google Cloud account for this lab may incur extra charges. -
Click through the subsequent pages:
- Accept the terms and conditions.
- Do not add recovery options or two-factor authentication (because this is a temporary account).
- Do not sign up for free trials.
After a few moments, the Google Cloud console opens in this tab.

Activate Cloud Shell
Cloud Shell is a virtual machine that is loaded with development tools. It offers a persistent 5GB home directory and runs on the Google Cloud. Cloud Shell provides command-line access to your Google Cloud resources.
- Click Activate Cloud Shell
at the top of the Google Cloud console.
When you are connected, you are already authenticated, and the project is set to your Project_ID,
gcloud is the command-line tool for Google Cloud. It comes pre-installed on Cloud Shell and supports tab-completion.
- (Optional) You can list the active account name with this command:
- Click Authorize.
Output:
- (Optional) You can list the project ID with this command:
Output:
gcloud, in Google Cloud, refer to the gcloud CLI overview guide.
Task 1. Persist events
An event is simply a thing that happened or occurred. An event in a business is some fact that occurred, such as a sale, an invoice, a trade, or a customer experience, and it is the source of truth. In event-oriented architectures, events are first-class citizens that constantly push data into applications. Client applications can then react to these streams of events in real time and decide what to do next.
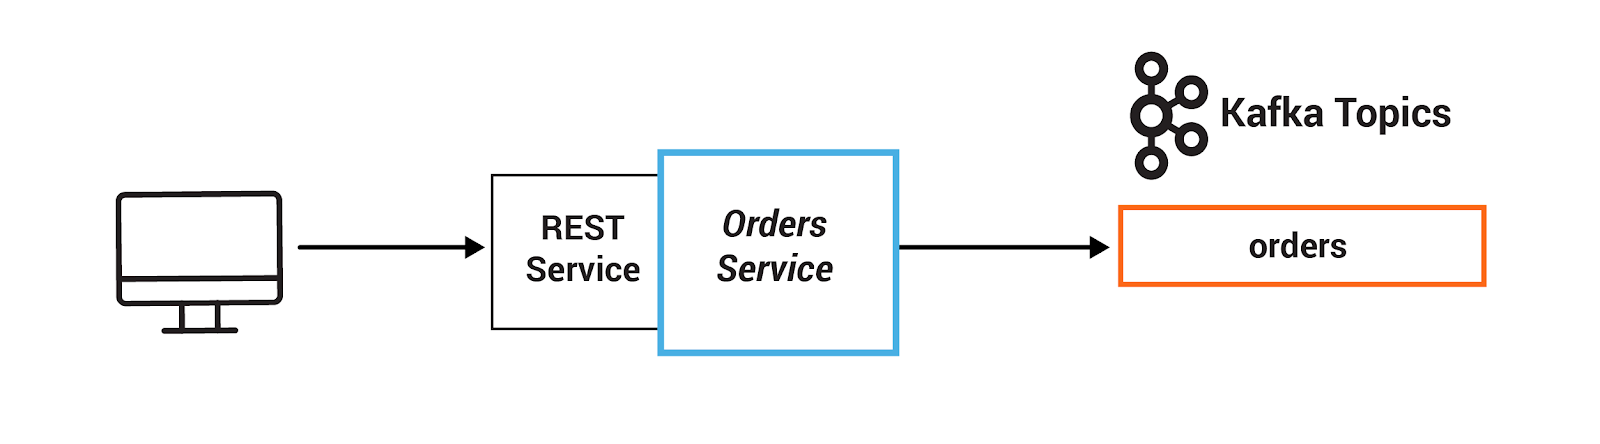
In this section, you will persist events into Kafka by producing records that represent customer orders. This event happens in the Orders Service, which provides a REST interface to POST and GET Orders. Posting an Order is essentially a REST call, and it creates the event in Kafka.
- In Cloud Shell, start by cloning the Examples repository and the Kafka Streams Examples repository. You will use the latter for testing purposes.
- Change the Java version to 8 (since this is the version used in the branched Kafka Streams Examples repository) and set the
JAVA_HOMEenvironment variable:
- Next, run the following to navigate to the
kafka-streams-examplesfolder and switch to the 5.5.1-post branch:
- Next, navigate to
mircoservice-orders/exercisesdirectory and switch to the 5.5.1-post branch:
-
Click Open Editor (
) on the toolbar of Cloud Shell. (You can switch between Cloud Shell and the code editor by using the Open Editor and Open Terminal icons as required, or click the Open in new window button to leave the Editor open in a separate tab).
-
Open the OrdersService.java file by navigating to
examples/microservices-orders/exercises/OrdersService.javain the Editor. -
In
OrdersService.java, fill in TODO 1.1: create a new ProducerRecord with a key specified by bean.getId() and value of the bean, to the orders topic whose name is specified by ORDERS.name():
- Next, fill in TODO 1.2: produce the newly created record using the existing producer and pass use the OrdersService#callback function to send the response and the record key:
- Navigate back to Cloud Shell. To test your code, run the following commands to copy your version of the file to the main project, compile, and run the unit test:
This may take a couple of minutes to complete.
Task 2. Event-driven applications
Service-based architectures are often designed to be request-driven, in which services send commands to other services to tell them what to do, await a response, or send queries to get the resulting state. Building services on a protocol of requests and responses forces a complicated web of synchronous dependencies that bind services together.
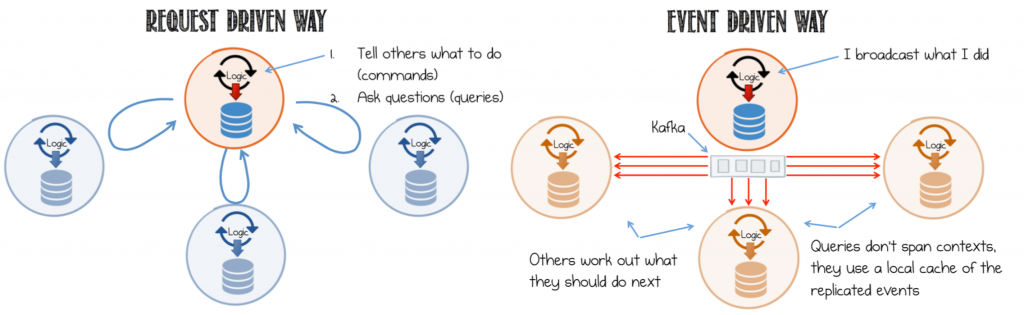
In contrast, in an event-driven design, the event stream is the inter-service communication that enables services to cross deployment boundaries and avoids synchronous execution. When and how downstream services respond to those events is within their control, which reduces the coupling between services and enables an architecture with more pluggability. Read more on Build Services on a Backbone of Events from the Confluent Developer documentation.
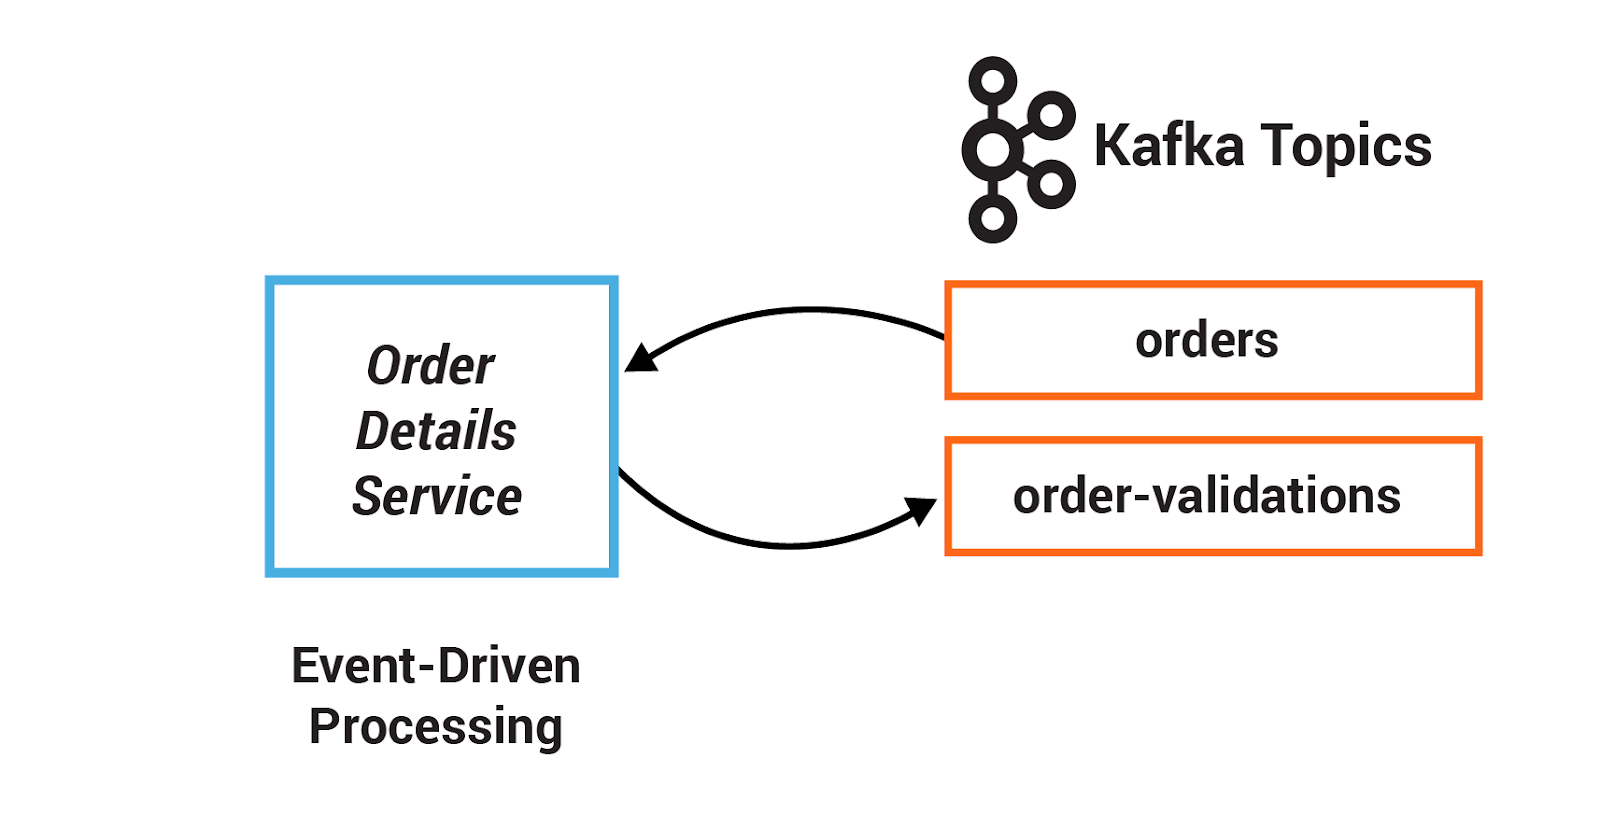
In this section, you will write a service that validates customer orders. Instead of using a series of synchronous calls to submit and validate orders, the order event itself triggers the OrderDetailsService. When a new order is created, it is written to the topic orders, from which OrderDetailsService has a consumer polling for new records.
-
In the Cloud Shell Editor, navigate to
examples/microservices-orders/exercisesand open theOrderDetailsService.javafile. -
In
OrderDetailsService.java, implement TODO 2.1: subscribe the existing consumer to a Collections#singletonList with the orders topic whose name is specified by Topics.ORDERS.name():
- Implement TODO 2.2: validate the order using OrderDetailsService#isValid and save the validation result to type OrderValidationResult:
- Adding to the previous command, implement TODO 2.3: create a new record using OrderDetailsService#result() that takes the order and validation result:
- Finally, implement TODO 2.4: produce the newly created record using the existing producer:
TODO 2.1 and TODO 2.4 in the file.
- Navigate back to Cloud Shell. To test your code, run the following commands to copy your version of the file to the main project, compile, and run the unit test:
This may take a couple of minutes to complete.
COMPILATION ERROR, please wait for a minute and re-run the above commands.Task 3. Enriching streams with joins
Streams can be enriched with data from other streams or tables through joins. A join enriches data by performing lookups in a streaming context where data is updated continuously and concurrently. For example, applications backing an online retail store might enrich new data records with information from multiple databases.
In this scenario, it may be that a stream of customer transactions is enriched with sales price, inventory, customer information, etc. These lookups can be performed at very large scale and with a low processing latency.
A popular pattern is to make the information in the databases available in Kafka through so-called change data capture (CDC), together with Kafka's Connect API to pull in the data from the database.
Once the data is in Kafka, client applications can perform very fast and efficient joins of such tables and streams, rather than requiring the application to make a query to a remote database over the network for each record. Read more on an overview of distributed, real-time joins and implementing joins in Kafka Streams.
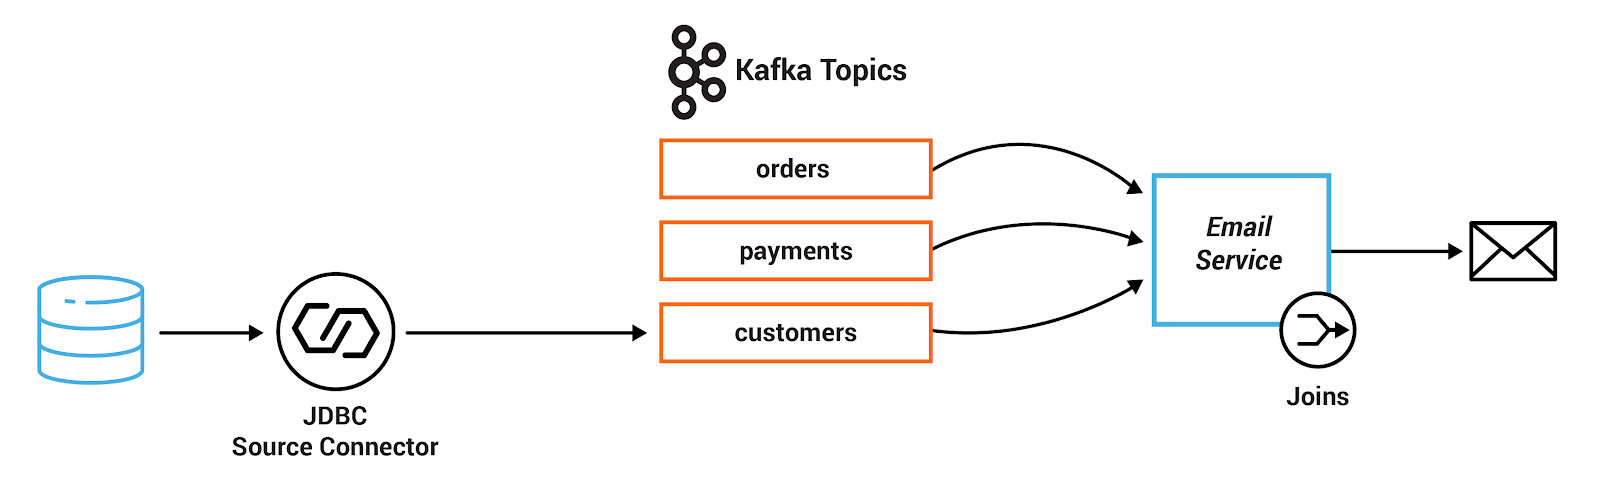
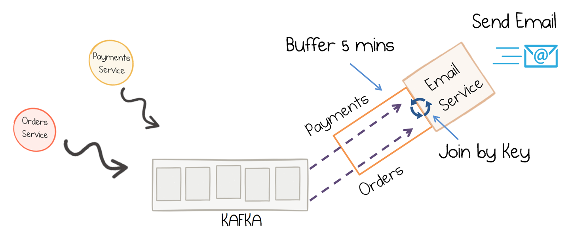
In this exercise, you will write a service that joins streaming order information with streaming payment information and data from a customer database. First, the payment stream needs to be rekeyed to match the same key info as the order stream before joined together.
The resulting stream is then joined with the customer information that was read into Kafka by a JDBC source from a customer database. Additionally, this service performs dynamic routing: an enriched order record is written to a topic that is determined from the value of level field of the corresponding customer.
-
In the Cloud Shell editor, navigate to
examples/microservices-orders/exercises/EmailService.javaand open the file. -
In
EmailService.java, implement TODO 3.1: create a new KStream called payments from payments_original, using KStream#selectKey to rekey on order id specified by payment.getOrderId() instead of payment id.
You will replace this:
With this:
- Next, implement TODO 3.2: do a stream-table join with the customers table, which requires three arguments:
- The GlobalKTable for the stream-table join.
-
customer Id, specified by order.getCustomerId(), using a KeyValueMapper that gets the customer id from the tuple in the record's value. - A method that computes a value for the result record, in this case EmailTuple::setCustomer.
- Implement TODO 3.3: route an enriched order record to a topic that is dynamically determined from the value of the customerLevel field of the corresponding customer:
- Navigate back to Cloud Shell. To test your code, run the following to copy your version of the file to the main project, compile, and run the unit test:
This may take a couple of minutes to complete.
Task 4. Filtering and branching
A stream of events can be captured in a Kafka topic. Client applications can then manipulate this stream based on some user-defined criteria, even creating new streams of data that they can act on or downstream services can act on. These help create new streams with more logically consistent data.
In some cases, the application may need to filter events from an input stream that match certain criteria, which results in a new stream with just a subset of records from the original stream.
In other cases, the application may need to branch events, whereby each event is tested against a predicate and then routed to a stream that matches, which results in multiple new streams split from the original stream.

In this section, you will define one set of criteria to filter records in a stream based on some criteria. Then you will define another set of criteria to branch records into two different streams.
-
In the Cloud Shell Editor, navigate to
examples/microservices-orders/exercisesand open theFraudService.javafile. -
In
FraudService.java, implement TODO 4.1: filter this stream to include only orders in "CREATED" state, i.e., it should satisfy the predicate OrderState.CREATED.equals(order.getState()):
- Next, implement TODO 4.2: create a KStream<String, OrderValue> array from the ordersWithTotals stream by branching the records based on OrderValue#getValue.
- First branched stream:
FRAUD_CHECKwill fail for predicate where order value>= FRAUD_LIMIT - Second branched stream:
FRAUD_CHECKwill pass for predicate where order value< FRAUD_LIMIT
- Navigate back to Cloud Shell. To test your code, run the following to copy your version of the file to the main project, compile, and run the unit test:
This may take a couple of minutes to complete.
Task 5. Stateful operations
An aggregation operation takes one input stream or table, and yields a new table by combining multiple input records into a single output record.
Examples of aggregations are computing count or sum, because they combine current record values with previous record values. These are stateful operations because they maintain data during processing.
Aggregations are always key-based operations, and Kafka's Streams API ensures that records for the same key are always routed to the same stream processing task. Oftentimes, these are combined with windowing capabilities in order to run computations in real time over a window of time.
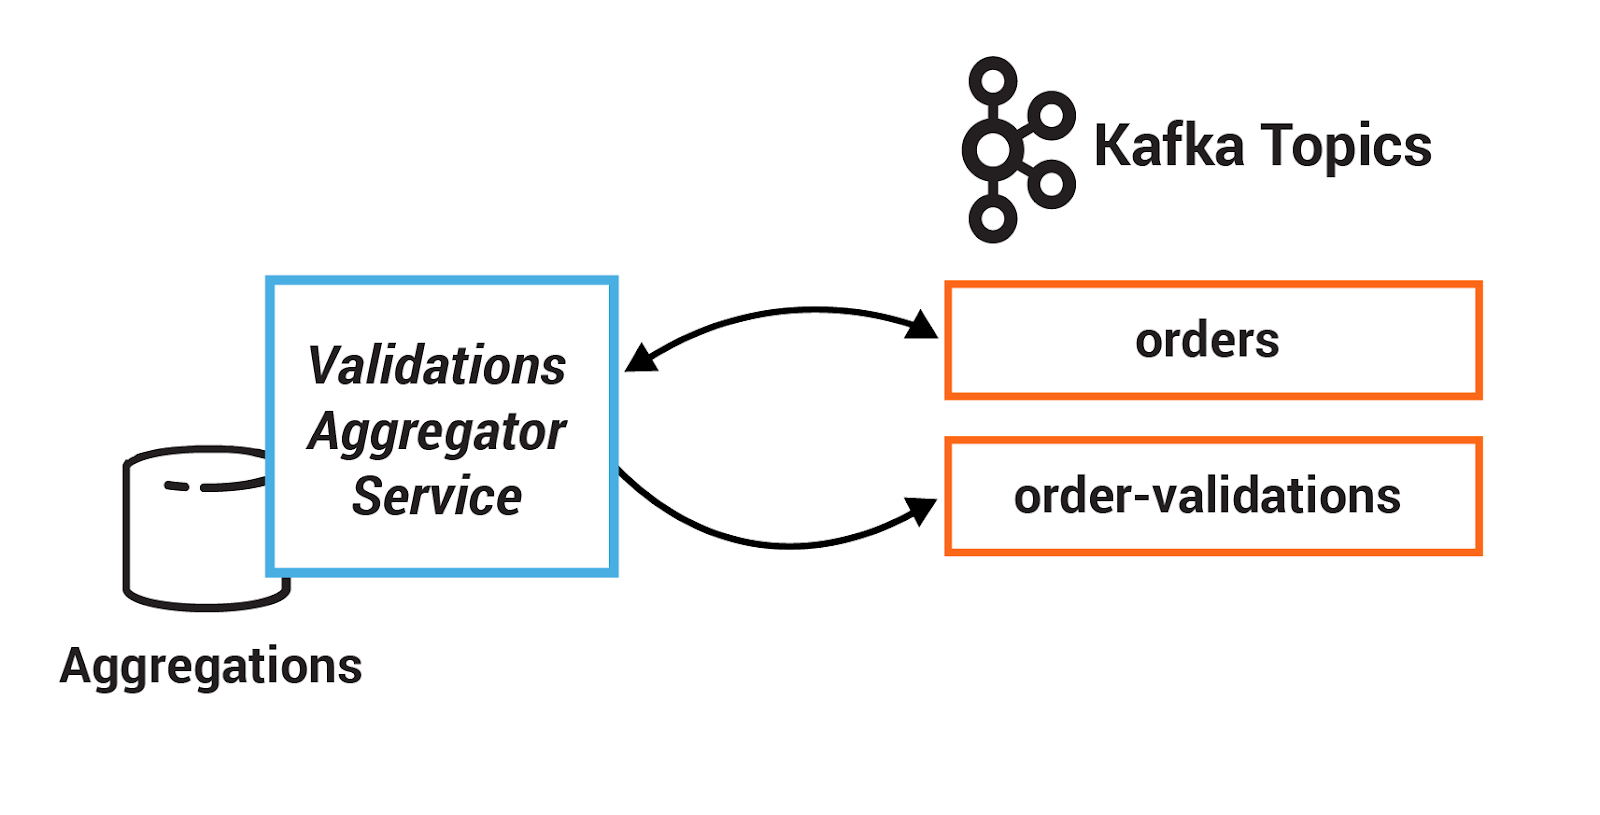
In this section, you will create a session window to define five-minute windows for processing.
Additionally, you will use a stateful operation, reduce, to collapse duplicate records in a stream. Before running reduce you will group the records to repartition the data, which is generally required before using an aggregation operator.
-
In the Cloud Shell Editor, navigate to
examples/microservices-orders/exercisesand open theValidationsAggregatorService.javafile. -
In
ValidationsAggregatorService.java, implement TODO 5.1: window the data using KGroupedStream#windowedBy, specifically using SessionWindows.with to define 5-minute windows:
- Next, implement TODO 5.2: group the records by key using KStream#groupByKey, providing the existing Serialized instance for ORDERS:
- Implement TODO 5.3: use an aggregation operator KTable#reduce to collapse the records in this stream to a single order for a given key:
- Navigate back to Cloud Shell. To test your code, run the following to copy your version of the file to the main project, compile, and run the unit test:
This may take a couple of minutes to complete.
Task 6. State stores
Kafka Streams provides so-called state stores, which are disk-resident hash tables held inside the API for the client application.
The state store can be used within stream processing applications to store and query data, an important capability when implementing stateful operations. It can be used to remember recently received input records, to track rolling aggregates, to de-duplicate input records, etc.
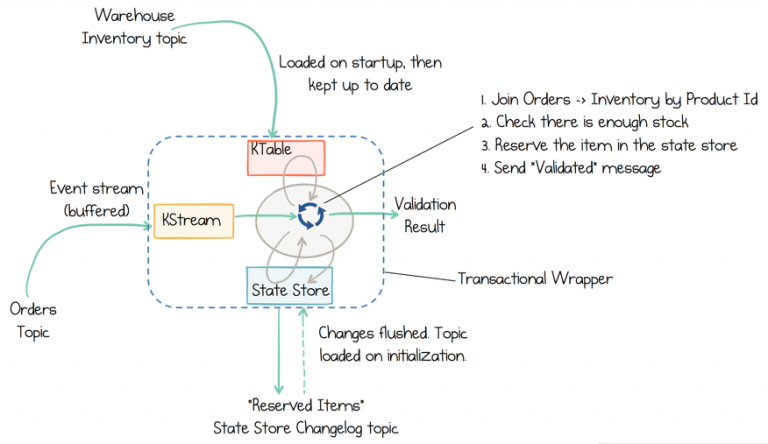
It is also backed by a Kafka topic and comes with all the Kafka guarantees. Consequently, other applications can also interactively query another application's state store.
Querying state stores is always read-only to guarantee that the underlying state stores will never be mutated out-of-band (i.e., you cannot add new entries).
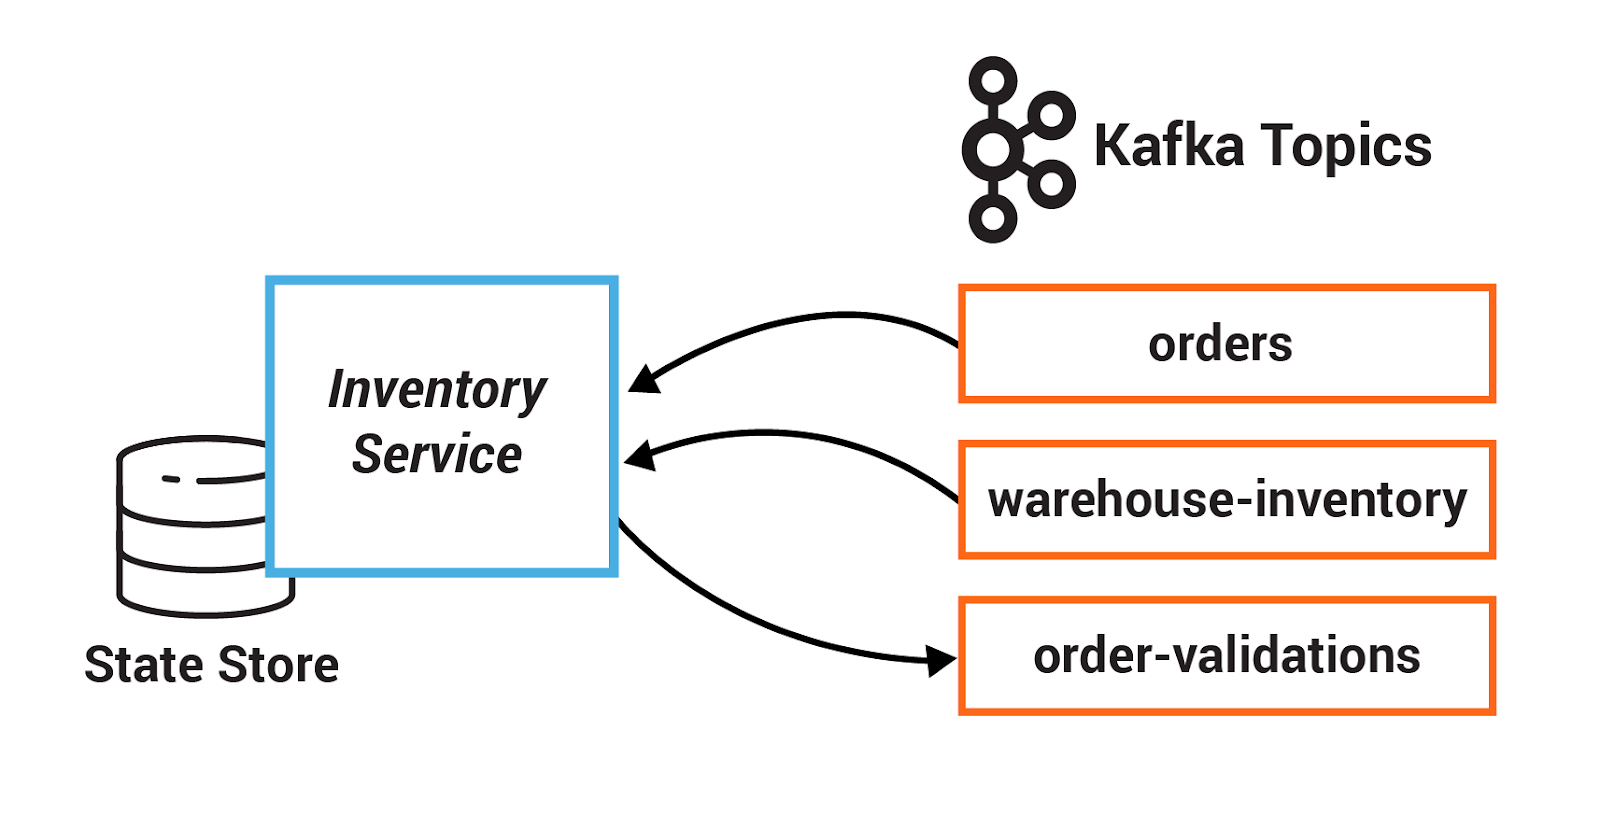
In this section, you will create a state store for the Inventory Service. This state store is initialized with data from a Kafka topic before the service starts processing, and then it is updated as new orders are created.
-
In the Cloud Shell editor, navigate to
examples/microservices-orders/exercisesand open theInventoryService.javafile. -
In
InventoryService.java, implement TODO 6.1: create a state store called RESERVED_STOCK_STORE_NAME, using Stores#keyValueStoreBuilder and Stores#persistentKeyValueStore.
- The key Serde is derived from the topic specified by
WAREHOUSE_INVENTORY - The value Serde is derived from
Serdes.Long()because it represents a count
- Implement TODO 6.2: update the reserved stock in the KeyValueStore called reservedStocksStore.
- The key is the product in the order, using OrderBean#getProduct
- The value is the sum of the current reserved stock and the quantity in the order, using OrderBean#getQuantity
- Navigate back to Cloud Shell. To test your code, run the following to copy your version of the file to the main project, compile, and run the unit test:
This may take a couple of minutes to complete.
COMPILATION ERROR, please wait for a minute and re-run the above commands.Task 7. Enrichment with ksqlDB
Confluent ksqlDB is the streaming SQL engine that enables real-time data processing against Apache Kafka. It provides an easy-to-use yet powerful interactive SQL interface for stream processing on Kafka, without requiring you to write code in a programming language such as Java or Python.
ksqlDB is scalable, elastic, fault tolerant, and it supports a wide range of streaming operations, including data filtering, transformations, aggregations, joins, windowing, and sessionization.
You can use ksqlDB to merge streams of data in real time by using a SQL-like join syntax. A ksqlDB join and a relational database join are similar in that they both combine data from two sources based on common values. The result of a ksqlDB join is a new stream or table that's populated with the column values that you specify in a SELECT statement. ksqlDB also supports several aggregate functions, like COUNT and SUM. You can use these to build stateful aggregates on streaming data.
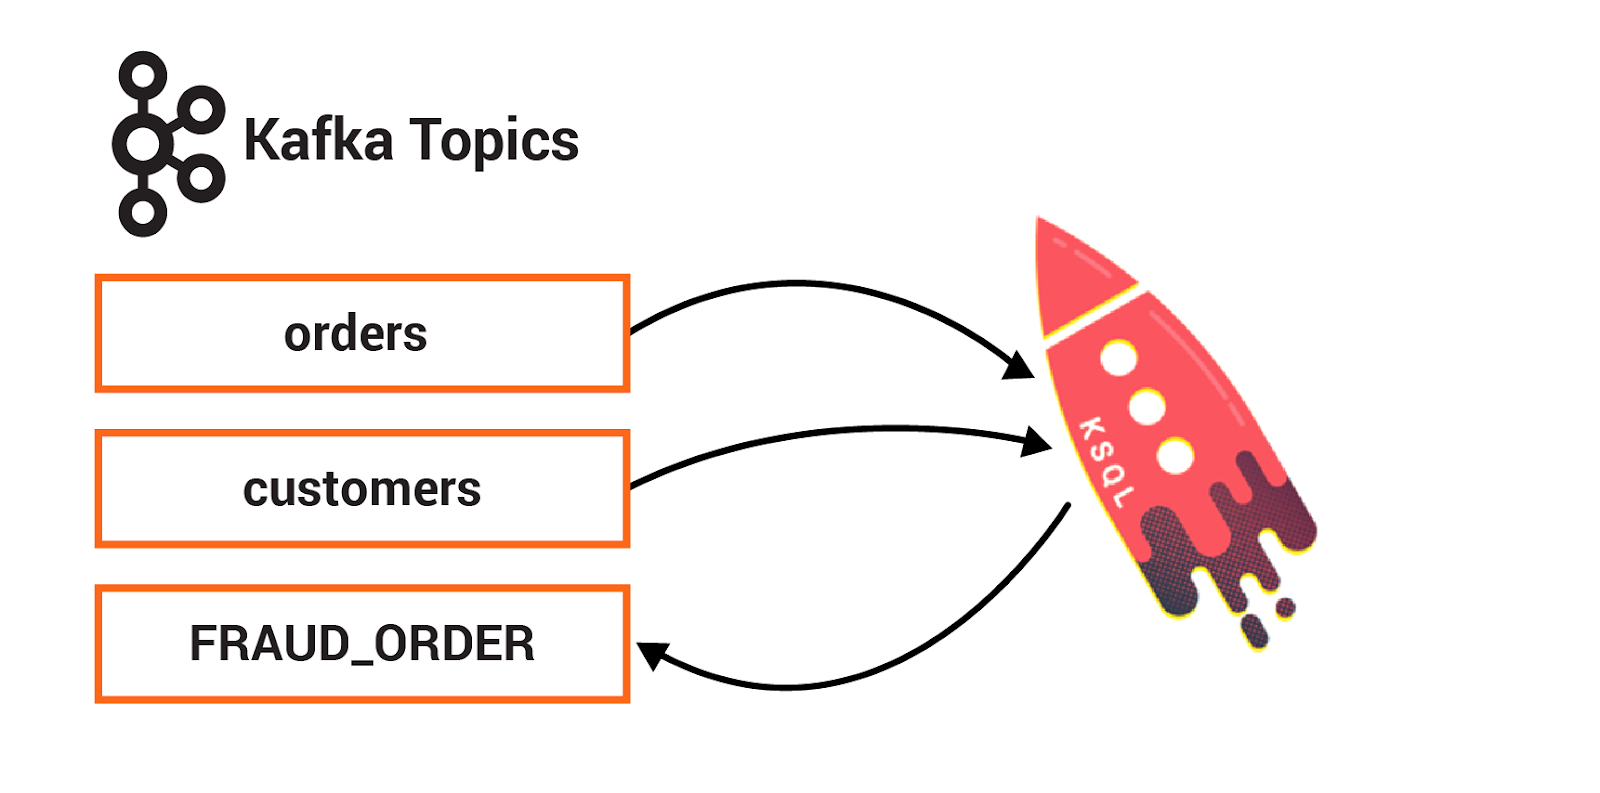
In this section, you will create one persistent query that enriches the orders stream with customer information using a stream-table join. You will create another persistent query that detects fraudulent behavior by counting the number of orders in a given window.
-
In the Cloud Console, from the Navigation menu, navigate to Compute Engine > VM Instances.
-
Click SSH for the microservices-vm instance.
-
In your SSH window, run the following script to bootstrap the VM:
-
Once the commands finish executing, exit out of your SSH window.
-
Now, click SSH again to restart the session.
-
Clone the repository, and switch to the 5.5.1-post branch:
#TODO implementations you've written won't be used in this last part of the lab. You can simply copy over the files from the repository again.
- Run the following to change to the
microservices-ordersdirectory, and build the Docker image:
- After a minute or so, run the
docker-compose psstatus command to ensure that everything has started correctly:
- Launch the ksqlDB CLI:
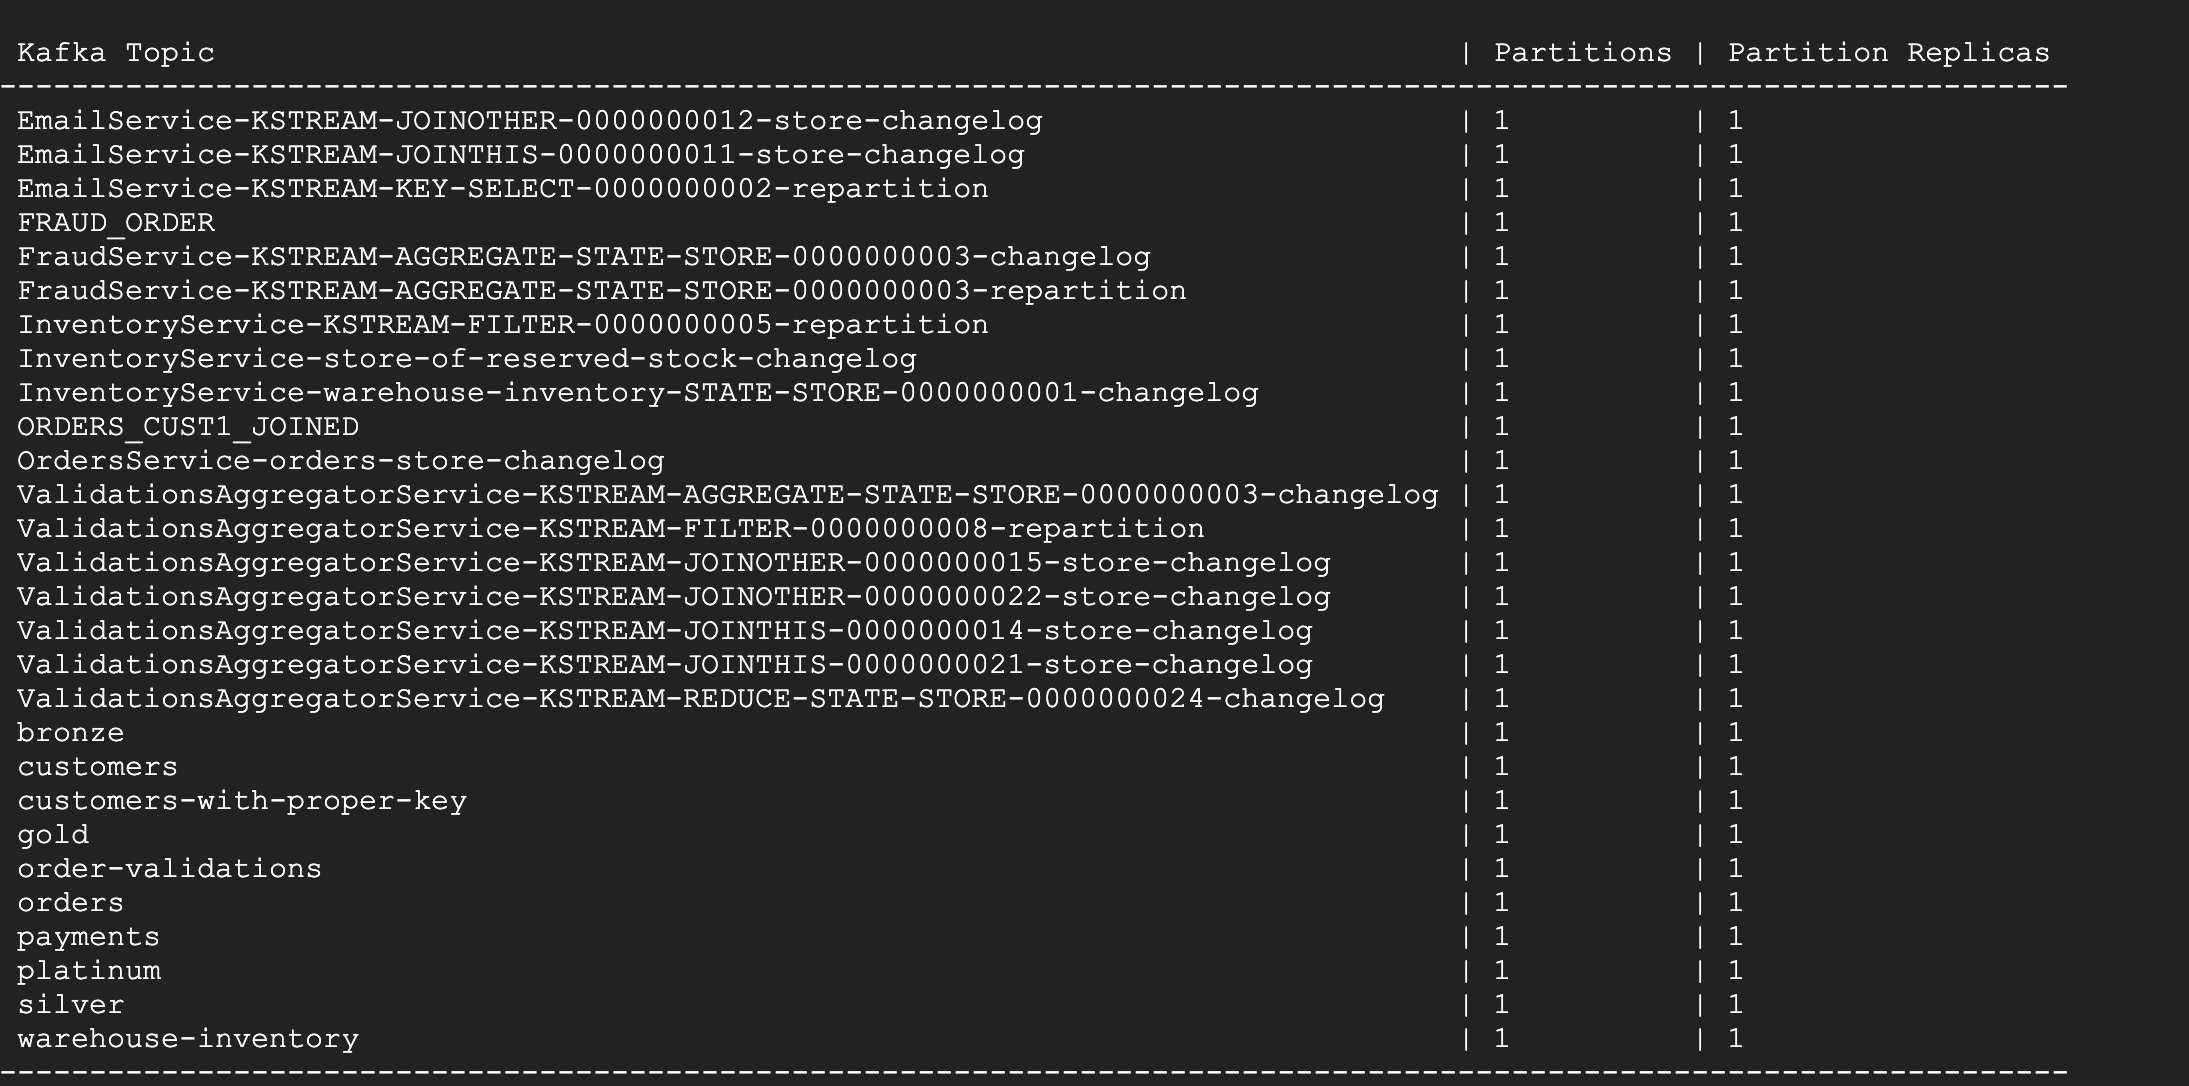
- From the ksqlDB CLI prompt, execute the following command to see the Kafka topics created. For this lab, you will be using
ordersandcustomerstopics.
You should see the following topics:
Click Check my progress to verify the objective.
- Next, you will create some persistent queries. Start by creating a new ksqlDB stream that does a stream-table join between orders and my_customers_table based on customer id:
- Finally, create a new ksqlDB table that counts if a customer submits more than 2 orders in a 30 second time window:
- The CLI parser will give immediate feedback whether your ksqlDB queries worked or not. Use the following command to see the rows in each query. You can exit out of the process by typing
CTRL+Cat any point.
Click Check my progress to verify the objective.
Congratulations!
In this lab, you started by producing records representing customer orders to persist into Kafka. You then wrote services that validated customer orders and joined streaming order information with streaming payment information and data from a customer database. Next, you defined one set of criteria to filter records in a stream. Lastly, you created a session window to define five-minute windows for processing, created a state store for the Inventory Service, and created one persistent query that enriched the orders stream with customer information using a stream-table join.
Next steps / learn more
- Confluent on the Google Cloud Marketplace!
- More details are provided in the rest of the Kafka Streams documentation.
Google Cloud training and certification
...helps you make the most of Google Cloud technologies. Our classes include technical skills and best practices to help you get up to speed quickly and continue your learning journey. We offer fundamental to advanced level training, with on-demand, live, and virtual options to suit your busy schedule. Certifications help you validate and prove your skill and expertise in Google Cloud technologies.
Manual Last Updated April 23, 2024
Lab Last Tested April 23, 2024
Copyright 2024 Google LLC All rights reserved. Google and the Google logo are trademarks of Google LLC. All other company and product names may be trademarks of the respective companies with which they are associated.