체크포인트
Build GCP networking footprint
/ 15
Create Cloud Firewall Rules and CloudNAT
/ 15
Create a CloudRouter and Configure a CloudNAT
/ 20
Create Virtual Machines
/ 20
Create Internal LoadBalancer
/ 20
Configure Packet Mirror Policy
/ 10
Google Cloud Packet Mirroring with OpenSource IDS
- GSP474
- Overview
- Packet Mirroring lab description
- Setup and requirements
- Task 1. Build a networking footprint
- Task 2. Create firewall rules and Cloud NAT
- Task 3. Create virtual machines
- Task 4. Create an internal load balancer
- Task 5. Install open source IDS - Suricata
- Task 6. Configure and review Suricata
- Task 7. Configure Packet Mirror policy
- Task 8. Test Packet Mirroring
- Task 9. Test Suricata IDS inspection and alerts
- Congratulations!
GSP474

Overview
Traffic Mirroring is a key feature in Google Cloud networking for security and network analysis. Its functionality is similar to that of a network tap or a span session in traditional networking. In short, Packet Mirroring captures network traffic (ingress and egress) from select "mirrored sources", copies the traffic, and forwards the copy to "collectors".
It is important to note that Packet Mirroring captures the full payload of each packet and thus consumes additional bandwidth. Because Packet Mirroring is not based on any sampling period, it is able to be used for better troubleshooting, security solutions, and higher layer application based analysis.
Packet Mirroring is founded on a "Packet Mirroring Policy", which contains the following attributes:
- Region
- VPC Network(s)
- Mirrored Source(s)
- Collector (destination)
- Mirrored traffic (filter)
Here are a some key points that also need to be considered:
- Only TCP, UDP and ICMP traffic may be mirrored. This, however, should satisfy the majority of use cases.
- "Mirrored Sources" and "Collectors" must be in the SAME Region, but can be in different zones and even different VPCs, as long as those VPCs are properly Peered.
- Additional bandwidth charges apply, especially between zones. To limit the traffic being mirrored, filters can be used.
One prime use case for "Packet Mirroring" is to use it in an Intrusion Detection System (IDS) solution. Some cloud-based IDS solutions require a special service to run on each source VM, or to put an IDS virtual appliance in-line between the network source and destination. Both of these have significant implications. For example, the service based solution, though fully distributed, requires that the guest operating system supports the software. The "in-line" solution can create a network bottleneck as all traffic must be funneled through the IDS appliance. The in-line solution will also not be able to capture "east-west" traffic within VMs in the same VPC.
Google Cloud Packet Mirroring does not require any additional software on the VMs and it is fully distributed across each of the mirrored virtual machines. The "Collector" IDS is placed out-of-path using an Internal Network Load Balancer (ILB) and will receive both "north-south" traffic and "east-west" traffic.
Packet Mirroring lab description
To demonstrate how Packet Mirroring can be used with an IDS consider this example using OpenSource IDS Suricata.
- A single VPC with 2 subnets, one for mirrored sources and one for the collector
- 2 Web servers created with a public IP address
- 1 Collector server (IDS) created with NO public IP for security reasons
- CloudNAT enabled for Internet access as needed
- All VMs created in the same region and zone, for simplicity and cost reasons
In this lab you will create a Google Cloud environment, configure the "Collector" ILB, configure the Packet Mirror Policy, as well as install and configure [Suricata] (https://suricata-ids.org/) on a virtual instance to act as an IDS. Once complete, network tests will be performed to validate the configuration and use of Packet Mirroring with the Open Source IDS. A very stripped down rule-set and Suricata configuration is used to simplify the demonstration..
Objectives:
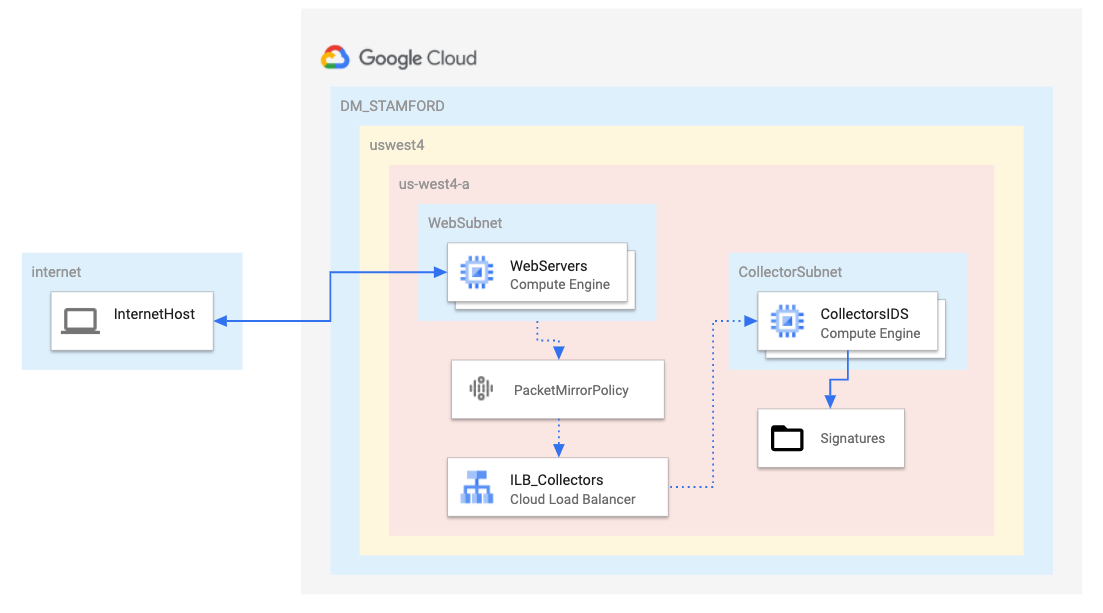
- Build out a Google Cloud Networking environment as shown in the diagram above
- Create 2 virtual machines with
gcloudcommands to act as WEB SERVERS - Create a single virtual machine with
gcloudcommands to act as IDS - Create an Internal LoadBalancer (ILB) to act as a "collector" for Packet Mirroring
- Install and configure an Open Source IDS (Suricata) on the IDS VM
- Review some basic IDS alert rules
- Create a Packet Mirror Policy
- Test Packet Mirroring by generating network traffic to the "mirrored" subnet
- Test Suricata IDS by generating network traffic to simulate an IDS event and review IDS logging
Setup and requirements
Before you click the Start Lab button
Read these instructions. Labs are timed and you cannot pause them. The timer, which starts when you click Start Lab, shows how long Google Cloud resources will be made available to you.
This hands-on lab lets you do the lab activities yourself in a real cloud environment, not in a simulation or demo environment. It does so by giving you new, temporary credentials that you use to sign in and access Google Cloud for the duration of the lab.
To complete this lab, you need:
- Access to a standard internet browser (Chrome browser recommended).
- Time to complete the lab---remember, once you start, you cannot pause a lab.
How to start your lab and sign in to the Google Cloud console
-
Click the Start Lab button. If you need to pay for the lab, a pop-up opens for you to select your payment method. On the left is the Lab Details panel with the following:
- The Open Google Cloud console button
- Time remaining
- The temporary credentials that you must use for this lab
- Other information, if needed, to step through this lab
-
Click Open Google Cloud console (or right-click and select Open Link in Incognito Window if you are running the Chrome browser).
The lab spins up resources, and then opens another tab that shows the Sign in page.
Tip: Arrange the tabs in separate windows, side-by-side.
Note: If you see the Choose an account dialog, click Use Another Account. -
If necessary, copy the Username below and paste it into the Sign in dialog.
{{{user_0.username | "Username"}}} You can also find the Username in the Lab Details panel.
-
Click Next.
-
Copy the Password below and paste it into the Welcome dialog.
{{{user_0.password | "Password"}}} You can also find the Password in the Lab Details panel.
-
Click Next.
Important: You must use the credentials the lab provides you. Do not use your Google Cloud account credentials. Note: Using your own Google Cloud account for this lab may incur extra charges. -
Click through the subsequent pages:
- Accept the terms and conditions.
- Do not add recovery options or two-factor authentication (because this is a temporary account).
- Do not sign up for free trials.
After a few moments, the Google Cloud console opens in this tab.

Activate Cloud Shell
Cloud Shell is a virtual machine that is loaded with development tools. It offers a persistent 5GB home directory and runs on the Google Cloud. Cloud Shell provides command-line access to your Google Cloud resources.
- Click Activate Cloud Shell
at the top of the Google Cloud console.
When you are connected, you are already authenticated, and the project is set to your Project_ID,
gcloud is the command-line tool for Google Cloud. It comes pre-installed on Cloud Shell and supports tab-completion.
- (Optional) You can list the active account name with this command:
- Click Authorize.
Output:
- (Optional) You can list the project ID with this command:
Output:
gcloud, in Google Cloud, refer to the gcloud CLI overview guide.
Task 1. Build a networking footprint
In this section, you will create a VPC and create 2 subnets inside that VPC. This will all be done using gcloud CLI commands inside Google Cloud Shell.
- Run the following to create a virtual private network:
- Add a subnet to the VPC for mirrored traffic in
:
- Add a subnet to the VPC for the collector in
:
Click Check my progress to verify the objective.
Task 2. Create firewall rules and Cloud NAT
A total of three firewall rules will be required to complete this lab.
- Rule 1 allows the standard http port (TCP 80) and the ICMP protocol to all VMs from all sources.
- Rule 2 allows the IDS to receive ALL traffic from ALL sources. Be careful NOT to give the IDS VM a public IP in the later sections.
- Rule 3 allows the "Google Cloud IAP Proxy" IP range TCP port 22 to ALL VMs, enabling you to ssh into the VMs via the Cloud Console
Run the following commands to create the firewall rules:
Click Check my progress to verify the objective.
Create a Cloud Router
- As a prerequisite for Cloud NAT, a Cloud Router must first be configured in the respective region:
Configure a Cloud NAT
- To provide Internet access to VMs without a public IP, a Cloud NAT must be created in the respective region:
The IDS VM will be created without a public IP to make sure that it is inaccessible from the Internet. However, it will need internet access to download updates and install Suricata packages.
Click Check my progress to verify the objective.
Task 3. Create virtual machines
Create an instance template for a web server
- This template prepares an Ubuntu server in
and installs a simple web service:
Create a managed instance group for the web servers
- This command uses the Instance Template in the previous step to create 2 web servers:
Create an Instance Template for the IDS VM
- This template prepares an Ubuntu server in
and with no public IP:
Create a managed instance group for the IDS VM
- This command uses the Instance Template in the previous step to create 1 VM to be configured as your IDS. The installation of Suricata will be addressed in a later section.
Click Check my progress to verify the objective.
Task 4. Create an internal load balancer
Packet Mirroring uses an internal load balancer (ILB) to forward mirrored traffic to a group of collectors. In this case, the collector group contains a single VM.
- Create a basic health check for the backend services:
- Create a backend service group to be used for an ILB:
- Add the created IDS managed instance group into the backend service group created in the previous step:
- Create a front end forwarding rule to act as the collection endpoint:
--is-mirroring-collector, flag is set.
Click Check my progress to verify the objective.
Task 5. Install open source IDS - Suricata
Note: For the next 2 sections, you will SSH into the IDS VM and run the commands in its shell. Be careful not to run the commands in the Cloud Shell.
SSH into the IDS VM
-
Using the Cloud Console, from the Navigation menu, navigate to Compute Engine > VM Instances.
-
Click on the SSH button of your IDS VM.

This opens a new window allowing you to run commands inside the IDS VM.
- Update the IDS VM:
- Install Suricata dependencies:
- Install Suricata:
Verify the installation
- Use the following command to verify the installation and check the installed version of Suricata:
The output should be something similar to this:
Task 6. Configure and review Suricata
Commands and steps for the following section should also be done inside the SSH of IDS/Suricata VM.
- Stop the Suricata service and backup the default configuration file:
Download and replace new Suricata configuration file and abridged rules file
The new configuration file updates the collector interface as well as only alerts on a very small set of traffic as configured in the my.rules file and the suricata.yaml file. The defaults for Suricata rulesets and alerting are quite extensive and superfluous for this lab.
- Run the following commands to copy the files.
Start the Suricata service
Occasionally, the service needs to be restarted. The restart command is included in this step to account for that possibility:
Review simple Suricata rules for testing
For this lab, the ruleset for Suricata had been trimmed down to 4. However, the default Suricata installation has a vast and extensive ruleset.
- Condensing the alerting down to such a succinct and simple list is better for this lab exercise so that each one can be easily tested.
Output should show a total of 4 rules and a description of each.
/etc/suricata/rules/ or /var/lib/suricata/rules. It was reconfigured for a different location for this lab in Step 2.
Task 7. Configure Packet Mirror policy
For this section of the lab return to Cloud Shell
Setting up the Packet Mirror policy can be completed in one simple command (or by going through a "wizard" in the GUI). In this command, you specify all 5 attributes mentioned in the Packet Mirroring Description section.
- Region
- VPC Network(s)
- Mirrored Source(s)
- Collector (destination)
- Mirrored traffic (filter)
You may notice that there is no mention of "mirrored traffic". This is because the policy will be configured to mirror "ALL" traffic and no filter is needed. The policy will mirror both ingress and egress traffic and forward it to the Suricata IDS device, which is part of the collector ILB.
- Configure Packet Mirroring Policy by running the following in Cloud Shell:
At this point, the Packet Mirroring and the Suricata configuration should be complete. The following sections will test both.
Click Check my progress to verify the objective.
Task 8. Test Packet Mirroring
In this section, you will need to access the IDS VM shell. If the shell window is still open, use that. If the shell window has been closed, reconnect.
You will also be using Cloud Shell to act as the "Internet Client".
Take a few minutes to find the External IP of both WEB VMs.
In the Cloud Console, from the Navigation menu, click Compute Engine > VM Instances and note down the External IPs of both WEB VMs. Referred to these as [PUBLIC_IP_WEB1] and [PUBLIC_IP_WEB2], respectively.
You can also gather the same information through gcloud commands from Cloud Shell:
Return to the IDS VM shell
Test Packet Mirroring
- Run a packet capture (tcpdump) on the IDS/Suricata VM with the following filters:
Generate traffic to the "mirrored" subnet
- Using the Cloud Shell terminal, ping the public address assigned to WEB1, replacing [PUBLIC_IP_WEB1] with the public IP address of "WEB1" which can be seen in the Cloud Console:
Packet Mirroring should duplicate and forward that traffic to the IDS VM and you should be able to see it in the packet capture of Step 1. Output on the IDS VM should be similar to this, where X.X.X.X is the source IP address of the ICMP requests. In the tcpdump output, you should expect to see the private IP of the WEBSERVER. Google Cloud makes the network translation at the edge.
The same should be true if you ping the public address of WEB2.
- Ping the public address assigned to WEB2, replacing [PUBLIC_IP_WEB2] with the public IP address of "WEB2".
Packet Mirroring should forward that traffic to the IDS VM and you should be able to see it in the packet capture of Step 1. Output on the IDS VM should be similar to this. Please note that in the tcpdump output, you should expect to see the private IP of the WEBSERVER. Google Cloud makes the network translation at the edge.
To better demonstrate that Packet Mirroring shows more than just the Layer 3 headers, the following test will show a standard HTTP GET to one of the WEB servers, including the initial TCP 3-way handshake.
-
Open a new tab in your browser and open the public address assigned to WEB1 with the http protocol. The "curl" utility from Cloud Console may also be used, if you prefer.
-
Replace [PUBLIC_IP_WEB1] with the public IP address of "WEB1"
Packet Mirroring should forward that traffic to the IDS VM and you should be able to see it in the packet capture of Step 1.
Output on the IDS VM should be similar to this:
- The same should be true if you browse to the public address of WEB2. Replace [PUBLIC_IP_WEB2] with the public IP address of "WEB2"
Packet Mirroring should forward that traffic to the IDS VM and you should be able to see it in the packet capture of Step 1.
Output on the IDS VM should be similar to this.
Type ctrl+c inside the IDS VM to exit the tcpdump.
Task 9. Test Suricata IDS inspection and alerts
The final section of this lab is to test Packet Mirroring integration with the Open Source IDS Suricata. Take a minute to review the 4 Suricata rules set to alert from Step4 of the "Configure and Review Suricata" section:
The following 4 steps will have you generate network traffic that trigger each of these rules. Alerts for each of them should be seen in the Suricata event log file.
TEST1 and TEST2 will be initiated from the WEBSERVER and tests egress traffic.
TEST3 and TEST4 will be initiated in Cloud Shell and tests ingress traffic.
TEST 1: Test egress UDP rule/alert.
- Run the following command from one of the WEB servers to generate egress DNS traffic:
- Now, view the alert in the Suricata event log file on the IDS VM.
Switch to the ssh window for the IDS VM
- Run the following command in the SSH window for the IDS VM:
The log entry should be similar to this:
TEST 2: Test egress "TCP" rule/alert
- Run the following command from one of the WEB servers to generate Egress TCP traffic:
-
type
ctrl+cto exit. -
Now, view the alert in the Suricata event log file on the IDS VM.
Switch to the ssh window for the IDS VM
- Run the following command from the SSH window of the IDS VM:
The log entry should be similar to this:
TEST 3: Test ingress "ICMP" rule/alert
-
Run the following command from Cloud Shell to generate INGRESS ICMP traffic.
-
Replace [PUBLIC_IP_WEB1] with the public IP address of "WEB1".
- Now, view the alert in the Suricata event log file on the IDS VM:
The log entry should be similar to this:
TEST 4: Test ingress "HTTP" rule/alert.
Using the web browser of your local workstation or curl in Cloud Shell, browse the public address assigned to WEB1 for the page index.php, using the http protocol.
- Replace [PUBLIC_IP_WEB1] with the public IP address of "WEB1".
- Now, view the alert in the Suricata event log file on the IDS VM:
The log entry should be similar to this:
Congratulations!
This completes the lab for Google Cloud Packet Mirroring use with the Open Source IDS Suricata.
Finish your quest
This self-paced lab is part of the Security & Identity Fundamentals and Networking in Google Cloud quests. A quest is a series of related labs that form a learning path. Completing a quest earns you a badge to recognize your achievement. You can make your badge or badges public and link to them in your online resume or social media account. Enroll in any quest that contains this lab and get immediate completion credit. See the Google Cloud Skills Boost catalog to see all available quests.
Take your next lab
Continue your Quest with Multiple VPC Networks, or check out these other Google Cloud Skills Boost labs:
Next Steps / Learn More
For additional information regarding Packet Mirroring, see:
For more information about Suricata, see https://suricata-ids.org/
Google Cloud training and certification
...helps you make the most of Google Cloud technologies. Our classes include technical skills and best practices to help you get up to speed quickly and continue your learning journey. We offer fundamental to advanced level training, with on-demand, live, and virtual options to suit your busy schedule. Certifications help you validate and prove your skill and expertise in Google Cloud technologies.
Manual Last Updated September 6, 2023
Lab Last Tested September 6, 2023
Copyright 2024 Google LLC All rights reserved. Google and the Google logo are trademarks of Google LLC. All other company and product names may be trademarks of the respective companies with which they are associated.