Checkpoint
Provision infrastructure
/ 50
Upload files to the bucket
/ 50
Interact with Terraform Modules
This lab was developed with our partner, Hashicorp. Your personal information may be shared with Hashicorp, the lab sponsor, if you have opted in to receive product updates, announcements, and offers in your Account Profile.
GSP751

Overview
As you manage your infrastructure with Terraform, increasingly complex configurations will be created. There is no intrinsic limit to the complexity of a single Terraform configuration file or directory, so it is possible to continue writing and updating your configuration files in a single directory. However, if you do, you may encounter one or more of the following problems:
- Understanding and navigating the configuration files will become increasingly difficult.
- Updating the configuration will become more risky, because an update to one block may cause unintended consequences to other blocks of your configuration.
- Duplication of similar blocks of configuration may increase, for example, when you configure separate dev/staging/production environments, which will cause an increasing burden when updating those parts of your configuration.
- If you want to share parts of your configuration between projects and teams, cutting and pasting blocks of configuration between projects could be error-prone and hard to maintain.
In this lab, you will learn how modules can address these problems, the structure of a Terraform module, and best practices when using and creating modules.
What are modules for?
Here are some of the ways that modules help solve the problems listed above:
-
Organize configuration: Modules make it easier to navigate, understand, and update your configuration by keeping related parts of your configuration together. Even moderately complex infrastructure can require hundreds or thousands of lines of configuration to implement. By using modules, you can organize your configuration into logical components.
-
Encapsulate configuration: Another benefit of using modules is to encapsulate configuration into distinct logical components. Encapsulation can help prevent unintended consequences—such as a change to one part of your configuration accidentally causing changes to other infrastructure—and reduce the chances of simple errors like using the same name for two different resources.
-
Re-use configuration: Writing all of your configuration without using existing code can be time-consuming and error-prone. Using modules can save time and reduce costly errors by re-using configuration written either by yourself, other members of your team, or other Terraform practitioners who have published modules for you to use. You can also share modules that you have written with your team or the general public, giving them the benefit of your hard work.
-
Provide consistency and ensure best practices: Modules also help to provide consistency in your configurations. Consistency makes complex configurations easier to understand, and it also helps to ensure that best practices are applied across all of your configuration. For example, cloud providers offer many options for configuring object storage services, such as Amazon S3 (Simple Storage Service) or Google's Cloud Storage buckets. Many high-profile security incidents have involved incorrectly secured object storage, and because of the number of complex configuration options involved, it's easy to accidentally misconfigure these services.
Using modules can help reduce these errors. For example, you might create a module to describe how all of your organization's public website buckets will be configured, and another module for private buckets used for logging applications. Also, if a configuration for a type of resource needs to be updated, using modules allows you to make that update in a single place and have it be applied to all cases where you use that module.
Objectives
In this lab, you will learn how to perform the following tasks:
- Use a module from the Registry
- Build a module
Setup and requirements
Before you click the Start Lab button
Read these instructions. Labs are timed and you cannot pause them. The timer, which starts when you click Start Lab, shows how long Google Cloud resources will be made available to you.
This hands-on lab lets you do the lab activities yourself in a real cloud environment, not in a simulation or demo environment. It does so by giving you new, temporary credentials that you use to sign in and access Google Cloud for the duration of the lab.
To complete this lab, you need:
- Access to a standard internet browser (Chrome browser recommended).
- Time to complete the lab---remember, once you start, you cannot pause a lab.
How to start your lab and sign in to the Google Cloud console
-
Click the Start Lab button. If you need to pay for the lab, a pop-up opens for you to select your payment method. On the left is the Lab Details panel with the following:
- The Open Google Cloud console button
- Time remaining
- The temporary credentials that you must use for this lab
- Other information, if needed, to step through this lab
-
Click Open Google Cloud console (or right-click and select Open Link in Incognito Window if you are running the Chrome browser).
The lab spins up resources, and then opens another tab that shows the Sign in page.
Tip: Arrange the tabs in separate windows, side-by-side.
Note: If you see the Choose an account dialog, click Use Another Account. -
If necessary, copy the Username below and paste it into the Sign in dialog.
{{{user_0.username | "Username"}}} You can also find the Username in the Lab Details panel.
-
Click Next.
-
Copy the Password below and paste it into the Welcome dialog.
{{{user_0.password | "Password"}}} You can also find the Password in the Lab Details panel.
-
Click Next.
Important: You must use the credentials the lab provides you. Do not use your Google Cloud account credentials. Note: Using your own Google Cloud account for this lab may incur extra charges. -
Click through the subsequent pages:
- Accept the terms and conditions.
- Do not add recovery options or two-factor authentication (because this is a temporary account).
- Do not sign up for free trials.
After a few moments, the Google Cloud console opens in this tab.

Activate Cloud Shell
Cloud Shell is a virtual machine that is loaded with development tools. It offers a persistent 5GB home directory and runs on the Google Cloud. Cloud Shell provides command-line access to your Google Cloud resources.
- Click Activate Cloud Shell
at the top of the Google Cloud console.
When you are connected, you are already authenticated, and the project is set to your Project_ID,
gcloud is the command-line tool for Google Cloud. It comes pre-installed on Cloud Shell and supports tab-completion.
- (Optional) You can list the active account name with this command:
- Click Authorize.
Output:
- (Optional) You can list the project ID with this command:
Output:
gcloud, in Google Cloud, refer to the gcloud CLI overview guide.
What is a Terraform module?
A Terraform module is a set of Terraform configuration files in a single directory. Even a simple configuration consisting of a single directory with one or more .tf files is a module. When you run Terraform commands directly from such a directory, it is considered the root module. So in this sense, every Terraform configuration is part of a module. You may have a simple set of Terraform configuration files like this:
In this case, when you run Terraform commands from within the minimal-module directory, the contents of that directory are considered the root module.
Calling modules
Terraform commands will only directly use the configuration files in one directory, which is usually the current working directory. However, your configuration can use module blocks to call modules in other directories. When Terraform encounters a module block, it loads and processes that module's configuration files.
A module that is called by another configuration is sometimes referred to as a "child module" of that configuration.
Local and remote modules
Modules can be loaded from either the local filesystem or a remote source. Terraform supports a variety of remote sources, including the Terraform Registry, most version control systems, HTTP URLs, and Terraform Cloud or Terraform Enterprise private module registries.
Module best practices
In many ways, Terraform modules are similar to the concepts of libraries, packages, or modules found in most programming languages, and they provide many of the same benefits. Just like almost any non-trivial computer program, real-world Terraform configurations should almost always use modules to provide the benefits mentioned above.
It is recommended that every Terraform practitioner use modules by following these best practices:
-
Start writing your configuration with a plan for modules. Even for slightly complex Terraform configurations managed by a single person, the benefits of using modules outweigh the time it takes to use them properly.
-
Use local modules to organize and encapsulate your code. Even if you aren't using or publishing remote modules, organizing your configuration in terms of modules from the beginning will significantly reduce the burden of maintaining and updating your configuration as your infrastructure grows in complexity.
-
Use the public Terraform Registry to find useful modules. This way you can quickly and confidently implement your configuration by relying on the work of others.
-
Publish and share modules with your team. Most infrastructure is managed by a team of people, and modules are an important tool that teams can use to create and maintain infrastructure. As mentioned earlier, you can publish modules either publicly or privately. You will see how to do this in a later lab in this series.
Task 1. Use modules from the Registry
In this section, you use modules from the Terraform Registry to provision an example environment in Google Cloud. The concepts you use here will apply to any modules from any source.
- Open the Terraform Registry page for the Terraform Network module in a new browser tab or window. The page will look like this:
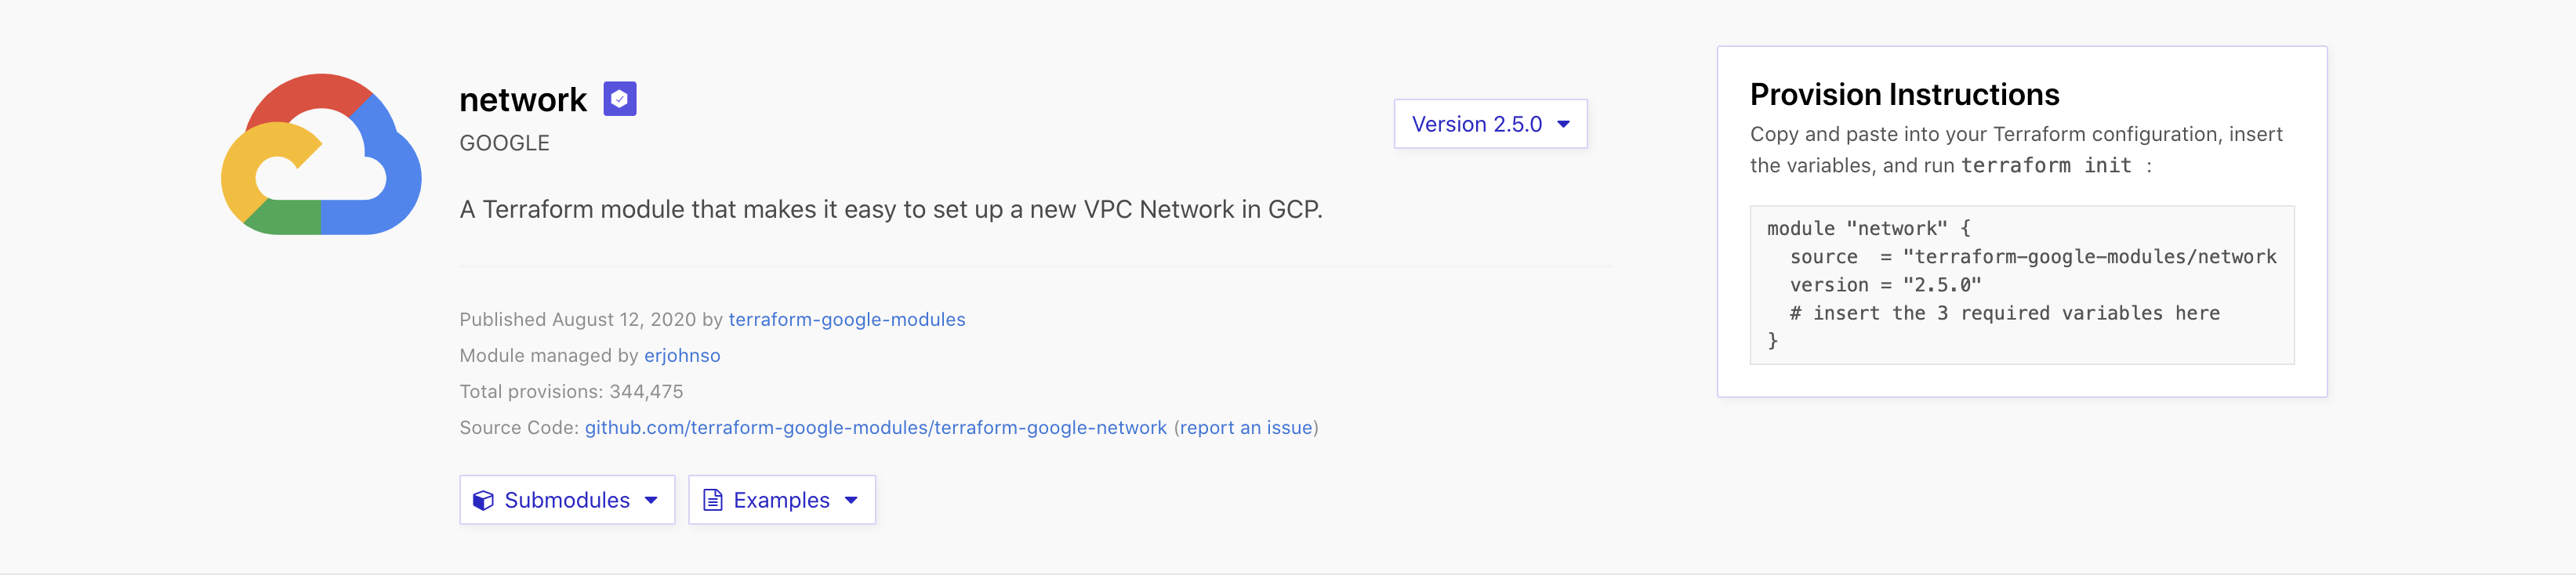
The page includes information about the module and a link to the source repository. The right side of the page includes a dropdown interface to select the module version and instructions for using the module to provision infrastructure.
When you call a module, the source argument is required. In this example, Terraform will search for a module in the Terraform Registry that matches the given string. You could also use a URL or local file path for the source of your modules. See the Terraform documentation for a list of possible module sources.
The other argument shown here is the version. For supported sources, the version will let you define what version or versions of the module will be loaded. In this lab, you will specify an exact version number for the modules you use. You can read about more ways to specify versions in the module documentation.
Other arguments to module blocks are treated as input variables to the modules.
Create a Terraform configuration
- To start, run the following commands in Cloud Shell to clone the example simple project from the Google Terraform modules GitHub repository and switch to the
v6.0.1branch:
This ensures that you're using the correct version number.
-
On the Cloud Shell toolbar, click Open Editor. To switch between Cloud Shell and the code editor, click Open Editor or Open Terminal as required, or click Open in a new window to leave the Editor open in a separate tab.
-
In the editor, navigate to
terraform-google-network/examples/simple_project, and open themain.tffile. Yourmain.tfconfiguration will look like this:
This configuration includes one important block:
-
module "test-vpc-module"defines a Virtual Private Cloud (VPC), which will provide networking services for the rest of your infrastructure.
Set values for module input variables
Some input variables are required, which means that the module doesn't provide a default value; an explicit value must be provided in order for Terraform to run correctly.
-
Within the module
"test-vpc-module"block, review the input variables you are setting. Each of these input variables is documented in the Terraform Registry. The required inputs for this module are:-
network_name: The name of the network being created -
project_id: The ID of the project where this VPC will be created -
subnets: The list of subnets being created
-
In order to use most modules, you will need to pass input variables to the module configuration. The configuration that calls a module is responsible for setting its input values, which are passed as arguments to the module block. Aside from source and version, most of the arguments to a module block will set variable values.
On the Terraform Registry page for the Google Cloud network module, an Inputs tab describes all of the input variables that module supports.
Define root input variables
Using input variables with modules is very similar to how you use variables in any Terraform configuration. A common pattern is to identify which module input variables you might want to change in the future, and then create matching variables in your configuration's variables.tf file with sensible default values. Those variables can then be passed to the module block as arguments.
- To retrieve your Project ID, run the following command in Cloud Shell:
-
In the Editor, still in the same directory, navigate to
variables.tf. -
Fill in the variable
project_idwith the output of the previous command. You must follow the format below and set thedefaultvalue for the variable:
- In
variables.tf, add in the variablenetwork_name. You can use the nameexample-vpcor any other name you'd like. You must follow the format below and set thedefaultvalue for the variable:
- Back in the
main.tffile, update thenetwork_nameparameter to use the variable you just defined by setting the value tovar.network_name.
- In the
main.tffile, update the subnet regions on lines 35, 40, and 47 fromus-west1to. This will ensure that the subnets are created in your project's allowed region. Your module should resemble the following:
Define root output values
Modules also have output values, which are defined within the module with the output keyword. You can access them by referring to module.<MODULE NAME>.<OUTPUT NAME>. Like input variables, module outputs are listed under the outputs tab in the Terraform Registry.
Module outputs are usually either passed to other parts of your configuration or defined as outputs in your root module. You will see both uses in this lab.
- Navigate to the
outputs.tffile inside of your configuration's directory. Verify that the file contains the following:
Provision infrastructure
- In Cloud Shell, navigate to your
simple_projectdirectory:
- Initialize your Terraform configuration:
- Create your VPC:
- To apply the changes and continue, respond to the prompt with yes.
Great! You've just used your first module. Your configuration's output should look like this:
Understand how modules work
When using a new module for the first time, you must run either terraform init or terraform get to install the module. When either of these commands is run, Terraform will install any new modules in the .terraform/modules directory within your configuration's working directory. For local modules, Terraform will create a symlink to the module's directory. Because of this, any changes to local modules will be effective immediately, without your having to re-run terraform get.
Clean up your infrastructure
Now you have seen how to use modules from the Terraform Registry, how to configure those modules with input variables, and how to get output values from those modules.
- Destroy the infrastructure you created:
-
Respond to the prompt with
yes. Terraform will destroy the infrastructure you created. -
Once you've destroyed your resourced, delete the
terraform-google-networkfolder.
Click Check my progress to verify the objective.
Task 2. Build a module
In the last task, you used a module from the Terraform Registry to create a VPC network in Google Cloud. Although using existing Terraform modules correctly is an important skill, every Terraform practitioner will also benefit from learning how to create modules. We recommend that you create every Terraform configuration with the assumption that it may be used as a module, because this will help you design your configurations to be flexible, reusable, and composable.
As you may already know, Terraform treats every configuration as a module. When you run terraform commands, or use Terraform Cloud or Terraform Enterprise to remotely run Terraform, the target directory containing Terraform configuration is treated as the root module.
In this task, you create a module to manage Compute Storage buckets used to host static websites.
Module structure
Terraform treats any local directory referenced in the source argument of a module block as a module. A typical file structure for a new module is:
.tf file or use any other file structure you like.
Each of these files serves a purpose:
-
LICENSEcontains the license under which your module will be distributed. When you share your module, the LICENSE file will let people using it know the terms under which it has been made available. Terraform itself does not use this file. -
README.mdcontains documentation in markdown format that describes how to use your module. Terraform does not use this file, but services like the Terraform Registry and GitHub will display the contents of this file to visitors to your module's Terraform Registry or GitHub page. -
main.tfcontains the main set of configurations for your module. You can also create other configuration files and organize them in a way that makes sense for your project. -
variables.tfcontains the variable definitions for your module. When your module is used by others, the variables will be configured as arguments in the module block. Because all Terraform values must be defined, any variables that don't have a default value will become required arguments. A variable with a default value can also be provided as a module argument, thus overriding the default value. -
outputs.tfcontains the output definitions for your module. Module outputs are made available to the configuration using the module, so they are often used to pass information about the parts of your infrastructure defined by the module to other parts of your configuration.
Be aware of these files and ensure that you don't distribute them as part of your module:
-
terraform.tfstateandterraform.tfstate.backupfiles contain your Terraform state and are how Terraform keeps track of the relationship between your configuration and the infrastructure provisioned by it. - The
.terraformdirectory contains the modules and plugins used to provision your infrastructure. These files are specific to an individual instance of Terraform when provisioning infrastructure, not the configuration of the infrastructure defined in.tffiles. -
*.tfvarsfiles don't need to be distributed with your module unless you are also using it as a standalone Terraform configuration because module input variables are set via arguments to the module block in your configuration.
Create a module
Navigate to your home directory and create your root module by constructing a new main.tf configuration file. Then create a directory called modules that contains another folder called gcs-static-website-bucket. You will work with three Terraform configuration files inside the gcs-static-website-bucket directory: website.tf, variables.tf, and outputs.tf.
- Create the directory for your new module:
- Navigate to the module directory and run the following commands to create three empty files:
- Inside the
gcs-static-website-bucketdirectory, run the following command to create a file calledREADME.mdwith the following content:
- Create another file called
LICENSEwith the following content:
Your current module directory structure should now look like this:
- Add this Cloud Storage bucket resource to your
website.tffile inside themodules/gcs-static-website-bucketdirectory:
The provider documentation is GitHub.
- Navigate to the
variables.tffile in your module and add the following code:
- Add an output to your module in the
outputs.tffile inside your module:
Like variables, outputs in modules perform the same function as they do in the root module but are accessed in a different way. A module's outputs can be accessed as read-only attributes on the module object, which is available within the configuration that calls the module.
- Return to the
main.tfin your root directory and add a reference to the new module:
- In your root directory, create an
outputs.tffile for your root module:
- Add the following code in the
outputs.tffile:
- In your root directory, create a
variables.tffile:
- Add the following code to the
variables.tffile. Set the variablesproject_idandnameto default to your Project ID:.
Install the local module
Whenever you add a new module to a configuration, Terraform must install the module before it can be used. Both the terraform get and terraform init commands will install and update modules. The terraform init command will also initialize backends and install plugins.
- Install the module:
- Provision your bucket:
- Respond yes to the prompt. Your bucket and other resources will be provisioned.
Upload files to the bucket
You have now configured and used your own module to create a static website. You may want to visit this static website. Right now there is nothing inside your bucket, so there is nothing to see at the website. In order to see any content, you will need to upload objects to your bucket. You can upload the contents of the www directory in the GitHub repository.
- Download the sample contents to your home directory:
- Copy the files over to the bucket, replacing
YOUR-BUCKET-NAMEwith the name of your storage bucket:
- In a new tab in your browser, go to the website
https://storage.cloud.google.com/YOUR-BUCKET-NAME/index.html, replacingYOUR-BUCKET-NAMEwith the name of your storage bucket.
You should see a basic HTML web page that says Nothing to see here.
Click Check my progress to verify the objective.
Clean up the website and infrastructure
Lastly, you will clean up your project by destroying the infrastructure you just created.
- Destroy your Terraform resources:
After you respond to the prompt with yes, Terraform will destroy all of the resources you created by following this lab.
Congratulations!
In this lab, you learned the foundations of Terraform modules and how to use a pre-existing module from the Registry. You then built your own module to create a static website hosted on a Cloud Storage bucket. In doing so, you defined inputs, outputs, and variables for your configuration files and learned the best-practices for building modules.
Next steps/Learn More
These links provide more hands-on practice with Terraform:
- Hashicorp on the Google Cloud Marketplace!
- Hashicorp Learn
- Terraform Community
- Terraform Google Examples
Google Cloud training and certification
...helps you make the most of Google Cloud technologies. Our classes include technical skills and best practices to help you get up to speed quickly and continue your learning journey. We offer fundamental to advanced level training, with on-demand, live, and virtual options to suit your busy schedule. Certifications help you validate and prove your skill and expertise in Google Cloud technologies.
Manual Last Updated January 26, 2024
Lab Last Tested December 11, 2023
Copyright 2024 Google LLC All rights reserved. Google and the Google logo are trademarks of Google LLC. All other company and product names may be trademarks of the respective companies with which they are associated.