Checkpoints
Working with Backends
/ 100
Managing Terraform State
This lab was developed with our partner, Hashicorp. Your personal information may be shared with Hashicorp, the lab sponsor, if you have opted-in to receive product updates, announcements, and offers in your Account Profile.
GSP752

Overview
Terraform must store the state about your managed infrastructure and configuration. This state is used by Terraform to map real-world resources to your configuration, keep track of metadata, and improve performance for large infrastructures.
This state is stored by default in a local file named terraform.tfstate, but it can also be stored remotely, which works better in a team environment.
Terraform uses this local state to create plans and make changes to your infrastructure. Before any operation, Terraform does a refresh to update the state with the real infrastructure.
The primary purpose of Terraform state is to store bindings between objects in a remote system and resource instances declared in your configuration. When Terraform creates a remote object in response to a change of configuration, it will record the identity of that remote object against a particular resource instance and then potentially update or delete that object in response to future configuration changes.
Objectives
In this lab, you will learn how to perform the following tasks:
- Create a local backend.
- Create a Cloud Storage backend.
- Refresh your Terraform state.
- Import a Terraform configuration.
- Manage the imported configuration with Terraform.
Setup and requirements
Before you click the Start Lab button
Read these instructions. Labs are timed and you cannot pause them. The timer, which starts when you click Start Lab, shows how long Google Cloud resources will be made available to you.
This hands-on lab lets you do the lab activities yourself in a real cloud environment, not in a simulation or demo environment. It does so by giving you new, temporary credentials that you use to sign in and access Google Cloud for the duration of the lab.
To complete this lab, you need:
- Access to a standard internet browser (Chrome browser recommended).
- Time to complete the lab---remember, once you start, you cannot pause a lab.
How to start your lab and sign in to the Google Cloud console
-
Click the Start Lab button. If you need to pay for the lab, a pop-up opens for you to select your payment method. On the left is the Lab Details panel with the following:
- The Open Google Cloud console button
- Time remaining
- The temporary credentials that you must use for this lab
- Other information, if needed, to step through this lab
-
Click Open Google Cloud console (or right-click and select Open Link in Incognito Window if you are running the Chrome browser).
The lab spins up resources, and then opens another tab that shows the Sign in page.
Tip: Arrange the tabs in separate windows, side-by-side.
Note: If you see the Choose an account dialog, click Use Another Account. -
If necessary, copy the Username below and paste it into the Sign in dialog.
{{{user_0.username | "Username"}}} You can also find the Username in the Lab Details panel.
-
Click Next.
-
Copy the Password below and paste it into the Welcome dialog.
{{{user_0.password | "Password"}}} You can also find the Password in the Lab Details panel.
-
Click Next.
Important: You must use the credentials the lab provides you. Do not use your Google Cloud account credentials. Note: Using your own Google Cloud account for this lab may incur extra charges. -
Click through the subsequent pages:
- Accept the terms and conditions.
- Do not add recovery options or two-factor authentication (because this is a temporary account).
- Do not sign up for free trials.
After a few moments, the Google Cloud console opens in this tab.

Activate Cloud Shell
Cloud Shell is a virtual machine that is loaded with development tools. It offers a persistent 5GB home directory and runs on the Google Cloud. Cloud Shell provides command-line access to your Google Cloud resources.
- Click Activate Cloud Shell
at the top of the Google Cloud console.
When you are connected, you are already authenticated, and the project is set to your Project_ID,
gcloud is the command-line tool for Google Cloud. It comes pre-installed on Cloud Shell and supports tab-completion.
- (Optional) You can list the active account name with this command:
- Click Authorize.
Output:
- (Optional) You can list the project ID with this command:
Output:
gcloud, in Google Cloud, refer to the gcloud CLI overview guide.
Purpose of Terraform state
State is a necessary requirement for Terraform to function. People sometimes ask whether Terraform can work without state or not use state and just inspect cloud resources on every run. In the scenarios where Terraform may be able to get away without state, doing so would require shifting massive amounts of complexity from one place (state) to another place (the replacement concept). This section will help explain why Terraform state is required.
Mapping to the real world
Terraform requires some sort of database to map Terraform config to the real world. When your configuration contains a resource resource "google_compute_instance" "foo", Terraform uses this map to know that instance i-abcd1234 is represented by that resource.
Terraform expects that each remote object is bound to only one resource instance, which is normally guaranteed because Terraform is responsible for creating the objects and recording their identities in the state. If you instead import objects that were created outside of Terraform, you must verify that each distinct object is imported to only one resource instance.
If one remote object is bound to two or more resource instances, Terraform may take unexpected actions against those objects because the mapping from configuration to the remote object state has become ambiguous.
Metadata
In addition to tracking the mappings between resources and remote objects, Terraform must also track metadata such as resource dependencies.
Terraform typically uses the configuration to determine dependency order. However, when you remove a resource from a Terraform configuration, Terraform must know how to delete that resource. Terraform can see that a mapping exists for a resource that is not in your configuration file and plan to destroy. However, because the resource no longer exists, the order cannot be determined from the configuration alone.
To ensure correct operation, Terraform retains a copy of the most recent set of dependencies within the state. Now Terraform can still determine the correct order for destruction from the state when you delete one or more items from the configuration.
This could be avoided if Terraform knew a required ordering between resource types. For example, Terraform could know that servers must be deleted before the subnets they are a part of. The complexity for this approach quickly becomes unmanageable, however: in addition to understanding the ordering semantics of every resource for every cloud, Terraform must also understand the ordering across providers.
Terraform also stores other metadata for similar reasons, such as a pointer to the provider configuration that was most recently used with the resource in situations where multiple aliased providers are present.
Performance
In addition to basic mapping, Terraform stores a cache of the attribute values for all resources in the state. This is an optional feature of Terraform state and is used only as a performance improvement.
When running a terraform plan, Terraform must know the current state of resources in order to effectively determine the changes needed to reach your desired configuration.
For small infrastructures, Terraform can query your providers and sync the latest attributes from all your resources. This is the default behavior of Terraform: for every plan and apply, Terraform will sync all resources in your state.
For larger infrastructures, querying every resource is too slow. Many cloud providers do not provide APIs to query multiple resources at the same time, and the round trip time for each resource is hundreds of milliseconds. In addition, cloud providers almost always have API rate limiting, so Terraform can only request a limited number of resources in a period of time. Larger users of Terraform frequently use both the -refresh=false flag and the -target flag in order to work around this. In these scenarios, the cached state is treated as the record of truth.
Syncing
In the default configuration, Terraform stores the state in a file in the current working directory where Terraform was run. This works when you are getting started, but when Terraform is used in a team, it is important for everyone to be working with the same state so that operations will be applied to the same remote objects.
Remote state is the recommended solution to this problem. With a fully featured state backend, Terraform can use remote locking as a measure to avoid multiple different users accidentally running Terraform at the same time; this ensures that each Terraform run begins with the most recent updated state.
State locking
If supported by your backend, Terraform will lock your state for all operations that could write state. This prevents others from acquiring the lock and potentially corrupting your state.
State locking happens automatically on all operations that could write state. You won't see any message that it is happening. If state locking fails, Terraform will not continue. You can disable state locking for most commands with the -lock flag, but it is not recommended.
If acquiring the lock is taking longer than expected, Terraform will output a status message. If Terraform doesn't output a message, state locking is still occurring.
Not all backends support locking. View the list of backend types for details on whether a backend supports locking.
Workspaces
Each Terraform configuration has an associated backend that defines how operations are executed and where persistent data such as the Terraform state is stored.
The persistent data stored in the backend belongs to a workspace. Initially the backend has only one workspace, called default, and thus only one Terraform state is associated with that configuration.
Certain backends support multiple named workspaces, which allows multiple states to be associated with a single configuration. The configuration still has only one backend, but multiple distinct instances of that configuration can be deployed without configuring a new backend or changing authentication credentials
Task 1. Working with backends
A backend in Terraform determines how state is loaded and how an operation such as apply is executed. This abstraction enables non-local file state storage, remote execution, etc.
By default, Terraform uses the "local" backend, which is the normal behavior of Terraform you're used to. This is the backend that was being invoked throughout the previous labs.
Here are some of the benefits of backends:
- Working in a team: Backends can store their state remotely and protect that state with locks to prevent corruption. Some backends, such as Terraform Cloud, even automatically store a history of all state revisions.
- Keeping sensitive information off disk: State is retrieved from backends on demand and only stored in memory.
-
Remote operations: For larger infrastructures or certain changes,
terraform applycan take a long time. Some backends support remote operations, which enable the operation to execute remotely. You can then turn off your computer, and your operation will still complete. Combined with remote state storage and locking (described above), this also helps in team environments.
Backends are completely optional: You can successfully use Terraform without ever having to learn or use backends. However, they do solve pain points that afflict teams at a certain scale. If you're working as an individual, you can probably succeed without ever using backends.
Even if you only intend to use the "local" backend, it may be useful to learn about backends because you can also change the behavior of the local backend.
Add a local backend
In this section, you will configure a local backend.
When configuring a backend for the first time (moving from no defined backend to explicitly configuring one), Terraform will give you the option to migrate your state to the new backend. This lets you adopt backends without losing any existing state.
To be extra careful, we always recommend that you also manually back up your state. You can do this by simply copying your terraform.tfstate file to another location. The initialization process should also create a backup, but it never hurts to be safe!
Configuring a backend for the first time is no different from changing a configuration in the future: create the new configuration and run terraform init. Terraform will guide you the rest of the way.
- In a new Cloud Shell window, create your
main.tfconfiguration file:
- To retrieve your Project ID, run the following command:
- On the Cloud Shell toolbar, click Open Editor. To switch between Cloud Shell and the code editor, click Open Editor or Open Terminal as required, or click Open in new window to leave the Editor open in a separate tab.
- Copy the Cloud Storage bucket resource code into your
main.tfconfiguration file, replacing theprojectandnamevariable definitions with your Project ID:
Learn more about Cloud Storage resources from the Terraform Documentation.
- Add a local backend to your
main.tffile:
This will reference a terraform.tfstate file in the terraform/state directory. To specify a different file path, change the path variable.
The local backend stores state on the local filesystem, locks that state using system APIs, and performs operations locally.
Terraform must initialize any configured backend before use. To do this, you will run terraform init. The terraform init command should be run by any member of your team on any Terraform configuration as a first step. It is safe to execute multiple times and performs all the setup actions required for a Terraform environment, including initializing the backend.
The init command must be called:
- On any new environment that configures a backend
- On any change of the backend configuration (including type of backend)
- On removing backend configuration completely
You don't need to remember these exact cases. Terraform will detect when initialization is required and present an error message in that situation. Terraform doesn't auto-initialize because it might require additional information from the user or perform state migrations, etc.
- On the Cloud Shell toolbar, click Open Terminal, then initialize Terraform:
- Apply the changes. Type yes at the prompt to confirm:
The Cloud Shell Editor should now display the state file called terraform.tfstate in the terraform/state directory.
- Examine your state file:
Your google_storage_bucket.test-bucket-for-state resource should be displayed.
Add a Cloud Storage backend
A Cloud Storage backend stores the state as an object in a configurable prefix in a given bucket on Cloud Storage. This backend also supports state locking. This will lock your state for all operations that could write state. This prevents others from acquiring the lock and potentially corrupting your state.
State locking happens automatically on all operations that could write state. You won't see any message that it is happening. If state locking fails, Terraform will not continue. You can disable state locking for most commands with the -lock flag, but this is not recommended.
-
Navigate back to your
main.tffile in the editor. You will now replace the current local backend with agcsbackend. -
To change the existing local backend configuration, copy the following configuration into your file, replacing the
localbackend:
bucket. If you didn't change the configuration, it will be the name from the google_storage_bucket resource. This bucket will be used to host the state file.
- Initialize your backend again, this time to automatically migrate the state:
Type yes at the prompt to confirm.
-
In the Cloud Console, in the Navigation menu, click Cloud Storage > Buckets.
-
Click on your bucket and navigate to the file
terraform/state/default.tfstate. Your state file now exists in a Cloud Storage bucket!
Refresh the state
The terraform refresh command is used to reconcile the state Terraform knows about (via its state file) with the real-world infrastructure. This can be used to detect any drift from the last-known state and to update the state file.
This does not modify infrastructure, but does modify the state file. If the state is changed, this may cause changes to occur during the next plan or apply.
-
Return to your storage bucket in the Cloud Console. Select the check box next to the name.
-
Click the Labels tab.
-
Click Add Label. Set the Key 1 =
keyand Value 1 =value. -
Click Save.
-
Return to Cloud Shell and use the following command to update the state file:
- Examine the updates:
The "key" = "value" key-value pair should be displayed in the labels attribute of the configuration.
Click Check my progress to verify the objective.
Clean up your workspace
Before continuing to the next task, destroy your provisioned infrastructure.
- First, revert your backend to
localso you can delete the storage bucket. Copy and replace thegcsconfiguration with the following:
- Initialize the
localbackend again:
Type yes at the prompt to confirm.
- In the
main.tffile, add theforce_destroy = trueargument to yourgoogle_storage_bucketresource. When you delete a bucket, this boolean option will delete all contained objects. If you try to delete a bucket that contains objects, Terraform will fail that run. Your resource configuration should resemble the following:
- Apply the changes:
Type yes at the prompt to confirm.
- You can now successfully destroy your infrastructure:
Type yes at the prompt to confirm.
Task 2. Import Terraform configuration
In this section, you will import an existing Docker container and image into an empty Terraform workspace. By doing so, you will learn strategies and considerations for importing real-world infrastructure into Terraform.
The default Terraform workflow involves creating and managing infrastructure entirely with Terraform.
-
Write a Terraform configuration that defines the infrastructure you want to create.
-
Review the Terraform plan to ensure that the configuration will result in the expected state and infrastructure.
-
Apply the configuration to create your Terraform state and infrastructure.

After you create infrastructure with Terraform, you can update the configuration and plan and apply those changes. Eventually you will use Terraform to destroy the infrastructure when it is no longer needed. This workflow assumes that Terraform will create an entirely new infrastructure.
However, you may need to manage infrastructure that wasn’t created by Terraform. Terraform import solves this problem by loading supported resources into your Terraform workspace’s state.
The import command doesn’t automatically generate the configuration to manage the infrastructure, though. Because of this, importing existing infrastructure into Terraform is a multi-step process.
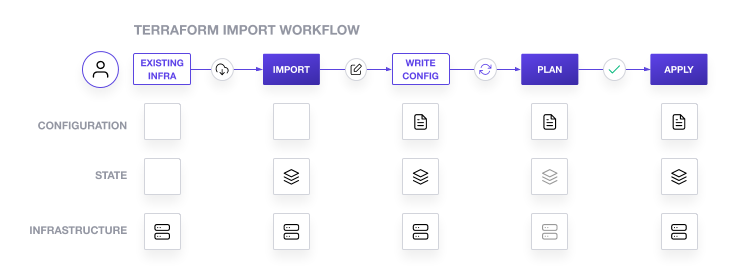
Bringing existing infrastructure under Terraform’s control involves five main steps:
- Identify the existing infrastructure to be imported.
- Import the infrastructure into your Terraform state.
- Write a Terraform configuration that matches that infrastructure.
- Review the Terraform plan to ensure that the configuration matches the expected state and infrastructure.
- Apply the configuration to update your Terraform state.
In this section, first you will create a Docker container with the Docker CLI. Next, you will import it into a new Terraform workspace. Then you will update the container’s configuration using Terraform before finally destroying it when you are done.
terraform.tfstate file and .terraform directory before using Terraform import on a real Terraform project, and store them securely.
Create a Docker container
- Create a container named
hashicorp-learnusing the latest NGINX image from Docker Hub, and preview the container on the Cloud Shell virtual machine over port 80 (HTTP):
- Verify that the container is running:
- In the Cloud Shell pane, click Web Preview, and then click Preview on port 8080.
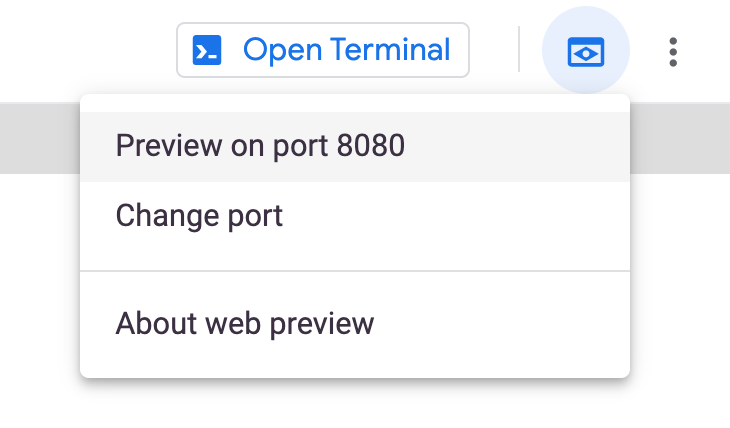
Cloud Shell opens the preview URL on its proxy service in a new browser window and displays the NGINX default index page. Now you have a Docker image and container to import into your workspace and manage with Terraform.
Import the container into Terraform
- Clone the example repository:
- Change into that directory:
This directory contains two Terraform configuration files that make up the configuration you will use in this guide:
-
main.tffile configures the Docker provider. -
docker.tffile will contain the configuration necessary to manage the Docker container you created in an earlier step.
- Initialize your Terraform workspace:
terraform init -upgrade
-
In the Cloud Shell Editor, navigate to
learn-terraform-import/main.tf. -
Find the
provider: dockerresource and comment out or delete thehostargument:
-
Next, navigate to
learn-terraform-import/docker.tf. -
Under the commented-out code, define an empty
docker_containerresource in yourdocker.tffile, which represents a Docker container with the Terraform resource IDdocker_container.web:
- Find the name of the container you want to import: in this case, the container you created in the previous step:
- Run the following
terraform importcommand to attach the existing Docker container to thedocker_container.webresource you just created. Terraform import requires this Terraform resource ID and the full Docker container ID. The commanddocker inspect -f {{.ID}} hashicorp-learnreturns the full SHA256 container ID:
terraform import varies by resource type and is documented in the provider documentation for any resource that can be imported to Terraform. For this example, consult the Docker provider documentation
- Verify that the container has been imported into your Terraform state:
This state contains everything that Terraform knows about the Docker container you just imported. However, Terraform import does not create the configuration for the resource.
Create configuration
You’ll need to create Terraform configuration before you can use Terraform to manage this container.
- Run the following code:
image and name. Terraform cannot generate a plan for a resource that is missing required arguments.
There are two approaches to update the configuration in docker.tf to match the state you imported. You can either accept the entire current state of the resource into your configuration as-is or select the required attributes into your configuration individually. Each of these approaches can be useful in different circumstances.
-
Using the current state is often faster, but can result in an overly verbose configuration because every attribute is included in the state, whether it is necessary to include in your configuration or not.
-
Individually selecting the required attributes can lead to more manageable configuration, but requires you to understand which attributes need to be set in the configuration.
For this lab's purposes, you will use the current state as the resource.
- Copy your Terraform state into your
docker.tffile:
> symbol will replace the entire contents of docker.tf with the output of the terraform show command. Although this works for this example, importing a resource into a configuration that already manages resources will require you to edit the output of terraform show to remove existing resources whose configuration you do not want to replace completely and merge the new resources into your existing configuration.
-
Inspect the
docker.tffile to see that its contents have been replaced with the output of the terraform show command you just ran. -
Run the following code:
Terraform will show warnings and errors about a deprecated argument ('links'), and several read-only arguments (ip_address, network_data, gateway, ip_prefix_length, id).
These read-only arguments are values that Terraform stores in its state for Docker containers but that it cannot set via configuration because they are managed internally by Docker. Terraform can set the links argument with configuration, but still displays a warning because it is deprecated and might not be supported by future versions of the Docker provider.
Because the approach shown here loads all of the attributes represented in Terraform state, your configuration includes optional attributes whose values are the same as their defaults. Which attributes are optional, and their default values, will vary from provider to provider, and are listed in the provider documentation.
- You can now selectively remove these optional attributes. Remove all of these attributes, keeping only the required attributes:
image,name, andports. After removing these optional attributes, your configuration should match the following:
When importing real infrastructure, consult the provider documentation to learn what each argument does. This will help you to determine how to handle any errors or warnings from the plan step. For instance, the documentation for the links argument is in the Docker provider documentation.
- Verify that the errors have been resolved:
The plan should now execute successfully. Notice that the plan indicates that Terraform will update the container to add the attach, logs, must_run, and start attributes.
Terraform uses these attributes to create Docker containers, but Docker doesn’t store them. As a result, terraform import didn’t load their values into state. When you plan and apply your configuration, the Docker provider will assign the default values for these attributes and save them in state, but they won’t affect the running container.
- Apply the changes and finish the process of syncing your updated Terraform configuration and state with the Docker container they represent. Type yes at the prompt to confirm.
Now your configuration file, Terraform state, and the container are all in sync, and you can use Terraform to manage the Terraform container as you normally would.
Create image resource
In some cases, you can bring resources under Terraform's control without using the terraform import command. This is often the case for resources that are defined by a single unique ID or tag, such as Docker images.
In your docker.tf file, the docker_container.web resource specifies the SHA256 hash ID of the image used to create the container. This is how docker stores the image ID internally, and so terraform import loaded the image ID directly into your state. However the image ID is not as human readable as the image tag or name, and it may not match your intent. For example, you might want to use the latest version of the "nginx" image.
- To retrieve the image's tag name, run the following command, replacing
<IMAGE-ID>with the image ID fromdocker.tf:
- Add the following configuration to your
docker.tffile to represent this image as a resource:
docker_container.web resource yet, or Terraform will destroy and recreate your container. Because Terraform hasn’t loaded the docker_image.nginx resource into state yet, it does not have an image ID to compare with the hardcoded one, which will cause Terraform to assume the container must be replaced. To work around this situation, create the image first, and then update the container to use it, as shown in this lab.
- Create an image resource in state:
Now that Terraform has created a resource for the image, you can reference it in your container’s configuration.
- Change the image value for
docker_container.webto reference the new image resource:
- Look for changes:
Because docker_image.nginx.latest will match the hardcoded image ID you replaced, running terraform apply at this point will show no changes.
Manage the container with Terraform
Now that Terraform manages the Docker container, use Terraform to change the configuration.
- In your
docker.tffile, change the container's external port from8080to8081:
- Apply the change:
Type yes at the prompt to confirm.
This will cause Terraform to destroy and recreate the container with the new port configuration.
- Verify that the container has been replaced with a new one with the new configuration:
Notice that the container ID has changed. Because changing the port configuration required destroying and recreating it, this is a completely new container.
Destroy infrastructure
You have now imported your Docker container and the image used to create it into Terraform.
- Destroy the container and image:
Type yes at the prompt to confirm.
- Validate that the container was destroyed:
Limitations and other considerations
There are several important things to consider when importing resources into Terraform.
Terraform import can only know the current state of infrastructure as reported by the Terraform provider. It does not know:
- Whether the infrastructure is working correctly.
- The intent of the infrastructure.
- Changes you've made to the infrastructure that aren't controlled by Terraform; for example, the state of a Docker container's filesystem.
Importing involves manual steps which can be error-prone, especially if the person importing resources lacks the context of how and why those resources were created originally.
Importing manipulates the Terraform state file; you may want to create a backup before importing new infrastructure.
Terraform import doesn’t detect or generate relationships between infrastructure.
Terraform doesn’t detect default attributes that don’t need to be set in your configuration.
Not all providers and resources support Terraform import.
Importing infrastructure into Terraform does not mean that it can be destroyed and recreated by Terraform. For example, the imported infrastructure could rely on other unmanaged infrastructure or configuration.
Following infrastructure as code (IaC) best practices such as immutable infrastructure can help prevent many of these problems, but infrastructure created manually is unlikely to follow IaC best practices.
Tools such as Terraformer can automate some manual steps associated with importing infrastructure. However, these tools are not part of Terraform itself and are not endorsed or supported by HashiCorp.
Congratulations!
In this lab, you learned how to manage backends and state with Terraform. You created local and Cloud Storage backends to manage your state file, refreshed your state, and imported configuration into Terraform. You then updated the configuration and manually edited to fully manage the Docker container with Terraform.
Next steps / Learn more
Be sure to check out the following to receive more hands-on practice with Terraform:
- Hashicorp on the Google Cloud Marketplace!
- Hashicorp Learn
- Terraform Community
- Terraform Google Examples
Google Cloud training and certification
...helps you make the most of Google Cloud technologies. Our classes include technical skills and best practices to help you get up to speed quickly and continue your learning journey. We offer fundamental to advanced level training, with on-demand, live, and virtual options to suit your busy schedule. Certifications help you validate and prove your skill and expertise in Google Cloud technologies.
Manual Last Updated January 26, 2024
Lab Last Tested December 11, 2023
Copyright 2024 Google LLC All rights reserved. Google and the Google logo are trademarks of Google LLC. All other company and product names may be trademarks of the respective companies with which they are associated.