Checkpoint
Deploying an API backend
/ 10
Test the API Backend
/ 10
Creating a gateway
/ 20
Securing access by using an API Key
/ 20
Create and deploy a new API config to your existing gateway
/ 20
Testing API call using API Key
/ 20
API Gateway: Qwik Start
GSP872

Overview
API Gateway enables you to provide secure access to your services through a well-defined REST API that is consistent across all of your services, regardless of service implementation. A consistent API:
- Makes it easy for app developers to consume your services.
- Enables you to change the backend service implementation without affecting the public API.
- Enables you to take advantage of the scaling, monitoring, and security features built into the Google Cloud.
In this lab, you will deploy an API on API Gateway to secure traffic to a backend service.
Setup and requirements
Before you click the Start Lab button
Read these instructions. Labs are timed and you cannot pause them. The timer, which starts when you click Start Lab, shows how long Google Cloud resources will be made available to you.
This hands-on lab lets you do the lab activities yourself in a real cloud environment, not in a simulation or demo environment. It does so by giving you new, temporary credentials that you use to sign in and access Google Cloud for the duration of the lab.
To complete this lab, you need:
- Access to a standard internet browser (Chrome browser recommended).
- Time to complete the lab---remember, once you start, you cannot pause a lab.
How to start your lab and sign in to the Google Cloud console
-
Click the Start Lab button. If you need to pay for the lab, a pop-up opens for you to select your payment method. On the left is the Lab Details panel with the following:
- The Open Google Cloud console button
- Time remaining
- The temporary credentials that you must use for this lab
- Other information, if needed, to step through this lab
-
Click Open Google Cloud console (or right-click and select Open Link in Incognito Window if you are running the Chrome browser).
The lab spins up resources, and then opens another tab that shows the Sign in page.
Tip: Arrange the tabs in separate windows, side-by-side.
Note: If you see the Choose an account dialog, click Use Another Account. -
If necessary, copy the Username below and paste it into the Sign in dialog.
{{{user_0.username | "Username"}}} You can also find the Username in the Lab Details panel.
-
Click Next.
-
Copy the Password below and paste it into the Welcome dialog.
{{{user_0.password | "Password"}}} You can also find the Password in the Lab Details panel.
-
Click Next.
Important: You must use the credentials the lab provides you. Do not use your Google Cloud account credentials. Note: Using your own Google Cloud account for this lab may incur extra charges. -
Click through the subsequent pages:
- Accept the terms and conditions.
- Do not add recovery options or two-factor authentication (because this is a temporary account).
- Do not sign up for free trials.
After a few moments, the Google Cloud console opens in this tab.

Activate Cloud Shell
Cloud Shell is a virtual machine that is loaded with development tools. It offers a persistent 5GB home directory and runs on the Google Cloud. Cloud Shell provides command-line access to your Google Cloud resources.
- Click Activate Cloud Shell
at the top of the Google Cloud console.
When you are connected, you are already authenticated, and the project is set to your Project_ID,
gcloud is the command-line tool for Google Cloud. It comes pre-installed on Cloud Shell and supports tab-completion.
- (Optional) You can list the active account name with this command:
- Click Authorize.
Output:
- (Optional) You can list the project ID with this command:
Output:
gcloud, in Google Cloud, refer to the gcloud CLI overview guide.
Set the region
Set the project region for this lab:
Enable the required APIs
-
In the Cloud Console, on the Navigation menu (
) click APIs & Services > Library.
-
Start typing "api gateway" in the Search bar, then select the API Gateway API tile.
-
Now click the Enable button on the next screen.
Task 1. Deploying an API backend
API Gateway sits in front of a deployed backend service and handles all incoming requests. In this lab, API Gateway routes incoming calls to a Cloud Function backend named helloGET that contains the function shown below:
- In Cloud Console, clone the Cloud Function sample repository:
- Change to the directory that contains the Cloud Functions sample code:
3.To deploy the function with an HTTP trigger, run the following command in the directory containing your function:
Click Check my progress to verify the objective.
Task 2. Test the API backend
- When the function finishes deploying, take note of the
httpsTrigger's url property or find it using the following command:
The output should look similar to the URL below where PROJECT_ID is a value specific to your project.
- Set your PROJECT_ID as a variable:
- Visit the URL to invoke the Cloud Function. You should see the message
Hello World!as the response:
Click Check my progress to verify the objective.
Create the API definition
API Gateway uses an API definition to route calls to the backend service. You can use an OpenAPI spec that contains specialized annotations to define the desired API Gateway behavior. The OpenAPI spec for this quickstart contains routing instructions to the Cloud Function backend.
- From Cloud Shell, navigate back to your home directory:
- Create a new file named
openapi2-functions.yaml:
- Copy and paste the contents of the OpenAPI spec shown below into the newly created file:
- Set the following environment variables:
- Run the following commands to replace the variables set in the last step in the OpenAPI spec file:
Task 3. Creating a gateway
Now you are ready to create and deploy a gateway on API Gateway.
-
In the top search bar enter API Gateway and select it from the options that appear.
-
Click Create Gateway. Then, in the APIs section:
- Ensure the Select an API input is set to Create new API.
- For Display Name enter
Hello World API - For API ID, run the following command to once again obtain the API ID and enter it into the API ID field:
- In the API Config section:
- Ensure the Select a Config input is set to Create new API config.
- Do the following to upload the
openapi2-functions.yamlfile previously created.
- In Cloud Shell, run the following command:
- Click Download.
openapi2-functions.yaml is now downloaded to your local machine.- Select Browse and select the file from the browser's download location:
- Enter
Hello World Configin the Display Name field. - Ensure the Select a Service Account input is set to Compute Engine default service account.
- In the Gateway details Section:
- Enter
Hello Gatewayin the Display Name field. - Set the Location drop down to
.
- Click Create Gateway.
Click Check my progress to verify the objective.
Testing your API Deployment
Now you can send requests to your API using the URL generated upon deployment of your gateway.
- In Cloud Shell, enter the following command to retrieve the
GATEWAY_URLof the newly created API hosted by API Gateway:
- Run the following command to ensure that the GATEWAY_URL environment variable is set:
If it is not, that means you will need to wait longer for the API Gateway to be deployed.
- Run the following curl command and validate that the response returned is
Hello World!:
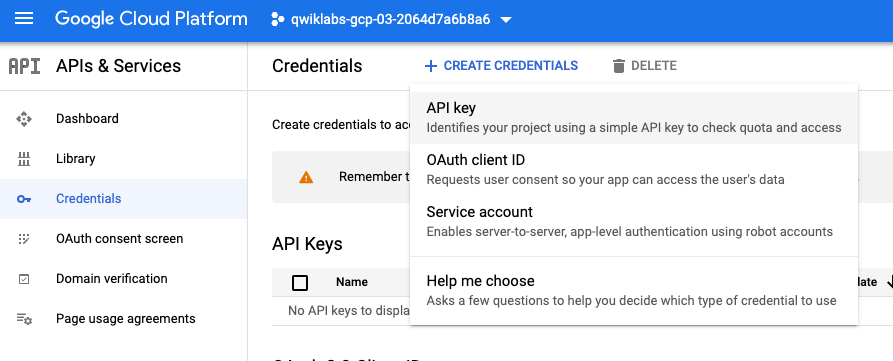
Task 4. Securing access by using an API key
To secure access to your API backend, you can generate an API key associated with your project and grant that key access to call your API. To create an API Key you must do the following:
- In the Cloud Console, navigate to APIs & Services > Credentials.
- Select Create credentials, then select API Key from the dropdown menu. The API key created dialog box displays your newly created key.
Click Check my progress to verify the objective.
-
Copy the API Key from the dialog, then click on close.
-
Store the API Key value in Cloud Shell by running the following command:
Now, enable the API Key support for your service.
- In Cloud Shell, obtain the name of the
Managed Serviceyou just created using the following command:
- Then, using the
Managed Servicename of the API you just created, run this command to enable API key support for the service:
Modify the OpenAPI Spec to leverage API Key Security
In this section, modify the API config of the deployed API to enforce an API key validation security policy on all traffic.
- Add the
securitytype andsecurityDefinitionssections to a new file calledopenapi2-functions2.yamlfile as shown below:
- Copy and paste the contents of the OpenAPI spec shown below into the newly created file:
- Run the following commands to replace the variables set in the last step in the OpenAPI spec file:
- Download the updated API spec file, you will use it to update the Gateway config in the next step:
- Click Download.
Task 5. Create and deploy a new API config to your existing gateway
- Open the API Gateway page in Cloud Console. (Click Navigation Menu > API Gateway.)
- Select your API from the list to view details.
- Select the Gateways tab.
- Select
Hello Gatewayfrom the list of available Gateways. - Click on
Editat the top of the Gateway page. - Under API Config change the drop down to
Create new API config. - Click Browse in the Upload an API Spec input box and select the
openapi2-functions2.yamlfile. - Enter
Hello Configfor Display Name. - Select
Qwiklabs User Service Accountfor Select a Service Account. - Click Update.
Click Check my progress to verify the objective.
Task 6. Testing calls using your API key
- To test using your API key run the following command:
You should see a response similar to the following error as an API key was not supplied with the curl call:
UNAUTHENTICATED:Method doesn't allow unregistered callers (callers without established identity). Please use API Key or other form of API consumer identity to call this API.
- Run the following curl command with the
keyquery parameter and use the API key previously created to call the API:
If you do not have the API_KEY environment variable set you can get your API key from the left menu by navigating APIs & Services > Credentials. The key will be available under the API Keys section.
The response returned from the API should now be Hello World!.
Click Check my progress to verify the objective.
Congratulations!
You have successfully protected an API backend with API Gateway. Now you can start onboarding new API clients by generating additional API keys.
Google Cloud training and certification
...helps you make the most of Google Cloud technologies. Our classes include technical skills and best practices to help you get up to speed quickly and continue your learning journey. We offer fundamental to advanced level training, with on-demand, live, and virtual options to suit your busy schedule. Certifications help you validate and prove your skill and expertise in Google Cloud technologies.
Manual Last Updated January 18, 2024
Lab Last Tested January 18, 2024
Copyright 2024 Google LLC All rights reserved. Google and the Google logo are trademarks of Google LLC. All other company and product names may be trademarks of the respective companies with which they are associated.