检查点
Create PubSub Topics and Subscriptions
/ 10
Create BigQuery Dataset
/ 10
Create Healthcare API Dataset and Datastores
/ 10
Create Service Account and add IAM binding
/ 10
Create GCS Buckets for Mapping Configs
/ 10
Create GKE Cluster
/ 10
Create Deployment & Service for MLLP Adapter
/ 10
Create SimHospital Deployment
/ 10
Create Dataflow Job
/ 10
Testing
/ 10
Streaming HL7 to FHIR Data with Dataflow and the Healthcare API
- GSP894
- Overview
- Setup and requirements
- Healthcare API introduction
- Healthcare API concepts
- Task 1. Set SDK defaults
- Task 2. Enable APIs needed
- Task 3. Set environment variables
- Task 4. Create PubSub topics and subscriptions
- Task 5. Create BigQuery dataset
- Task 6. Create Healthcare API dataset and datastores
- Task 7. Create service account and add IAM binding
- Task 8. Create Storage buckets for mapping configs
- Task 9. Updating configurations of the HC API datastores
- Task 10. Create GKE cluster
- Task 11. Setup auth for kubectl
- Task 12. Create deployment & service for MLLP adapter
- Task 13. Create SimHospital deployment
- Task 14. Create Dataflow job
- Task 15. Testing
- Lab review
- Congratulations!
- End your lab
GSP894

Overview
In the healthcare industry today, data such as Electronic Healthcare Records (EHR) is in disparate formats and silos and often non-interoperable, meaning the silos cannot be shared with each other. Additionally, the global healthcare community has adopted FHIR as the main format for web applications. Getting the disparate formats into FHIR has been a challenge for many healthcare organizations.
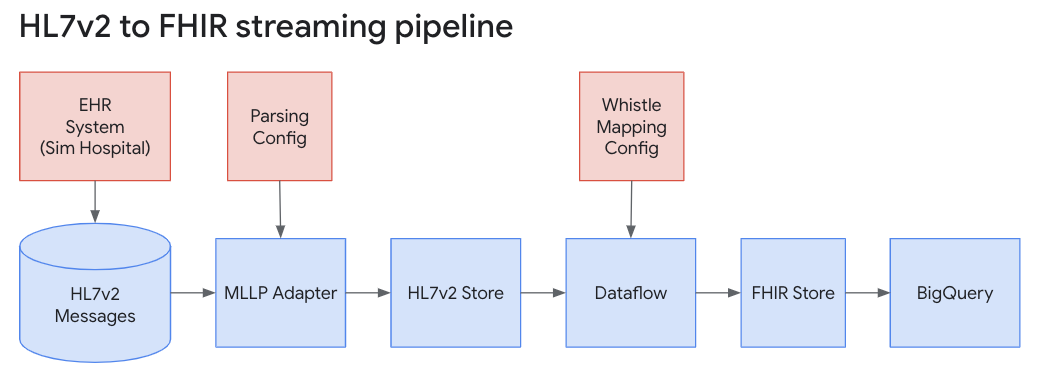
In this lab, you will explore some of the features of the Cloud Healthcare API (HCAPI) and the Healthcare Data Harmonization tool to stream HL7v2 messages into HCAPI datastores and convert HL7v2 to Fast Healthcare Interoperability Resources (FHIR), then import the FHIR data into BigQuery for analytical use.
To complete this lab, you need:
- Access to a standard internet browser (Chrome browser recommended) and a good Internet connection.
- The gcloud and bq utilities installed on the system on which you will run the lab. These utilities are already installed in Qwiklabs and Cloud Shell. If you are completing this lab in another environment, install Google Cloud SDK, which includes these utilities. See Installing Google Cloud SDK for steps.
- Time to complete the lab.
What you learn
In this lab, you will:
- Gain a general understanding of the Cloud Healthcare API and its role in managing healthcare data.
- Learn how to create Cloud Healthcare API datasets , HL7v2 and FHIR stores.
- Import HL7v2 data and importing into a FHIR data using the Cloud Healthcare API.
- Exporting data from the FHIR store into BigQuery.
Setup and requirements
Before you click the Start Lab button
Read these instructions. Labs are timed and you cannot pause them. The timer, which starts when you click Start Lab, shows how long Google Cloud resources will be made available to you.
This hands-on lab lets you do the lab activities yourself in a real cloud environment, not in a simulation or demo environment. It does so by giving you new, temporary credentials that you use to sign in and access Google Cloud for the duration of the lab.
To complete this lab, you need:
- Access to a standard internet browser (Chrome browser recommended).
- Time to complete the lab---remember, once you start, you cannot pause a lab.
How to start your lab and sign in to the Google Cloud console
-
Click the Start Lab button. If you need to pay for the lab, a pop-up opens for you to select your payment method. On the left is the Lab Details panel with the following:
- The Open Google Cloud console button
- Time remaining
- The temporary credentials that you must use for this lab
- Other information, if needed, to step through this lab
-
Click Open Google Cloud console (or right-click and select Open Link in Incognito Window if you are running the Chrome browser).
The lab spins up resources, and then opens another tab that shows the Sign in page.
Tip: Arrange the tabs in separate windows, side-by-side.
Note: If you see the Choose an account dialog, click Use Another Account. -
If necessary, copy the Username below and paste it into the Sign in dialog.
{{{user_0.username | "Username"}}} You can also find the Username in the Lab Details panel.
-
Click Next.
-
Copy the Password below and paste it into the Welcome dialog.
{{{user_0.password | "Password"}}} You can also find the Password in the Lab Details panel.
-
Click Next.
Important: You must use the credentials the lab provides you. Do not use your Google Cloud account credentials. Note: Using your own Google Cloud account for this lab may incur extra charges. -
Click through the subsequent pages:
- Accept the terms and conditions.
- Do not add recovery options or two-factor authentication (because this is a temporary account).
- Do not sign up for free trials.
After a few moments, the Google Cloud console opens in this tab.

Activate Cloud Shell
Cloud Shell is a virtual machine that is loaded with development tools. It offers a persistent 5GB home directory and runs on the Google Cloud. Cloud Shell provides command-line access to your Google Cloud resources.
- Click Activate Cloud Shell
at the top of the Google Cloud console.
When you are connected, you are already authenticated, and the project is set to your Project_ID,
gcloud is the command-line tool for Google Cloud. It comes pre-installed on Cloud Shell and supports tab-completion.
- (Optional) You can list the active account name with this command:
- Click Authorize.
Output:
- (Optional) You can list the project ID with this command:
Output:
gcloud, in Google Cloud, refer to the gcloud CLI overview guide.
Healthcare API introduction
Cloud Healthcare API provides a managed solution for storing and accessing healthcare data in Google Cloud, providing a critical bridge between existing care systems and applications hosted on Google Cloud. Using the API, you can unlock significant new capabilities for data analysis, machine learning and application development, and use these capabilities to build the next generation of healthcare solutions.
The API is comprised of three modality-specific interfaces that implement key industry-wide standards for healthcare data:
- FHIR, an emerging standard for health data interchange
- HL7v2, the most widely adopted method for health systems integration
- DICOM, the dominant standard for radiology and imaging-related disciplines
Each interface is backed by a standards-compliant data store that provides read, write, search, and other operations on the data.
The Cloud Healthcare API provides a number of key features that are critical to bridging current technologies to the next generation of healthcare systems and applications:
- Standards conformance - Google supports the use of standards-based interoperability through its participation in a number of healthcare standards bodies. In the Cloud Healthcare API each modality-specific data store and its associated API is substantially conformant with its relevant standard. For example, FHIR stores implement STU3, the current version of the FHIR specification, and DICOM stores implement DICOMweb, a web-based standard for exchanging medical images. In future updates, we expect to support additional versions of these specifications as well as the ability to request a resource in a different version than its canonical representation.
- Compliance with privacy regulations - Google Cloud provides detailed guidance regarding how it supports compliance with HIPAA in the US, the PIPEDA in Canada, and other global privacy standards at cloud.google.com/security/compliance.
- Data location control - The Cloud Healthcare API treats data location as a core component of the API. You have the option to select the storage location for each dataset from a list of currently available locations which correspond to distinct geographic areas aligned with Google Cloud's regional structure. Future Google Cloud regions will allow for the distribution of storage across wider geographic areas.
- Security - The Cloud Healthcare API security model is based on Google's proven Identity and Access Management (IAM) system. IAM's fine-grained permissions give you complete control over access to your healthcare data. In addition, we've created open-source proxies for our powerful Apigee API Management system, which provides comprehensive threat detection and traffic management capabilities that allow you to securely expose sensitive ePHI with patient and provider applications.
- Bulk import and export - The Cloud Healthcare API's DICOM and FHIR modalities support bulk import and export of data, making it easier to transfer data via the Cloud Storage system.
- De-identification - De-identification support for DICOM is available, making it much easier to redact patient information from studies for research and other purposes. The de-identification process operates on a data store basis.
- Auditability - Both administrative and data access requests to the Cloud Healthcare API can be audited. Logs are available through Google Cloud's Stackdriver hybrid monitoring system.
- High availability - Availability for mission-critical scenarios is made possible through Google Cloud's robust and highly redundant infrastructure.
For many applications, the Cloud Healthcare API can provide a modern alternative to legacy stacks implementing DICOM, HL7v2 or FHIR STU3 standards, simplifying data integration with existing systems and enabling the application developers to focus on their differentiating features such as UX and intelligence.
Healthcare API concepts
To get the most out of the Cloud Healthcare API, there are a few key concepts you'll want to understand. The information below should give you a good sense of Cloud Healthcare API capabilities, but you can find more details in the Cloud Healthcare API documentation.
General structure of the Cloud Healthcare API
The Cloud Healthcare API exposes interfaces that enable you to perform different types of functions:
- Administrative functions, such as creating or listing datasets and stores that will contain your data.
- Data access functions that allow you to create, update, delete and search the data stored in Cloud Healthcare API, or to perform bulk import and export operations.
- Security functions that allow you to impose access controls on data stored in Cloud Healthcare API.
- De-identification functions that allow you to replace ePHI with anonymized data, or to obfuscate ePHI so that it cannot be used.
- Metadata functions, such as retrieval of a FHIR capabilities statement for the FHIR API.
These functions may vary slightly depending on the modality of data (FHIR, HL7 v2 or DICOM) being operated on. For example, data retrieval operations against an FHIR data store use an API that conforms to the FHIR standard, but data retrieval operations against an HL7 v2 store use operations better suited to operating on HL7v2-structured data.
Datasets and stores
All Cloud Healthcare API usage occurs within the context of a Google Cloud project. Projects form the basis for creating, enabling, and using all Google Cloud services including managing APIs, enabling billing, adding and removing collaborators, and managing permissions for Google Cloud resources. Cloud Healthcare API can be used in one or many Google Cloud projects, as appropriate; this flexibility allows you to separate production from non-production usage, for example, or to segregate applications and resources in order to better manage access or accommodate different development lifecycles.
Within a project, data ingested through Cloud Healthcare API is stored in a dataset, which resides in a geographic location corresponding to a specific Google Cloud region. You use the Cloud Healthcare API's administrative functions to create a dataset in a particular location; doing so facilitates implementation of data location requirements for the countries in which your applications provide services. For example, you can choose to create a dataset in Google Cloud's "us-central1" region for US-based applications, or in an EU or UK region for applications serving those customers. This level of location control is also available in other Google Cloud products, which can be combined with Cloud Healthcare API to create a complete application architecture. A list of generally available Google Cloud products and the regions in which they are implemented can be found on Google Cloud, Cloud locations.
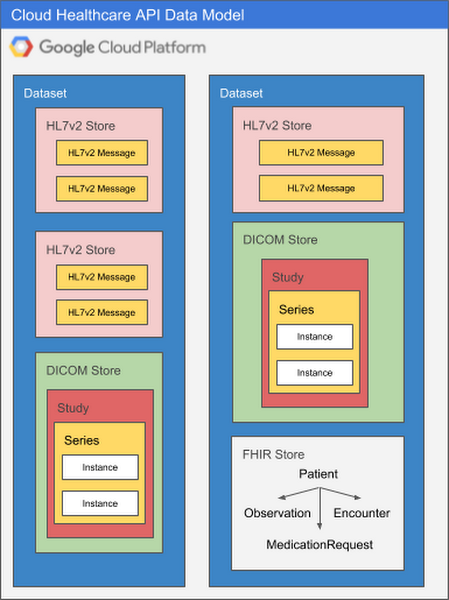
Because each healthcare data modality has different structural and processing characteristics, datasets are split into modality-specific stores. A single dataset can contain one or many stores, and those stores can all service the same modality or different modalities as application needs dictate. Using multiple stores in the same dataset might be appropriate if a given application processes different types of data, for example, or if you'd like to be able to separate data according to its source hospital, clinic, department, etc. An application can access as many datasets or stores as its requirements dictate with no performance penalty, so it's important to design your overall dataset and store architecture to meet the organization's broad goals for locality, partitioning, access control, and so on.
The diagram below illustrates two datasets in a Google Cloud project, each of which contains multiple stores.
There are many ways to structure datasets and stores. As you design systems that use the Cloud Healthcare API, you may want to take the following into consideration:
- Security and access control: Rules can be defined at both a dataset and store level, but you may choose to group all data for a particular application into the same dataset, and set access control rules such that only that application can access the dataset.
- Application requirements: An application processing different types of data may have all of its data for all modalities in a single dataset.
- Source systems: Often, the structure of healthcare data can vary according to the source system and modality. Separating data for different source systems into their own datasets may facilitate processing.
- Intended use: Data from different systems can have different intended uses, such as research, analytics, or machine learning predictions. Grouping data by intended use may facilitate ingestion into the target system.
- Separating ePHI from de-identified data: Cloud Healthcare API data de-identification functions read from a source dataset and write the output into a new dataset that you specify. If you are preparing data to be used by researchers, for example, this approach to de-identifying data may be a consideration in how you use datasets to segregate data.
MLLP Adapter
The minimal lower layer protocol (MLLP) is the standard used for transmitting HL7v2 messages over TCP/IP connections within a network, such as a hospital.
MLLP does not offer an exact mapping to the Cloud Healthcare API HL7v2 REST API], which uses HTTP. Therefore, an MLLP adapter must be used to convert messages transmitted over MLLP into a format that an HTTP/REST API can accept. To transmit messages over MLLP and then to the Cloud Healthcare API, use the Google Cloud MLLP adapter.
Task 1. Set SDK defaults
- Set the region and zone:
Task 2. Enable APIs needed
- Enable the required Google Cloud APIs needed for the lab by running the following command:
Task 3. Set environment variables
- Export the variables needed for the lab by running the following commands:
Task 4. Create PubSub topics and subscriptions
This lab uses PubSub as a message bus for HL7v2/FHIR messages that are created from the Simulated Hospital. Once the topic is created, you'll also create a Subscription to this topic. This will provide your Dataflow Job, which you will create in later steps, to take these messages and convert them to FHIR.
- The commands below will create the HL7v2/FHIR topic and the HL7v2 subscription:
Click Check my progress to verify the objective.
Task 5. Create BigQuery dataset
BigQuery will be used as the end destination for the FHIR data. This allows you to perform analytics on the data in near real-time.
- Create the BigQuery dataset for your FHIR messages:
Click Check my progress to verify the objective.
Task 6. Create Healthcare API dataset and datastores
The Healthcare API Dataset is where the HL7v2 and FHIR data will be stored and managed.
- Create the datasets where the FHIR and HL7v2 stores will reside:
Click Check my progress to verify the objective.
Task 7. Create service account and add IAM binding
The service account will be used to manage PubSub and HL7v2 ingest. You will also set up the appropriate permissions to enable exporting data from your FHIR store to BigQuery. This involves granting the Healthcare API service account (created per project) to access BigQuery, HC API Datastores, and Google Cloud buckets where you will store the sample data.
- Finally, the Compute Engine service account is also granted the roles allowing access to HC API, Cloud Storage, and PubSub for the Dataflow job:
Click Check my progress to verify the objective.
Task 8. Create Storage buckets for mapping configs
When you create the dataflow job in later steps, it will make use of mapping files to convert HL7v2 over to FHIR (R4).
- Run this code to create the Cloud Storage bucket, clones the git repo, modifies the path to the mapping, and then uploads the modified files into the bucket:
Click Check my progress to verify the objective.
Task 9. Updating configurations of the HC API datastores
Execute the following curl commands on the Cloud Shell command line. This will patch the respective datastores to modify their behaviors.
- Patch HL7v2 store to parse HL7v2 to JSON:
- Enable Streaming from FHIR Store to BigQuery:
Task 10. Create GKE cluster
A GKE (K8S) cluster is needed to run the SimHospital, Dataflow Job Creator, and the MLLP Adapter containers. For the purposes of lab, you have been granted full API access to this cluster. Create a Kubernetes Cluster by executing this code block in the Cloud Shell Command Line. This command will take at least five minutes to execute. You can follow along with the creation of this K8S cluster by navigating from the _Main Menu > Kubernetes Engine > Clusters
- In a production environment, please follow least-priviledges principles to support good security practices:
This step may take about 7 minutes to complete. You can check to see that the Kubernetes Cluster has been created by navigating to Navigation Menu > Kubernetes Engine > Clusters and noting that the cluster is up and the status is ready.
Click Check my progress to verify the objective.
Task 11. Setup auth for kubectl
- Once the cluster is created, you need to set up your authentication to be able to use
kubectlto manage the K8S cluster from the command line. Copy and paste this code block into the Cloud Shell command line:
Task 12. Create deployment & service for MLLP adapter
HL7v2 pre-dates the regular use of the TCP/IP protocol. Because of this, the lab needs to use a MLLP adapter or gateway to move the data from the HL7v2 storage to the Dataflow Pipeline before it can be go to both the Healthcare FHIR Datastore, and the BigQuery Dataset. Because of this, once the command is given the service must start, and then the load balancer endpoint created. This will take around five minutes to accomplish all of these tasks. If you move to the next step before this is completed, the rest of the lab will not work properly.
- Copy and paste this code block into the Cloud Shell command line to run the following, which will deploy a service for the MLLP Adapter on the GKE cluster:
- Validate that the MLLP Adaptor Service is Running by navigating to Navigation Menu > Kubernetes Engine > Services and Ingress and noting that the MLLP Adapter has been assigned an external IP address. This indicates that the endpoint for the load balancer has been created and is running. Check that there is an external IP address assigned to this service before moving on to the next step:
Output:
Click Check my progress to verify the objective.
Task 13. Create SimHospital deployment
- The SimHospital application that will generate simulated HL7v2 data that will be used to test the Dataflow pipeline. In the Cloud Shell command, copy the following code block and paste it on the command line:
The following Cloud Shell code block will show the status of the SimHospital Service in your GKE cluster.
- Validate that the SimHospital pod is Running before moving on to the next step. You can observe the SimHospital Service is running by navigating from Main Menu > Kubernetes Engine > Workloads and seeing that both the MLLP and SimHospital services are running. Th SimHospital service usually gets started in about than 3 minutes.
Output:
Click Check my progress to verify the objective.
Task 14. Create Dataflow job
- Now that the container is ready, you can run the Dataflow job against the k8s cluster:
- Validate that the Dataflow pod is Running and not Completed or Succeeded by navigating to Main Menu > Kubernetes Engine > Workloads before moving on to the next step. It might take a few seconds after you run the job for it to appear in the list. If the Dataflow job failed to start to stream the data the status will be Succeeded or Completed. Try to restart the job either by cloning it by navigating to Main Menu > Dataflow > Jobs and selecting Clone, the job can also be restarted by pasting the code block into the Cloud Shell again.
Output:
Click Check my progress to verify the objective.
Task 15. Testing
Validate HL7 data creation
- Now that the SimHospital application has been deployed, make sure that HL7v2 data is stored in the HL7v2 datastore:
Validate FHIR data
- With confirmation that the HL7v2 data exists in the HL7v2 datastore, make sure that the data has also been ingested into the FHIR datastore. A positive validation should be a JSON block returned with no error messages.
-
Using the Navigation menu, navigate to Healthcare > FHIR viewer.
-
In the FHIR Store drop down select datastore > fhirstore.
-
In the Filter search type Patient for Resource type.
-
Click on the Patient under Resource Type, then you will see the data.
Explore the data in BigQuery
The data should also be ingested into BigQuery so that you can access it using SQL commands.
-
Using the Navigation menu, navigate to BigQuery.
-
Under resources find your project ID and then expand the drop-down.
-
Under the drop-down find fhirdata and then expand the drop-down.
-
Select the Patient table under the drop down and then navigate to the Preview section, where it will display the recent exported data. You might have to scroll right to see the data in the cells.
Click Check my progress to verify the objective.
Lab review
Cloud Healthcare API provides a comprehensive facility for ingesting, storing, managing, and securely exposing healthcare data in FHIR, DICOM, and HL7 v2 formats. Using Cloud Healthcare API, you can ingest and store data from electronic health records systems (EHRs), radiological information systems (RISs), and custom healthcare applications. You can then immediately make that data available to applications for analysis, machine learning prediction and inference, and consumer access.
Cloud Healthcare API enables application access to healthcare data via widely-accepted, standards-based interfaces such as FHIR STU3 and DICOMweb. These APIs allow data ingestion into modality-specific stores, which support data retrieval, update, search and other functions using familiar standards-based interfaces.
Further, the API integrates with other capabilities in Google Cloud through two primary mechanisms:
- Cloud Pub/Sub, which provides near-real-time updates when data is ingested into a Cloud Healthcare API data store, and
- Import/export APIs, which allow you to integrate Cloud Healthcare API into both Google Cloud Storage and Google BigQuery.
Using Cloud Pub/Sub with Google Cloud Functions enables you to invoke machine learning models on healthcare data, storing the resulting predictions back in Cloud Healthcare API data store. A similar integration with Cloud Dataflow supports transformation and cleansing of healthcare data prior to use by applications.
To support healthcare research, Cloud Healthcare API offers de-identification capabilities for FHIR and DICOM. This feature allows customers to share data with researchers working on new cutting-edge diagnostics and medicines.
Congratulations!
In this lab, you:
- Gained a general understanding of Cloud Healthcare API and its role in managing healthcare data.
- Learned how to create datasets and FHIR stores.
- Imported and exported FHIR data.
Finish your quest
This self-paced lab is part of the Cloud Healthcare API quest. A quest is a series of related labs that form a learning path. Completing this quest earns you a badge to recognize your achievement. You can make your badge or badges public and link to them in your online resume or social media account. Enroll in this Quest or any quest that contains this lab and get immediate completion credit. See the Google Cloud Skills Boost catalog to see all available quests.
Take your next lab
Continue your quest with Ingesting DICOM Data with the Healthcare API or try one of these suggestions:
End your lab
When you have completed your lab, click End Lab. Your account and the resources you've used are removed from the lab platform.
You will be given an opportunity to rate the lab experience. Select the applicable number of stars, type a comment, and then click Submit.
The number of stars indicates the following:
- 1 star = Very dissatisfied
- 2 stars = Dissatisfied
- 3 stars = Neutral
- 4 stars = Satisfied
- 5 stars = Very satisfied
You can close the dialog box if you don't want to provide feedback.
For feedback, suggestions, or corrections, please use the Support tab.
Manual Last Updated February 1, 2024
Lab Last Tested February 1, 2024
Copyright 2024 Google LLC All rights reserved. Google and the Google logo are trademarks of Google LLC. All other company and product names may be trademarks of the respective companies with which they are associated.