Puntos de control
Apply a datagroup to an Explore
/ 100
Caching and Datagroups with LookML
GSP893

Overview
Looker is a modern data platform in Google Cloud that you can use to analyze and visualize your data interactively. You can use Looker to do in-depth data analysis, integrate insights across different data sources, build actionable data-driven workflows, and create custom data applications.
Looker is constantly generating SQL queries and sending them to the connected database. Whenever someone runs a query in Looker, the SQL results are cached and stored in an encrypted file on the Looker instance.
Caching leverages the saved results from previously executed queries so that the same query is not run on the database repeatedly. This helps reduce database load. Caching also helps optimize Looker performance. In this lab, you learn how caching works in Looker and explore how to use LookML datagroups to define caching policies.
The caching process
Looker acts like a front door attendant for a database. When a user runs a query, Looker determines whether the exact same query has been run before. If not, it allows the query to run on the database. When the results are returned, Looker caches them for future reference.
If the same query has been run before, Looker checks the caching policy to determine whether the results are still valid. If yes, Looker returns the cached results to the business user. This happens in less than a second.
If the same query has been run before but the results are no longer valid per the caching policy, Looker sends the query to the database. It then caches the new results for future reference.
Datagroups
A datagroup is the Looker term for a named caching policy or rule. LookML developers use datagroups to manage caching on a Looker instance. Different caching policies require separate datagroup definitions. The number and types of datagroups you need to create depends on your data’s extraction, transformation, and loading (ETL) processes and business requirements.
For example, you may need to define datagroups at the model level, for individual Explores, or for persistent derived tables (PDTs), depending on how often your data is updated.
- To apply a datagroup as the default for all Explores, use the
persist_withparameter at the model level. - To apply a datagroup to a specific Explore, use the
persist_withparameter in that Explore’s definition. - To apply a datagroup to a specific set of Explores but not all Explores in a model, use the
persist_withparameter in each Explore’s definition and specify the same datagroup name.
Objects that can use datagroups
Persist_with
If you apply a datagroup at the model level, Looker, by default, will apply the same caching rules to all Explores within this model.
However, you can apply a datagroup on an individual Explore, which overrides any setting at the model level. Because Explores are the foundation for all content, the same caching logic applies to Looks and dashboards in the Explore.
persist_for parameter to cache Explore queries for a fixed amount of time, and use either sql_trigger_value or persist_for for persistent derived tables.
datagroup_trigger
For PDTs, you can apply a datagroup to specify how the PDT is rebuilt.
schedules
Schedules for Looks and dashboards can also be run on datagroups. You can instruct Looker to run a Look or dashboard automatically upon expiration of a caching policy, so new data is retrieved and “pre-cached” for any business users who need it.
Datagroup configuration
Datagroups take two parameters: max_cache_age and sql_trigger.
-
max_cache_agespecifies the number of hours to keep a cached result, such as 24 hours. -
sql_triggeris used to write a SELECT statement that can tell Looker whether the results have changed. Thesql_triggershould be written to return only one value. Looker will regularly send this statement to the connected database. If the result has changed, Looker refreshes the cache.
Although only one parameter is required, it is best to use both to achieve the desired caching results. For example, if the sql_trigger check doesn't detect a change, that could mean something went wrong with the ETL process or the sql_trigger itself. If you include a max_cache_age parameter, the cache will be refreshed after a set duration regardless of the result of the sql_trigger check.
Objectives
In this lab, you learn how to:
- Define caching and the different datagroup objects in LookML
- Apply a datagroup to an individual Explore in a LookML model
Setup
Before you click the Start Lab button
Read these instructions. Labs are timed and you cannot pause them. The timer, which starts when you click Start Lab, shows how long Google Cloud resources will be made available to you.
This hands-on lab lets you do the lab activities yourself in a real cloud environment, not in a simulation or demo environment. It does so by giving you new, temporary credentials that you use to sign in and access Google Cloud for the duration of the lab.
To complete this lab, you need:
- Access to a standard internet browser (Chrome browser recommended).
- Time to complete the lab---remember, once you start, you cannot pause a lab.
How to start your lab and sign in to Looker
-
When ready, click
.
A new panel will appear with the temporary credentials that you must use for this lab.
If you need to pay for the lab, a pop-up will open for you to select your payment method.
-
Note your lab credentials in the left pane. You will use them to sign in to the Looker instance for this lab.
Note: If you use other credentials, you will get errors or incur charges. -
Click Open Looker.
-
Enter the provided Username and Password in the Email and Password fields.
Important: You must use the credentials from the Connection Details panel on this page. Do not use your Google Cloud Skills Boost credentials. If you have your own Looker account, do not use it for this lab. -
Click Log In.
After a successful login, you will see the Looker instance for this lab.
Task 1. Apply a datagroup to an Explore
Define and apply datagroups to individual Explores in a LookML model. Specifically, you update caching for all views in the Order Items Explore to refresh whenever a new order_item_id is added, because the order_item_id is the primary key for order items.
Open the model
-
Click the toggle button to enter Development mode.
-
On the Develop tab, select the qwiklabs-ecommerce LookML project.
-
Open the training_ecommerce.model file.
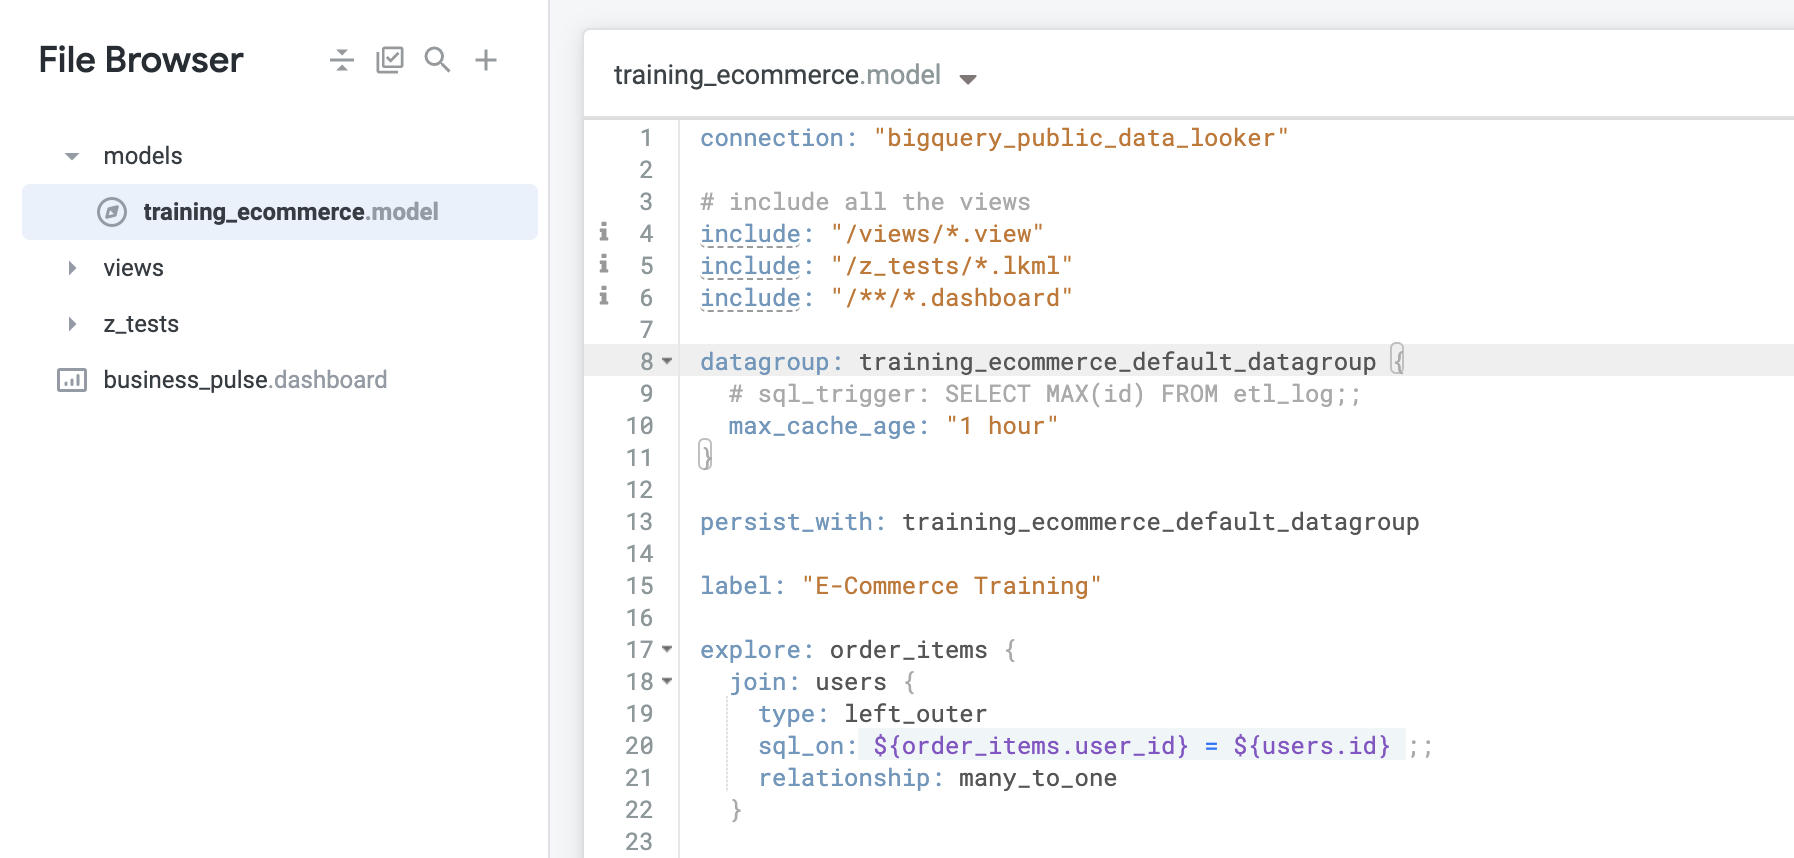
Notice that this model file has a default datagroup with a max_cache_age of 1 hour. Whenever you create a new LookML project by having Looker generate the model from the database schema, Looker automatically creates a default datagroup with the name of the model, in this case training_ecommerce, followed by _default_datagroup.
Delete the default datagroup and replace it
Because this default datagroup is currently defined at the model level, it is applied to all Explores defined in the model. You want to apply the datagroup to the Explore, so you must remove the default one and update it accordingly. To complete the definition of the new datagroup, you need to provide values for the two parameters: sql_trigger and max_cache_age.
-
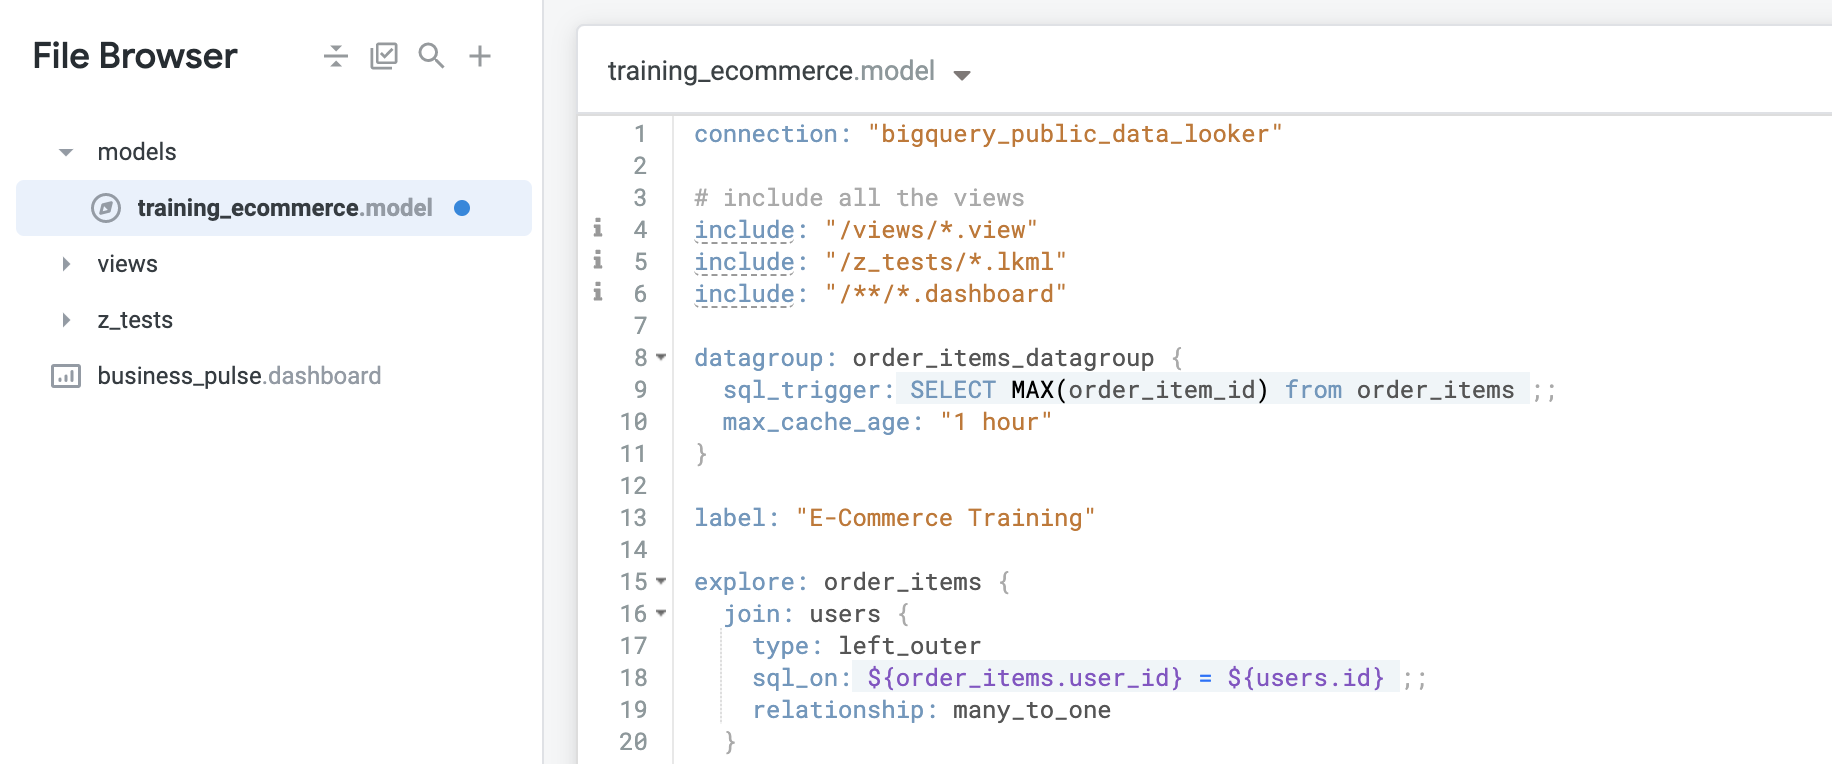
Delete the default datagroup and the
persist_withdefinition (Lines 8-13). -
To create a new datagroup for a specific Explore such as Order Items, enter the following code:
- For the
sql_trigger, to select the maximum ID fororder_item_id, enter the following code:
- Set the
max_cache_ageso that caching will continue to refresh every hour even if there is an issue with data updates. Enter the following code:
Apply the datagroup
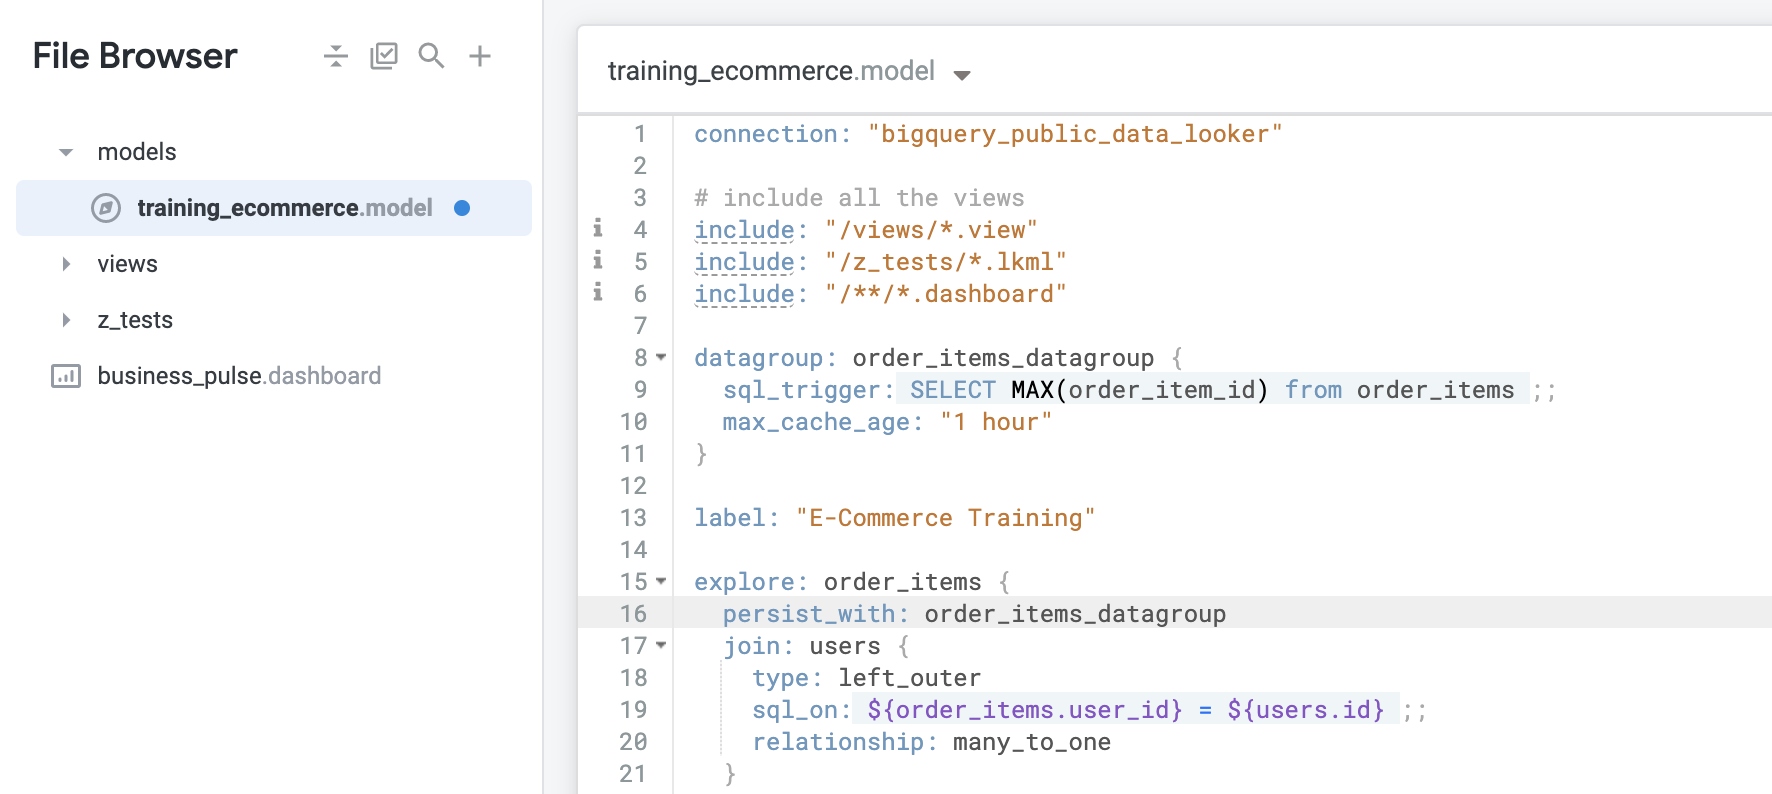
Note that configuring a datagroup by itself doesn’t do anything; it is a two-step process. After defining the datagroup, you need to apply the datagroup to an object by using a parameter called persist_with.
- To apply the datagroup to the definition for the Order Items Explore, directly under the
explore: order_itemsline, enter the following code:
-
Click Save Changes, and then click Validate LookML.
-
Navigate back to the
training_ecommerce.modelfile.
Commit changes and deploy to production
-
Click Validate LookML and then click Commit Changes & Push.
-
Add a commit message and click Commit.
-
Lastly, click Deploy to Production.
Great! You just defined your own caching policy (datagroup) to update every time a new order number is added and also used a max caching age parameter set to 1 hour so that caching will continue to refresh every hour, regardless of the data updates. You then applied this datagroup to the individual Order Items Explore instead of applying it to the entire model.
Click Check my progress to verify the objective.
Congratulations!
In this lab, you learned how to define and use caching in Looker and explored how to use LookML datagroups to define caching policies.
Finish your quest
This self-paced lab is part of the Advanced LookML Concepts in Looker quest and the Manage Data Models in Looker quests. A quest is a series of related labs that form a learning path. Completing a quest earns you a badge to recognize your achievement. You can make your badge or badges public and link to them in your online resume or social media account. Enroll in any quest that contains this lab and get immediate completion credit. Refer to the Google Cloud Skills Boost catalog for all available quests.
Next steps / learn more
Google Cloud training and certification
...helps you make the most of Google Cloud technologies. Our classes include technical skills and best practices to help you get up to speed quickly and continue your learning journey. We offer fundamental to advanced level training, with on-demand, live, and virtual options to suit your busy schedule. Certifications help you validate and prove your skill and expertise in Google Cloud technologies.
Manual Last Updated August 23, 2022
Lab Last September March 7, 2022
Copyright 2024 Google LLC All rights reserved. Google and the Google logo are trademarks of Google LLC. All other company and product names may be trademarks of the respective companies with which they are associated.