检查点
Provision a domain
/ 30
Create a Windows VM
/ 30
Set a password for the windows server for logging into the RDP
/ 20
Set a password for 'msad-1-ad-1' vm for logging into the RDP
/ 20
Managed Service for Microsoft Active Directory
- GSP847
- Overview
- Prerequisites
- Setup and requirements
- Task 1. Create a Windows VM
- Task 2. Test the Windows startup status
- Task 3. RDP into the Windows Server
- Task 4. Connecting to a Managed Microsoft AD domain
- Task 5. Test network connectivity
- Task 6. Configure the AD domain server
- Task 7. Configure the Windows VM
- Congratulations!
GSP847

Overview
Managed Service for Microsoft Active Directory (AD) is a highly available, hardened Google Cloud service running actual Microsoft AD that enables you to:
- Manage authentication and authorization for your AD-dependent workloads
- Automate AD server maintenance and security configuration
- Connect your on-premises AD domain to the cloud
Prerequisites
You will need a working RDP client for this lab.
Setup and requirements
Before you click the Start Lab button
Read these instructions. Labs are timed and you cannot pause them. The timer, which starts when you click Start Lab, shows how long Google Cloud resources will be made available to you.
This hands-on lab lets you do the lab activities yourself in a real cloud environment, not in a simulation or demo environment. It does so by giving you new, temporary credentials that you use to sign in and access Google Cloud for the duration of the lab.
To complete this lab, you need:
- Access to a standard internet browser (Chrome browser recommended).
- Time to complete the lab---remember, once you start, you cannot pause a lab.
How to start your lab and sign in to the Google Cloud console
-
Click the Start Lab button. If you need to pay for the lab, a pop-up opens for you to select your payment method. On the left is the Lab Details panel with the following:
- The Open Google Cloud console button
- Time remaining
- The temporary credentials that you must use for this lab
- Other information, if needed, to step through this lab
-
Click Open Google Cloud console (or right-click and select Open Link in Incognito Window if you are running the Chrome browser).
The lab spins up resources, and then opens another tab that shows the Sign in page.
Tip: Arrange the tabs in separate windows, side-by-side.
Note: If you see the Choose an account dialog, click Use Another Account. -
If necessary, copy the Username below and paste it into the Sign in dialog.
{{{user_0.username | "Username"}}} You can also find the Username in the Lab Details panel.
-
Click Next.
-
Copy the Password below and paste it into the Welcome dialog.
{{{user_0.password | "Password"}}} You can also find the Password in the Lab Details panel.
-
Click Next.
Important: You must use the credentials the lab provides you. Do not use your Google Cloud account credentials. Note: Using your own Google Cloud account for this lab may incur extra charges. -
Click through the subsequent pages:
- Accept the terms and conditions.
- Do not add recovery options or two-factor authentication (because this is a temporary account).
- Do not sign up for free trials.
After a few moments, the Google Cloud console opens in this tab.

Activate Cloud Shell
Cloud Shell is a virtual machine that is loaded with development tools. It offers a persistent 5GB home directory and runs on the Google Cloud. Cloud Shell provides command-line access to your Google Cloud resources.
- Click Activate Cloud Shell
at the top of the Google Cloud console.
When you are connected, you are already authenticated, and the project is set to your Project_ID,
gcloud is the command-line tool for Google Cloud. It comes pre-installed on Cloud Shell and supports tab-completion.
- (Optional) You can list the active account name with this command:
- Click Authorize.
Output:
- (Optional) You can list the project ID with this command:
Output:
gcloud, in Google Cloud, refer to the gcloud CLI overview guide.
To set the default region and zone in your local client, run the following command:
Provision a domain
For this lab, provision the domain using the Google Cloud Marketplace.
-
Add a Domain DNSName:
| Field | Value |
|---|---|
| AD Domain Name | gcpnext.com |
| Service Account Username | adsetup_sa |
| Service Account Password | ********** |
| Domain Controller 1 | msad-1-ad-1 |
| Domain Controller 2 | msad-1-ad-2 |
| Primary AD Zone | |
| Secondary AD Zone | |
| Primary DC Machine Type | e2-standard-2 |
| Second DC Machine Type | e2-standard-2 |
A Deployment Manager script will be initiated resulting in two AD servers.
The AD servers will use a custom VPC network (i.e. msad-1-net) with the following settings:
| NAME | Zone | Internal IP |
|---|---|---|
| msad-1-ad-1 | 10.0.0.100 | |
| msad-1-ad-2 | 10.1.0.100 |
Also note that the VPCs are defined in multiple regions.
If you were to create a domain on your own, you need the following information:
-
A fully qualified domain name (FQDN); for example, ad.mycompany.com. Learn more about Microsoft's naming conventions in Active Directory in the Naming conventions in Active Directory for computers, domains, sites, and OUs article.
-
A private CIDR IP range not in use by any of the VPC's subnetworks; for example, 172.16.0.0/24, 192.168.0.0/24, or 10.1.0.0/24. Ideally, select a range not in use of any of the VPC subnetworks where the domain might be used. Learn more about selecting IP ranges in the Google Cloud's Selecting IP address ranges guide.
-
A region to deploy the domain controller to; for example,
. Learn more about currently supported regions in Google Cloud's Adding and removing regions guide. -
A delegated administrator account username. You can define this username or use the default,
setupadmin. Note that this username cannot be changed after domain creation.
Then you would run the following command to create your domain (don't do this now):
Click Check my progress to verify the objective.
Task 1. Create a Windows VM
-
Start by creating a Windows Server virtual machine (VM) that will be connected to the domain. Your VM needs to be created in the same region as the domain, and be on the same network.
-
In the Cloud Console, from the Navigation menu, go to Compute Engine. You will see the domain listed.
-
Click Create instance.
| Field | Value |
|---|---|
| Region | |
| Zone | |
| Machine type | e2-standard-2 |
-
In the Boot disk section, click Change to begin configuring your boot disk.
-
On the Public images tab, in the Operating System dropdown, choose Windows Server.
-
In the Version dropdown, choose Windows Server 2019 Datacenter.
-
Click Select.
-
In the Firewall section, select Allow HTTP traffic and Allow HTTPS traffic.
Notice:
- Your VM instance has a public IP address.
- Your firewall rules allow TCP ingress traffic from your client's public IP address to the instance by using port 3389.
-
Click the Management, security, disks, networking, sole tenancy link.
-
Click the Networking tab.
-
Add Network tags:
msad-1-tcp-3389
In the Network Interface click default, use the dropdown arrow to select the network that starts with msad-1-net
- Type in a custom ephemeral IP address, like
10.0.0.3. - Click Done.
- Click Create to create the instance.
Click Check my progress to verify the objective.
Task 2. Test the Windows startup status
After a short time, the Windows Server instance will be provisioned and listed on the VM Instances page with a green status icon 
However, the server instance may not yet be ready to accept RDP connections, as it takes a while for all the OS components to initialize.
- To see whether the server instance is ready for an RDP connection, run the following command at your Cloud Shell terminal command line:
If prompted, type n and press Enter.
Repeat the command until you see the following in the command output, which tells you that the OS components have initialized and the Windows Server is ready to accept your RDP connection (attempt in the next step).
Task 3. RDP into the Windows Server
- To set a password for logging into the RDP, run the following command in Cloud Shell terminal and replace
[instance]with the VM Instance that you have created and set[username]as admin:
- If asked
Would you like to set or reset the password for [admin] (Y/n)?, enter Y.
Click Check my progress to verify the objective.
- Connect to your server through RDP. There are different ways to connect to your server through RDP, depending on whether or not you're on Windows:
- If you are using a Chromebook or other machine at a Google Cloud event there is likely an RDP app already installed on the computer. Click the icon as below, if it is present, in the lower left corner of the screen and enter the external IP of your VM.

-
If you are not on Windows but using Chrome, you can connect to your server through RDP directly from the browser using the Chrome RDP for Google Cloud Platform extension.
Click RDP.
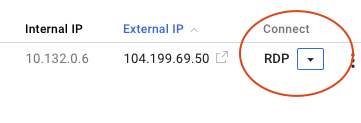
This prompts you to install Chrome RDP Extension. Once it is installed, the login page opens.
- Use the following credentials to log in to the Windows Server:
| Field | Value |
|---|---|
| Username | admin |
| Password | The Window Server password |
- In the resulting RDP session, if Windows asks you whether you want this machine to be discoverable by other machines on its network, click No.
Copy and paste with the RDP client
Once you are securely logged into your instance, you may find yourself copying and pasting commands from the lab manual.
To paste, hold the CTRL-V keys (if you are a Mac user, using CMND-V will not work.) If you are in a Powershell window, be sure that you have clicked into the window or else the paste shortcut won't work.
If you are pasting into putty, right click.
Task 4. Connecting to a Managed Microsoft AD domain
You can connect to your domain with Remote Desktop Protocol (RDP). For security reasons, you cannot use RDP to connect directly to a domain controller. Instead, you can use RDP to connect to a Compute Engine instance, and then use the standard AD Manageability tools to work remotely with your AD domain.
- To set a password for logging into the RDP, run the following command in Cloud Shell terminal
- If asked
Would you like to set or reset the password for [admin] (Y/n)?, enter Y.
Click Check my progress to verify the objective.
- Connect using the External IP address of the
msad-1-ad-1AD server.
| Field | Value |
|---|---|
| Username | admin |
| Password | As per reset above |
- In the resulting RDP session, if Windows asks you whether you want this machine to be discoverable by other machines on its network, click No.
Task 5. Test network connectivity
Now you can test network connectivity between the Windows Server and the AD domain server.
Windows VM
-
Open a Windows Powershell on the Windows Server.
-
Test connectivity using Ping to confirm the Windows Server can connect to the AD Domain:
The ping should receive a response and indicate no packet loss experienced.
Window AD
-
Now open a Windows Powershell on the Windows AD server.
-
Test connectivity using Ping to confirm the Windows Server can connect to the AD Domain:
You should receive a response that indicates no packet loss experienced.
Task 6. Configure the AD domain server
On the Windows AD:
- Open the Control Panel
- Select System and Security
- In the
Systemsetting, click "See the name of this computer"
On the screen you will see the Computer name and that it is part of a domain called gcpnext.com
Task 7. Configure the Windows VM
- On the Windows Instance/VM:
- Open the Control Panel
- Select the Network and Internet
- Click the Network and Sharing Center
- Click View network status and tasks
- Click the Ethernet link
- Select the Properties button
- Select the Internet Protocol Version 4 (TCP/IPv4) and click the Properties button
- Amend the DNS server address to point to the AD Server i.e.
10.0.0.100 - Click OK
-
Select System and Security.
-
In the
Systemsetting, click See the name of this computer. -
The computer setting will indicate this computer is part of WORKGROUP.
- Click the change setting option
- Select the
Changebutton - On the following screen, amend the
Member ofto Domain - Add
gcpnext.comas the domain name - Click OK
- The host will then require an account permission - enter the Window AD Username and Password.
A "Welcome to the gcpnext.com" message will be shown. The Windows VM will now need to be rebooted to use the updated settings.
- Log in to the Windows server:
| Field | Value |
|---|---|
| Username | admin |
| Password | The Window Server password |
- In the Control panel:
- Select System and Security.
- In the
Systemsetting, click See the name of this computer.
The computer setting will indicate this computer is part of gcpnext domain.
Congratulations!
Over this course of this lab, you have seen how to add a Windows VM to a Windows AD domain.
- Provision AD Servers using the Google Cloud Marketplace
- Deploy a Windows virtual machine
- Update DNS Settings for a Windows VM instance
- Add a Windows virtual machine to a domain
Google Cloud training and certification
...helps you make the most of Google Cloud technologies. Our classes include technical skills and best practices to help you get up to speed quickly and continue your learning journey. We offer fundamental to advanced level training, with on-demand, live, and virtual options to suit your busy schedule. Certifications help you validate and prove your skill and expertise in Google Cloud technologies.
Manual Last Updated November 10, 2023
Lab Last Tested November 10, 2023
Copyright 2024 Google LLC All rights reserved. Google and the Google logo are trademarks of Google LLC. All other company and product names may be trademarks of the respective companies with which they are associated.