체크포인트
Launch Strato
/ 100
BlockApps STRATO: Spin Up A Blockchain Node in 3 minutes
GSP705

Overview
In this lab, you will see just how easy it is to launch a blockchain network. This lab will show you how to spin up a simple private blockchain network consisting of one node.
What you'll learn
- How fast and easy it is to start up a private blockchain network with STRATO on Google Cloud
- The key components of a private blockchain network
- How to create users and log their creation on your blockchain network
- How to reset a STRATO network
By the end of this lab, you will see how launching a private blockchain network is "the easy part" and feel prepared to launch & reset STRATO networks as you add more complexity to them in the future.
Launching a blockchain is easy...
To do this you will be using BlockApps' flagship product called STRATO. For this lab, think of STRATO as software to launch and manage a blockchain network.
In this lab, STRATO will be deployed on a Google Cloud virtual machine.
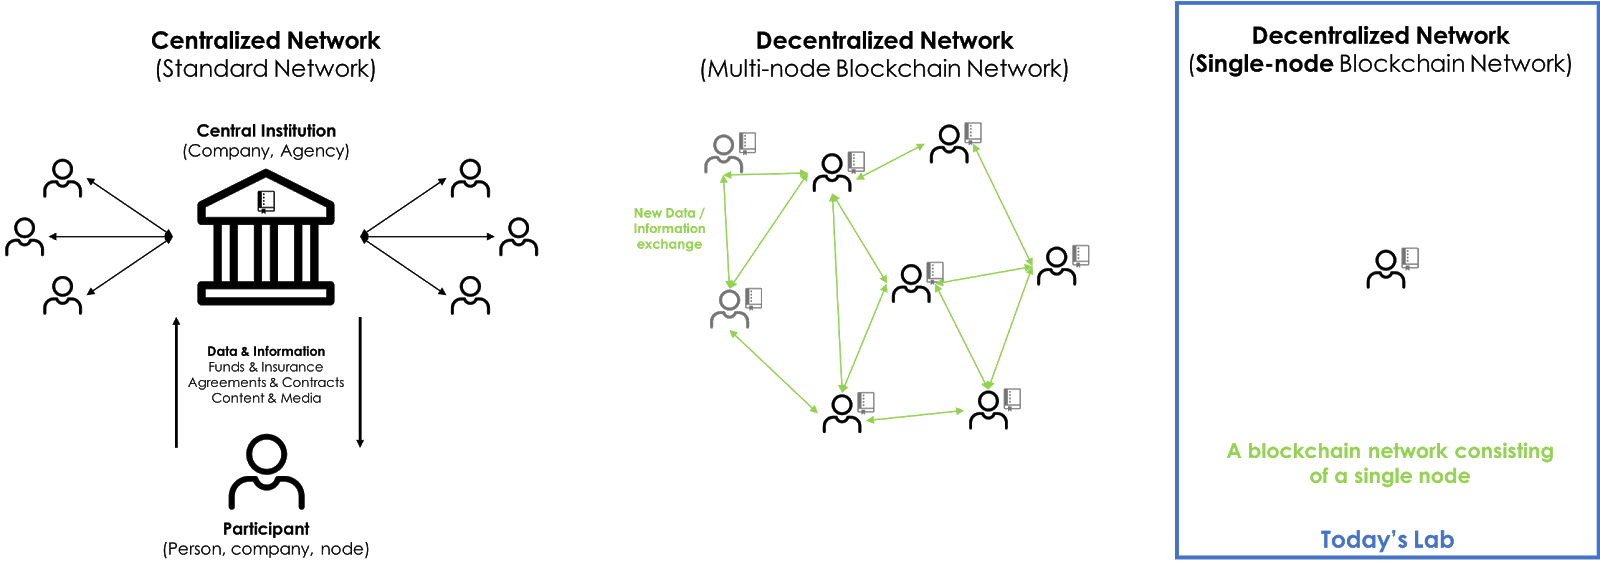
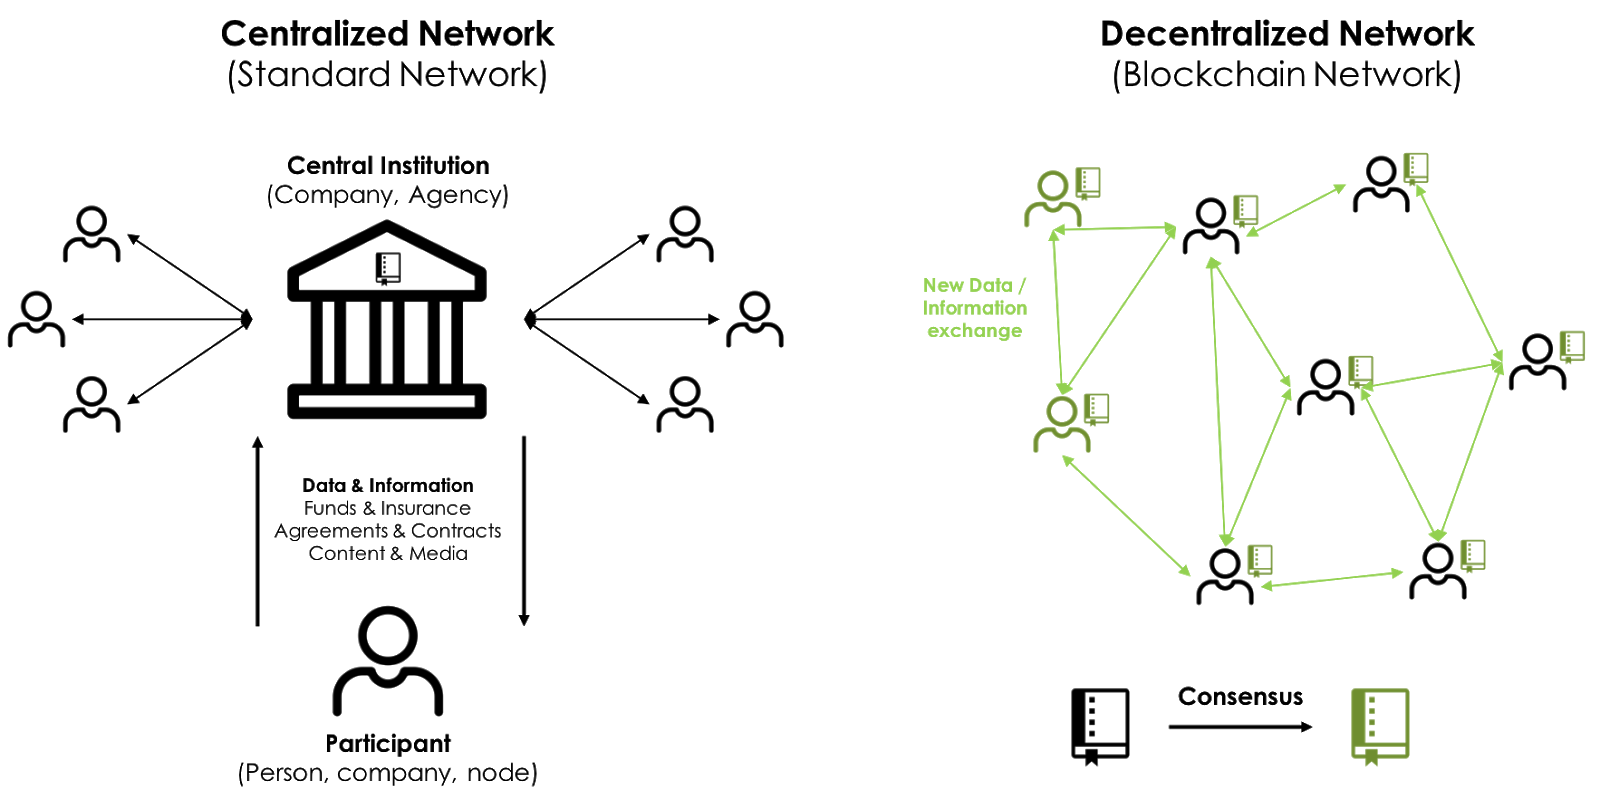
What is a private blockchain network?
Public vs. private blockchain networks
Blockchain is a technology that allows for the creation of scarce, transferable digital assets. It is a ledger that handles the "double spend" problem of accounting/economics for digital assets.
There are two general types of blockchains - public blockchains and private blockchains.
Public Blockchains:
- All activity visible to the public
- Network members can self-identify, but are usually anonymous
- Network latency does not scale well
Private Blockchains (also known as Permissioned Blockchains):
- Activity visible by network members only
- Visible identify of network members
- Lower network latency
Key Component of a Private Blockchain Network
Private blockchain networks consist of network nodes that maintain a shared ledger of transactions. As network users engage in transactions on the network, the transactions are added to the shared ledger based on the rules defined when a network is created.
Users
User accounts are used to create, send and accept transactions on the private network. On a private network, users can be configured to be anonynmous (like on the public blockchain networks) or identified with details like their email address.
Governance
Governance is a catch-all term for the rules of the network. This includes the rules for:
- How users can be added and removed from the network
- How the shared ledger is updated, and how (or "who") approves (i.e. validates) those changes.
- How the rules can be changed as the network evolves, and how those rule changes get approved.
If you've heard of terms like PoW (proof of work) or PBFT (partial byzantine fault tolerance), they are usually in reference to governance rules about this point - exactly how the shared ledger is updated, and how to be sure that the updates are accurate.
Transactions and smart contracts
Like on any kind of network, a transaction is an exchange of something. On private blockchain networks, transactions typically represent exchange of some asset or agreement between two parties.
A transaction could exchange something as simple as a message (e.g. "Hello there") or something more complex like the exchange of a rare piece of art.
In this context, smart contracts are used as templates that help a network recognize exactly what is being exchanged in a transaction.
Nodes
Nodes are the "Peers" in Peer-to-Peer. They are the actual computer machines that maintain a record of the blockchain ledger and execute the code as required by the network's governance rules.
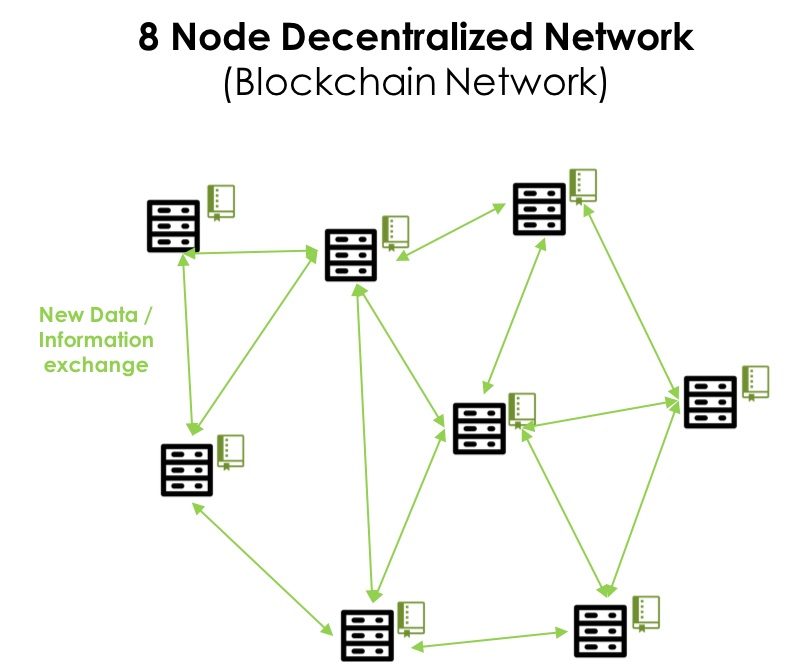
In this diagram, each server icon represents a node.
Hands-on lab overview
At the conclusion of this hands-on lab, you will be able to say - maybe for the first time in your life - that you built a blockchain network!
The hands-on portion of this lab features 3 major steps:
- Launch a network
- Access the management dashboard of your network as an admin
- Add a user account to your network
Setup and and requirements
Before you click the Start Lab button
Read these instructions. Labs are timed and you cannot pause them. The timer, which starts when you click Start Lab, shows how long Google Cloud resources will be made available to you.
This hands-on lab lets you do the lab activities yourself in a real cloud environment, not in a simulation or demo environment. It does so by giving you new, temporary credentials that you use to sign in and access Google Cloud for the duration of the lab.
To complete this lab, you need:
- Access to a standard internet browser (Chrome browser recommended).
- Time to complete the lab---remember, once you start, you cannot pause a lab.
How to start your lab and sign in to the Google Cloud console
-
Click the Start Lab button. If you need to pay for the lab, a pop-up opens for you to select your payment method. On the left is the Lab Details panel with the following:
- The Open Google Cloud console button
- Time remaining
- The temporary credentials that you must use for this lab
- Other information, if needed, to step through this lab
-
Click Open Google Cloud console (or right-click and select Open Link in Incognito Window if you are running the Chrome browser).
The lab spins up resources, and then opens another tab that shows the Sign in page.
Tip: Arrange the tabs in separate windows, side-by-side.
Note: If you see the Choose an account dialog, click Use Another Account. -
If necessary, copy the Username below and paste it into the Sign in dialog.
{{{user_0.username | "Username"}}} You can also find the Username in the Lab Details panel.
-
Click Next.
-
Copy the Password below and paste it into the Welcome dialog.
{{{user_0.password | "Password"}}} You can also find the Password in the Lab Details panel.
-
Click Next.
Important: You must use the credentials the lab provides you. Do not use your Google Cloud account credentials. Note: Using your own Google Cloud account for this lab may incur extra charges. -
Click through the subsequent pages:
- Accept the terms and conditions.
- Do not add recovery options or two-factor authentication (because this is a temporary account).
- Do not sign up for free trials.
After a few moments, the Google Cloud console opens in this tab.

Task 1. Launch STRATO
Now it's time to start STRATO... as promised, this is the easy part!
-
Click the link to go to Single Node version of BlockApps STRATO in the Google Cloud Marketplace.
-
Click the Launch button.
-
In the deployment setup page, select a zone
. -
Leave all the other values as default, accept the GCP Terms of Service and click Deploy.
Just sit back and relax as STRATO builds the single node network. This should take about two minutes.
You'll know it's ready when you see confirmation strato-node-1 has been deployed.
Just like that, you created a blockchain network!
Click Check my progress to verify the objective.
Task 2. Access the Management Dashboard
So far you've created a private blockchain network consisting of one node. It comes with one admin account, and that's about it.
You can see what's on this blockchain you just made by looking at the management dashboard.
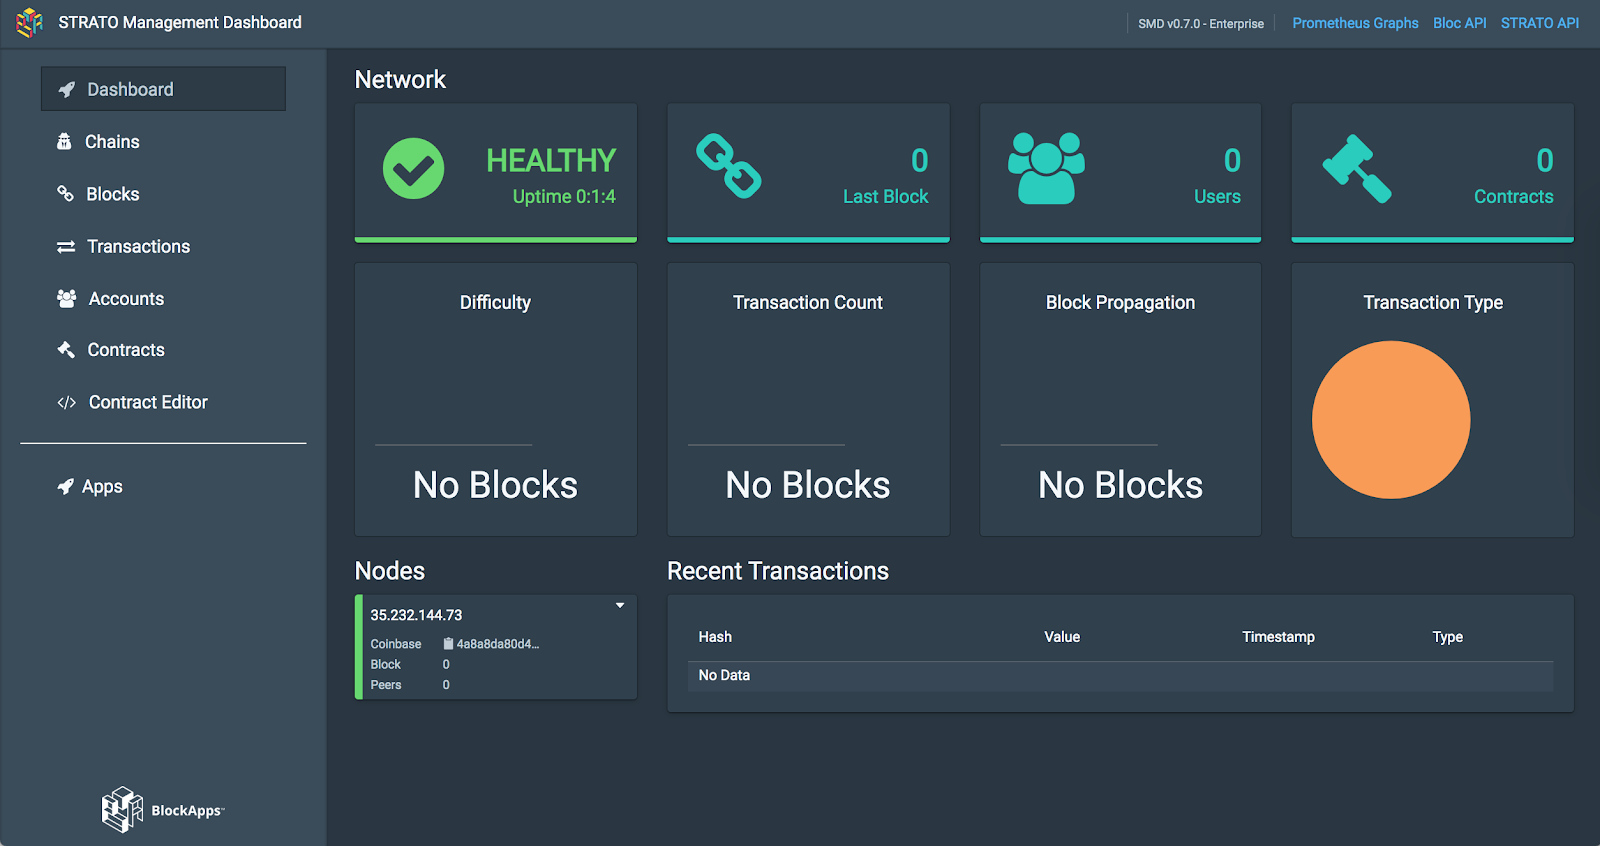
The management dashboard is your control center for monitoring and managing your blockchain network.
-
Access your management dashboard, in the Deployment Manager page, click on the Site address provided in the strato-node panel on the right.
-
Login to the dashboard with the admin credentials provided in the strato-node panel:
-
Username:
admin -
Password: Use the Admin password (Temporary) on the strato-node panel.
-
In this lab, you'll only be exploring the Accounts section. Feel free to take 3-5 minutes to click around and explore what is available on the dashboard.
Task 3. Create and activate a user
As the network administrator, you have a lot of control over this private blockchain - including control over who has access to it.
- Click on the Accounts tab of the management dashboard to see what user accounts have access to this network.
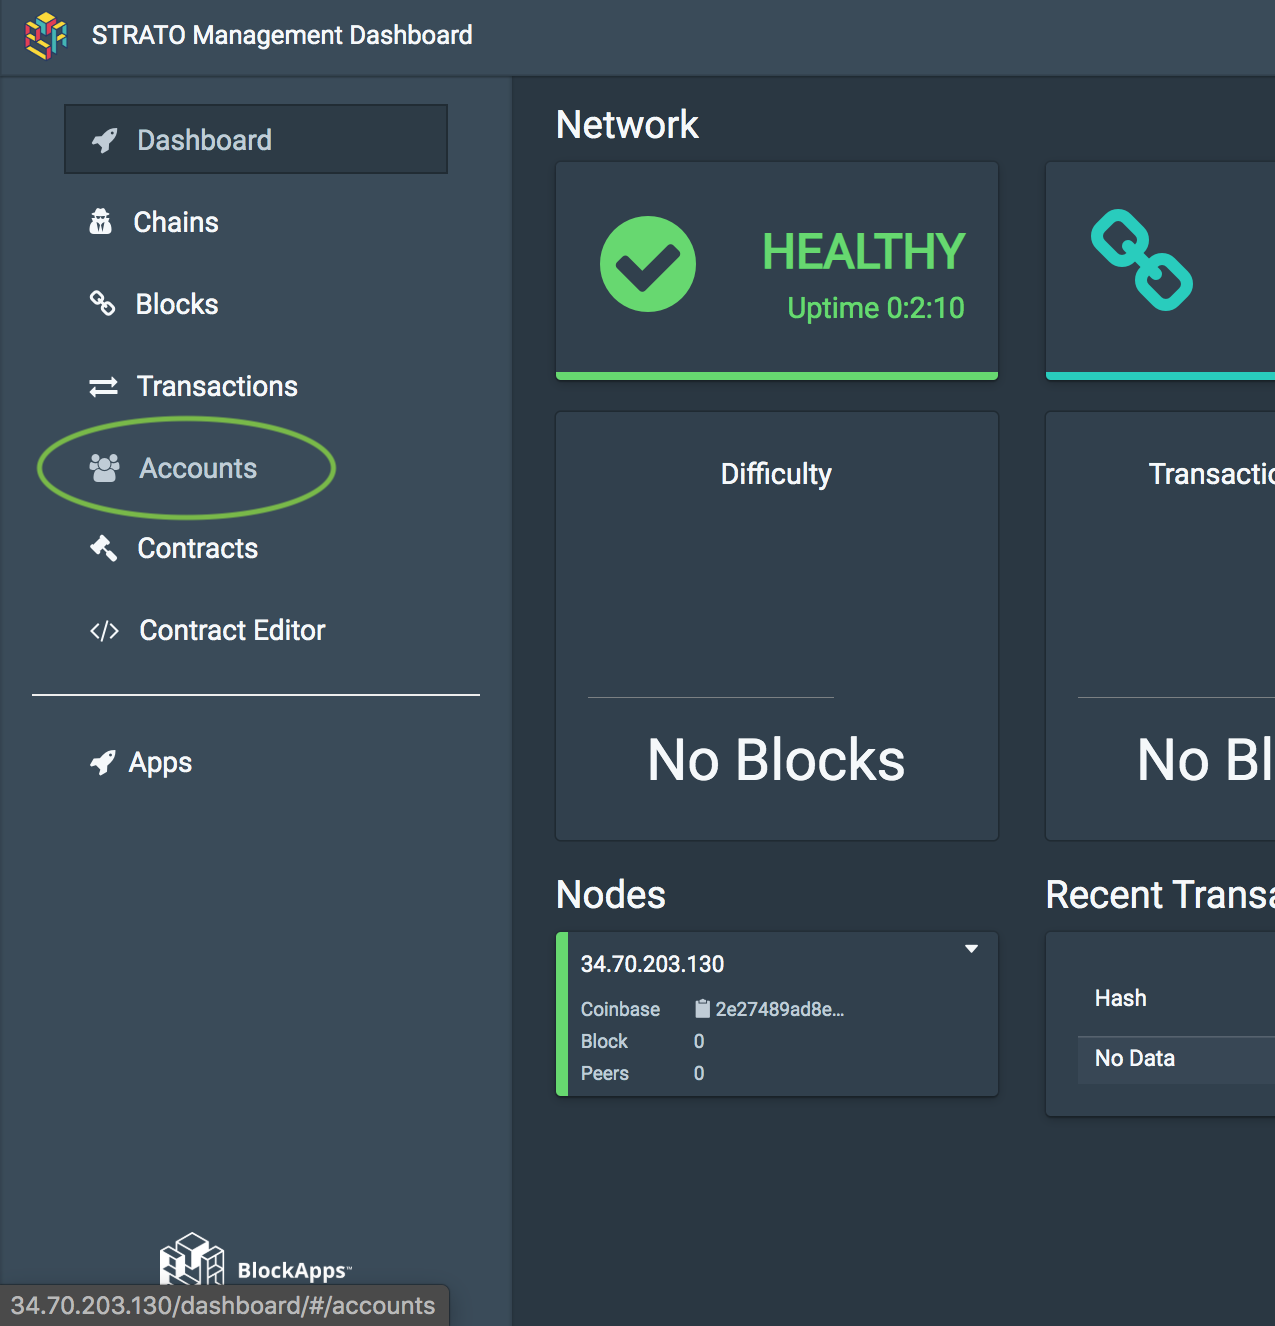
There are currently no users in this network. Without users, nothing of interest can happen on this network, so create one.
Create a user account
-
Click the Create User button in the upper-right corner.
-
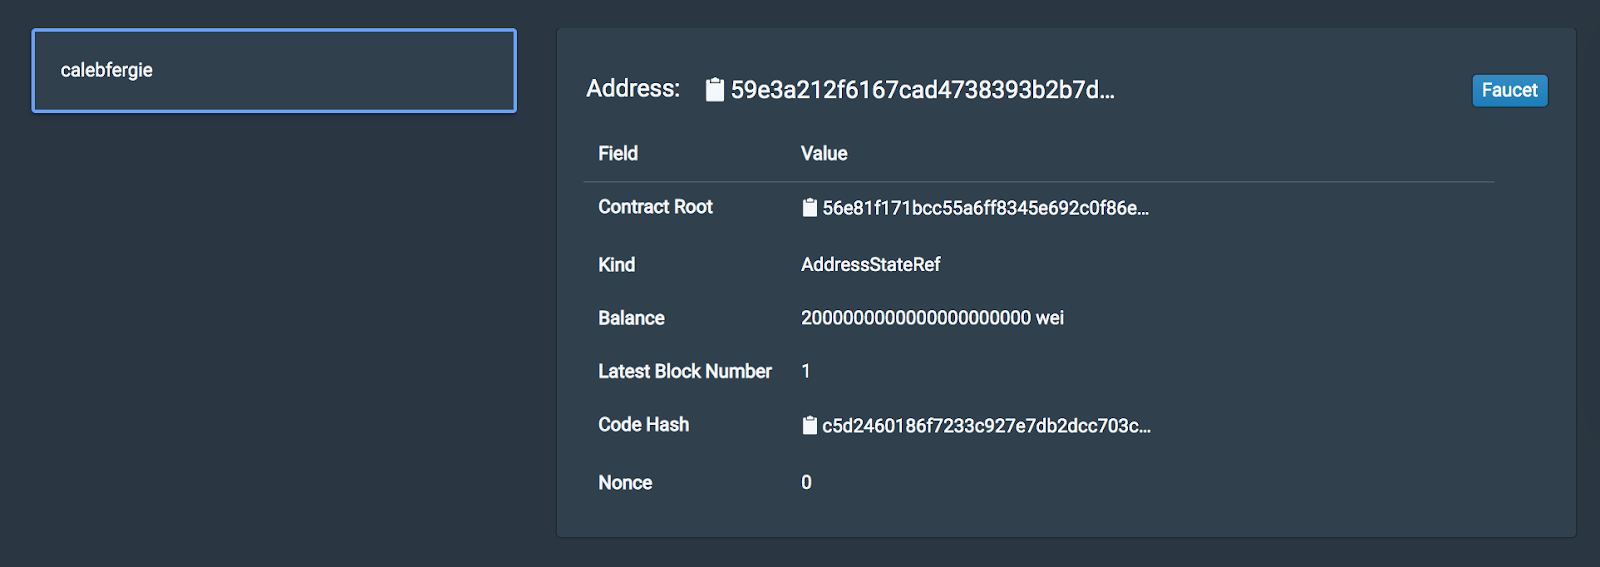
Choose a username and password (for example
calebfergie) and click the Create User button.
You should now see the user in the Accounts list!
Activate the account
While this user account has been created, it hasn't truly been "activated" yet.
Notice how most of the account fields are empty. You need to activate this account by fauceting it. Fauceting:
- Provides the user with what they need to perform transactions on your network
- Adds the user accounts "creation event" to the blockchain ledger
- Click the Faucet button to activate the account.
After fauceting, you will see the user's account fields are now populated with information.
- Look at elements of the user you created.
What do these fields mean?
- The Address field is the unique identifying key (hash) that allows other users on the network to interact with this one user
- The Contract Root is a hash of the proof that this user was created at this point in time on the blockchain
- The Kind field describes what type of information the Contract Root value represents
- The Balance field contains an allocation of credits (as a result of the faucet) assigned to the account upon creation. The balance is only useful in more advanced networks but provided here regardless
- The Latest Block Number is the most recent block this account has been active for
- The Code Hash is a hashed representation of the above information
- The Nonce field is not relevant here
Task 4. Reset STRATO
To reset STRATO:
-
in the Deployment Manager page, Click Delete next to
strato-node-1on the top of the middle pane. -
Select Delete strato-node-1 and all resources created by it, such as VMs, load balancers and disks and click Delete All.
This deletes the instance running on your machine from the Deployment Console.
- Repeat the steps to Launch STRATO.
Congratulations!
In just a few minutes, you have launched a private blockchain network with STRATO and added a user account to the network. Launching a blockchain is not so hard. The next steps in your blockchain journey will teach you how to build and run blockchain networks that do what you want them to.
If you still have time left in your session, you can:
- Continue to explore and play with the management dashboard
- Try creating another user and facilitating a transaction between them
- Submit a question or some feedback in the lab review
Want more from BlockApps?
- Overview of STRATO
- About BlockApps
- STRATO for Business Networks - Single Node
- Developer Documentation
Google Cloud training and certification
...helps you make the most of Google Cloud technologies. Our classes include technical skills and best practices to help you get up to speed quickly and continue your learning journey. We offer fundamental to advanced level training, with on-demand, live, and virtual options to suit your busy schedule. Certifications help you validate and prove your skill and expertise in Google Cloud technologies.
Manual Last Updated November 02, 2023
Lab Last Tested November 06, 2023
Copyright 2024 Google LLC All rights reserved. Google and the Google logo are trademarks of Google LLC. All other company and product names may be trademarks of the respective companies with which they are associated.