Checkpoint
Create Cloud Composer environment.
/ 25
Create two Cloud Storage buckets.
/ 25
Create a dataset.
/ 25
Uploading the DAG and dependencies to Cloud Storage
/ 25
Cloud Composer: Copying BigQuery Tables Across Different Locations
- GSP283
- Overview
- Setup and requirements
- Task 1. Create a Cloud Composer environment
- Task 2. Create Cloud Storage buckets
- Task 3. Create the BigQuery destination dataset
- Task 4. Airflow and core concepts, a brief introduction
- Task 5. Define the workflow
- Task 6. View environment information
- Task 7. Create a variable for the DAGs Cloud Storage bucket
- Task 8. Set Airflow variables
- Task 9. Upload the DAG and dependencies to Cloud Storage
- Task 10. Explore the Airflow UI
- Task 11. Validate the results
- Delete Cloud Composer Environment
- Congratulations!
- Next steps
GSP283

Overview
Imagine you have datasets that live in different locations around the globe, and your data is in Google Cloud Storage buckets or in BigQuery tables. How can you organize that data so that it gets consolidated and analyzed to provide insights on your business?
Cloud Composer can help you build workflows and move your data between regions and storage systems, with an intuitive graphical view. Among other benefits, it has templates for easy and reliable data transfer between BigQuery and Cloud Storage, both ways.
In this lab, you create and run an Apache Airflow workflow in Cloud Composer that completes the following tasks:
- Reads from a config file that provides a list of tables to copy
- Exports the list of tables from a BigQuery dataset located in US to Cloud Storage
- Copies the exported tables from the US to EU Cloud Storage bucket
- Imports the list of tables into the target BigQuery Dataset in EU
What you'll do
In this lab, you learn how to:
- Create a Cloud Composer environment
- Create Cloud Storage buckets
- Create BigQuery datasets
- Create and run Apache Airflow workflows in Cloud Composer to move data between Cloud Storage and BigQuery
Setup and requirements
Before you click the Start Lab button
Read these instructions. Labs are timed and you cannot pause them. The timer, which starts when you click Start Lab, shows how long Google Cloud resources will be made available to you.
This hands-on lab lets you do the lab activities yourself in a real cloud environment, not in a simulation or demo environment. It does so by giving you new, temporary credentials that you use to sign in and access Google Cloud for the duration of the lab.
To complete this lab, you need:
- Access to a standard internet browser (Chrome browser recommended).
- Time to complete the lab---remember, once you start, you cannot pause a lab.
How to start your lab and sign in to the Google Cloud console
-
Click the Start Lab button. If you need to pay for the lab, a pop-up opens for you to select your payment method. On the left is the Lab Details panel with the following:
- The Open Google Cloud console button
- Time remaining
- The temporary credentials that you must use for this lab
- Other information, if needed, to step through this lab
-
Click Open Google Cloud console (or right-click and select Open Link in Incognito Window if you are running the Chrome browser).
The lab spins up resources, and then opens another tab that shows the Sign in page.
Tip: Arrange the tabs in separate windows, side-by-side.
Note: If you see the Choose an account dialog, click Use Another Account. -
If necessary, copy the Username below and paste it into the Sign in dialog.
{{{user_0.username | "Username"}}} You can also find the Username in the Lab Details panel.
-
Click Next.
-
Copy the Password below and paste it into the Welcome dialog.
{{{user_0.password | "Password"}}} You can also find the Password in the Lab Details panel.
-
Click Next.
Important: You must use the credentials the lab provides you. Do not use your Google Cloud account credentials. Note: Using your own Google Cloud account for this lab may incur extra charges. -
Click through the subsequent pages:
- Accept the terms and conditions.
- Do not add recovery options or two-factor authentication (because this is a temporary account).
- Do not sign up for free trials.
After a few moments, the Google Cloud console opens in this tab.

Activate Cloud Shell
Cloud Shell is a virtual machine that is loaded with development tools. It offers a persistent 5GB home directory and runs on the Google Cloud. Cloud Shell provides command-line access to your Google Cloud resources.
- Click Activate Cloud Shell
at the top of the Google Cloud console.
When you are connected, you are already authenticated, and the project is set to your Project_ID,
gcloud is the command-line tool for Google Cloud. It comes pre-installed on Cloud Shell and supports tab-completion.
- (Optional) You can list the active account name with this command:
- Click Authorize.
Output:
- (Optional) You can list the project ID with this command:
Output:
gcloud, in Google Cloud, refer to the gcloud CLI overview guide.
Task 1. Create a Cloud Composer environment
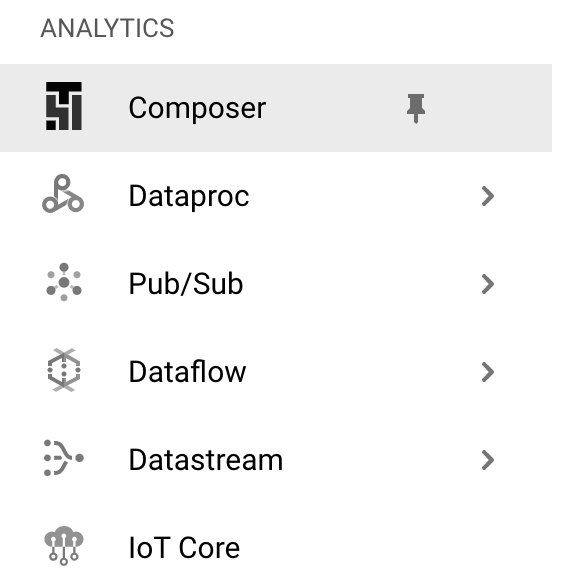
- First, create a Cloud Composer environment by clicking on Composer in the Navigation menu:
-
Then click Create environment.
-
In dropdown menu, select Composer 2.
-
Set the following parameters for your environment:
-
Name: composer-advanced-lab
-
Location:
-
Image Version: composer-2.6.x-airflow-2.x.x (select the latest image)
-
Select the checkbox for Grant required permissions to Cloud Composer service account and click Grant.
-
Click the dropdown for Show Advanced Configuration and select Airflow database zone as
.
Leave all other settings as default.
- Click Create.
The environment creation process is completed when the green checkmark displays to the left of the environment name on the Environments page in the Cloud Console.
Create Cloud Storage buckets and BigQuery destination dataset.Click Check my progress to verify the objective.
Task 2. Create Cloud Storage buckets
In this task you will create two Cloud Storage Multi-Regional buckets. These buckets will be used to copy the exported tables across locations, i.e., US to EU.
Create a bucket in US
- Navigate to Cloud Storage > Bucket and click Create.
- Give the bucket a universally unique name including the project ID (e.g.
-us). - For a Location Type select us (multiple regions in United States).
- Leave the other value as default and click Create.
- Check the box for
Enforce public access prevention on this bucketand click Confirm forPublic access will be preventedpop-up if prompted.
Create a bucket in EU
Repeat the steps to create another bucket in EU region. The universally unique name should include the location as a suffix to your bucket (e.g.
Click Check my progress to verify the objective.
Task 3. Create the BigQuery destination dataset
-
Create the destination BigQuery Dataset in EU from the BigQuery new web UI.
-
Go to Navigation menu > BigQuery.
The Welcome to BigQuery in the Cloud Console message box opens. This message box provides a link to the quickstart guide and lists UI updates.
-
Click Done.
-
Then click the three dots next to your Qwiklabs project ID and select Create dataset.
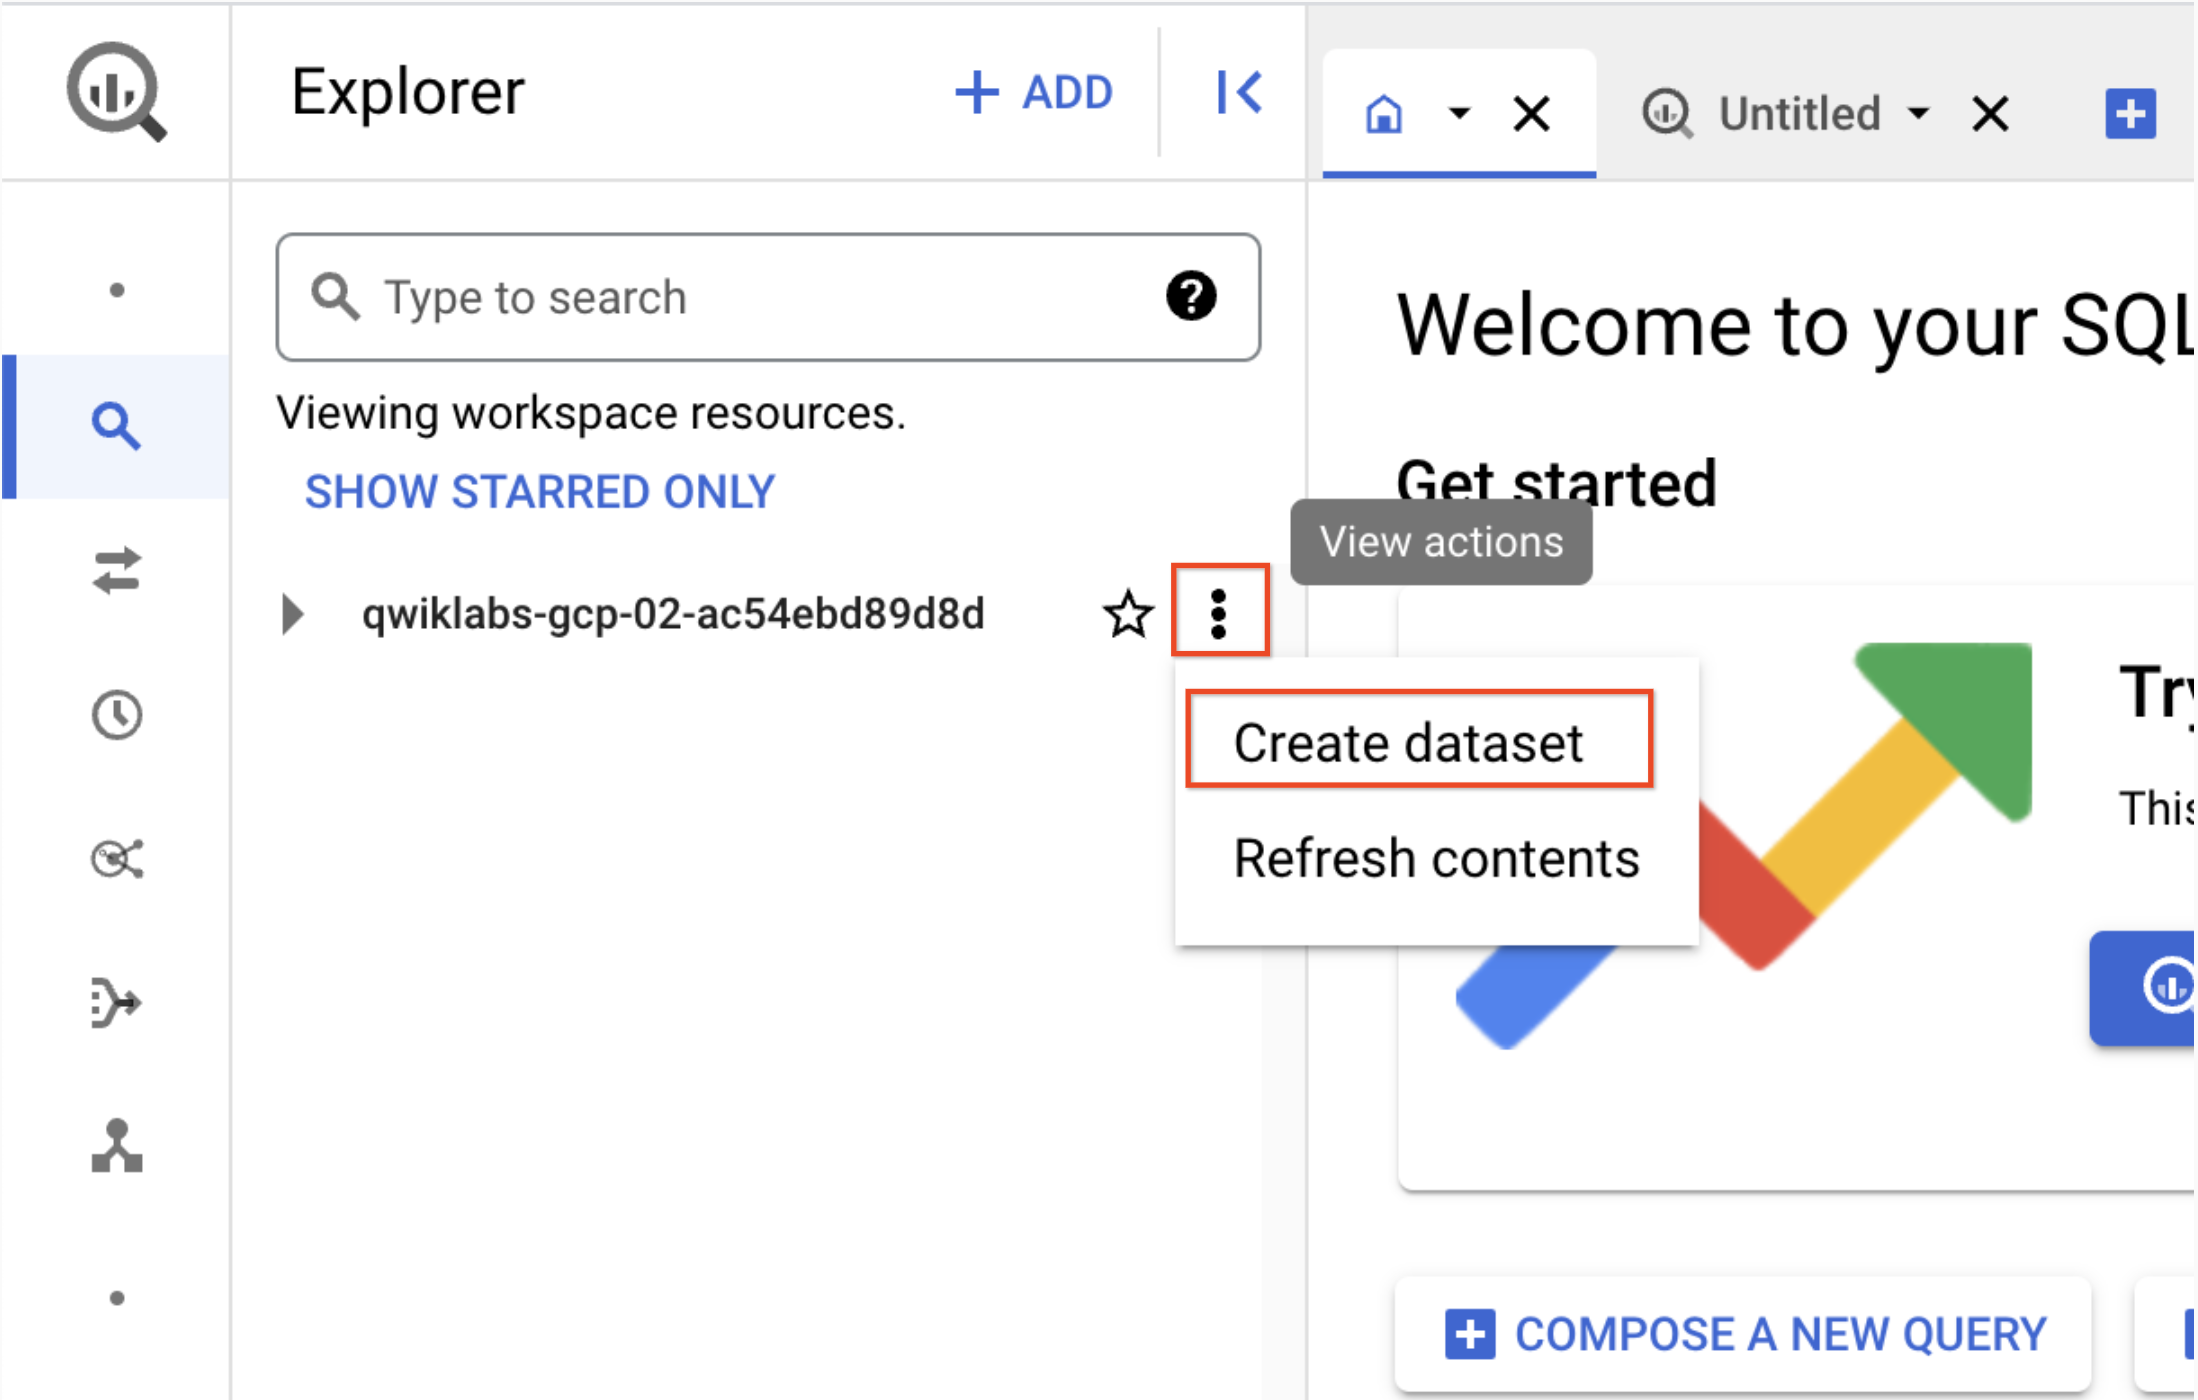
- Use the dataset ID nyc_tlc_EU, for location type choose Multi-region and select EU from the dropdown.

- Click CREATE DATASET.
Click Check my progress to verify the objective.
Task 4. Airflow and core concepts, a brief introduction
- While your environment is building, read about the sample file you'll be using in this lab.
Airflow is a platform to programmatically author, schedule and monitor workflows.
Use airflow to author workflows as directed acyclic graphs (DAGs) of tasks. The airflow scheduler executes your tasks on an array of workers while following the specified dependencies.
Core concepts
DAG - A Directed Acyclic Graph is a collection of tasks, organized to reflect their relationships and dependencies.
Operator - The description of a single task, it is usually atomic. For example, the BashOperator is used to execute bash command.
Task - A parameterised instance of an Operator; a node in the DAG.
Task Instance - A specific run of a task; characterized as: a DAG, a Task, and a point in time. It has an indicative state: running, success, failed, skipped, ...
Learn more about Airflow concepts from the Concepts documentation.
Task 5. Define the workflow
Cloud Composer workflows are comprised of DAGs (Directed Acyclic Graphs). The code shown in bq_copy_across_locations.py is the workflow code, also referred to as the DAG. Open the file now to see how it is built. Next will be a detailed look at some of the key components of the file.
To orchestrate all the workflow tasks, the DAG imports the following operators:
-
DummyOperator: Creates Start and End dummy tasks for better visual representation of the DAG. -
BigQueryToCloudStorageOperator: Exports BigQuery tables to Cloud Storage buckets using Avro format. -
GoogleCloudStorageToGoogleCloudStorageOperator: Copies files across Cloud Storage buckets. -
GoogleCloudStorageToBigQueryOperator: Imports tables from Avro files in Cloud Storage bucket.
- In this example, the function
read_table_list()is defined to read the config file and build the list of tables to copy:
- The name of the DAG is
bq_copy_us_to_eu_01, and the DAG is not scheduled by default so needs to be triggered manually.
- To define the Cloud Storage plugin, the class
Cloud StoragePlugin(AirflowPlugin)is defined, mapping the hook and operator downloaded from the Airflow 1.10-stable branch.
Task 6. View environment information
-
Go back to Composer to check on the status of your environment.
-
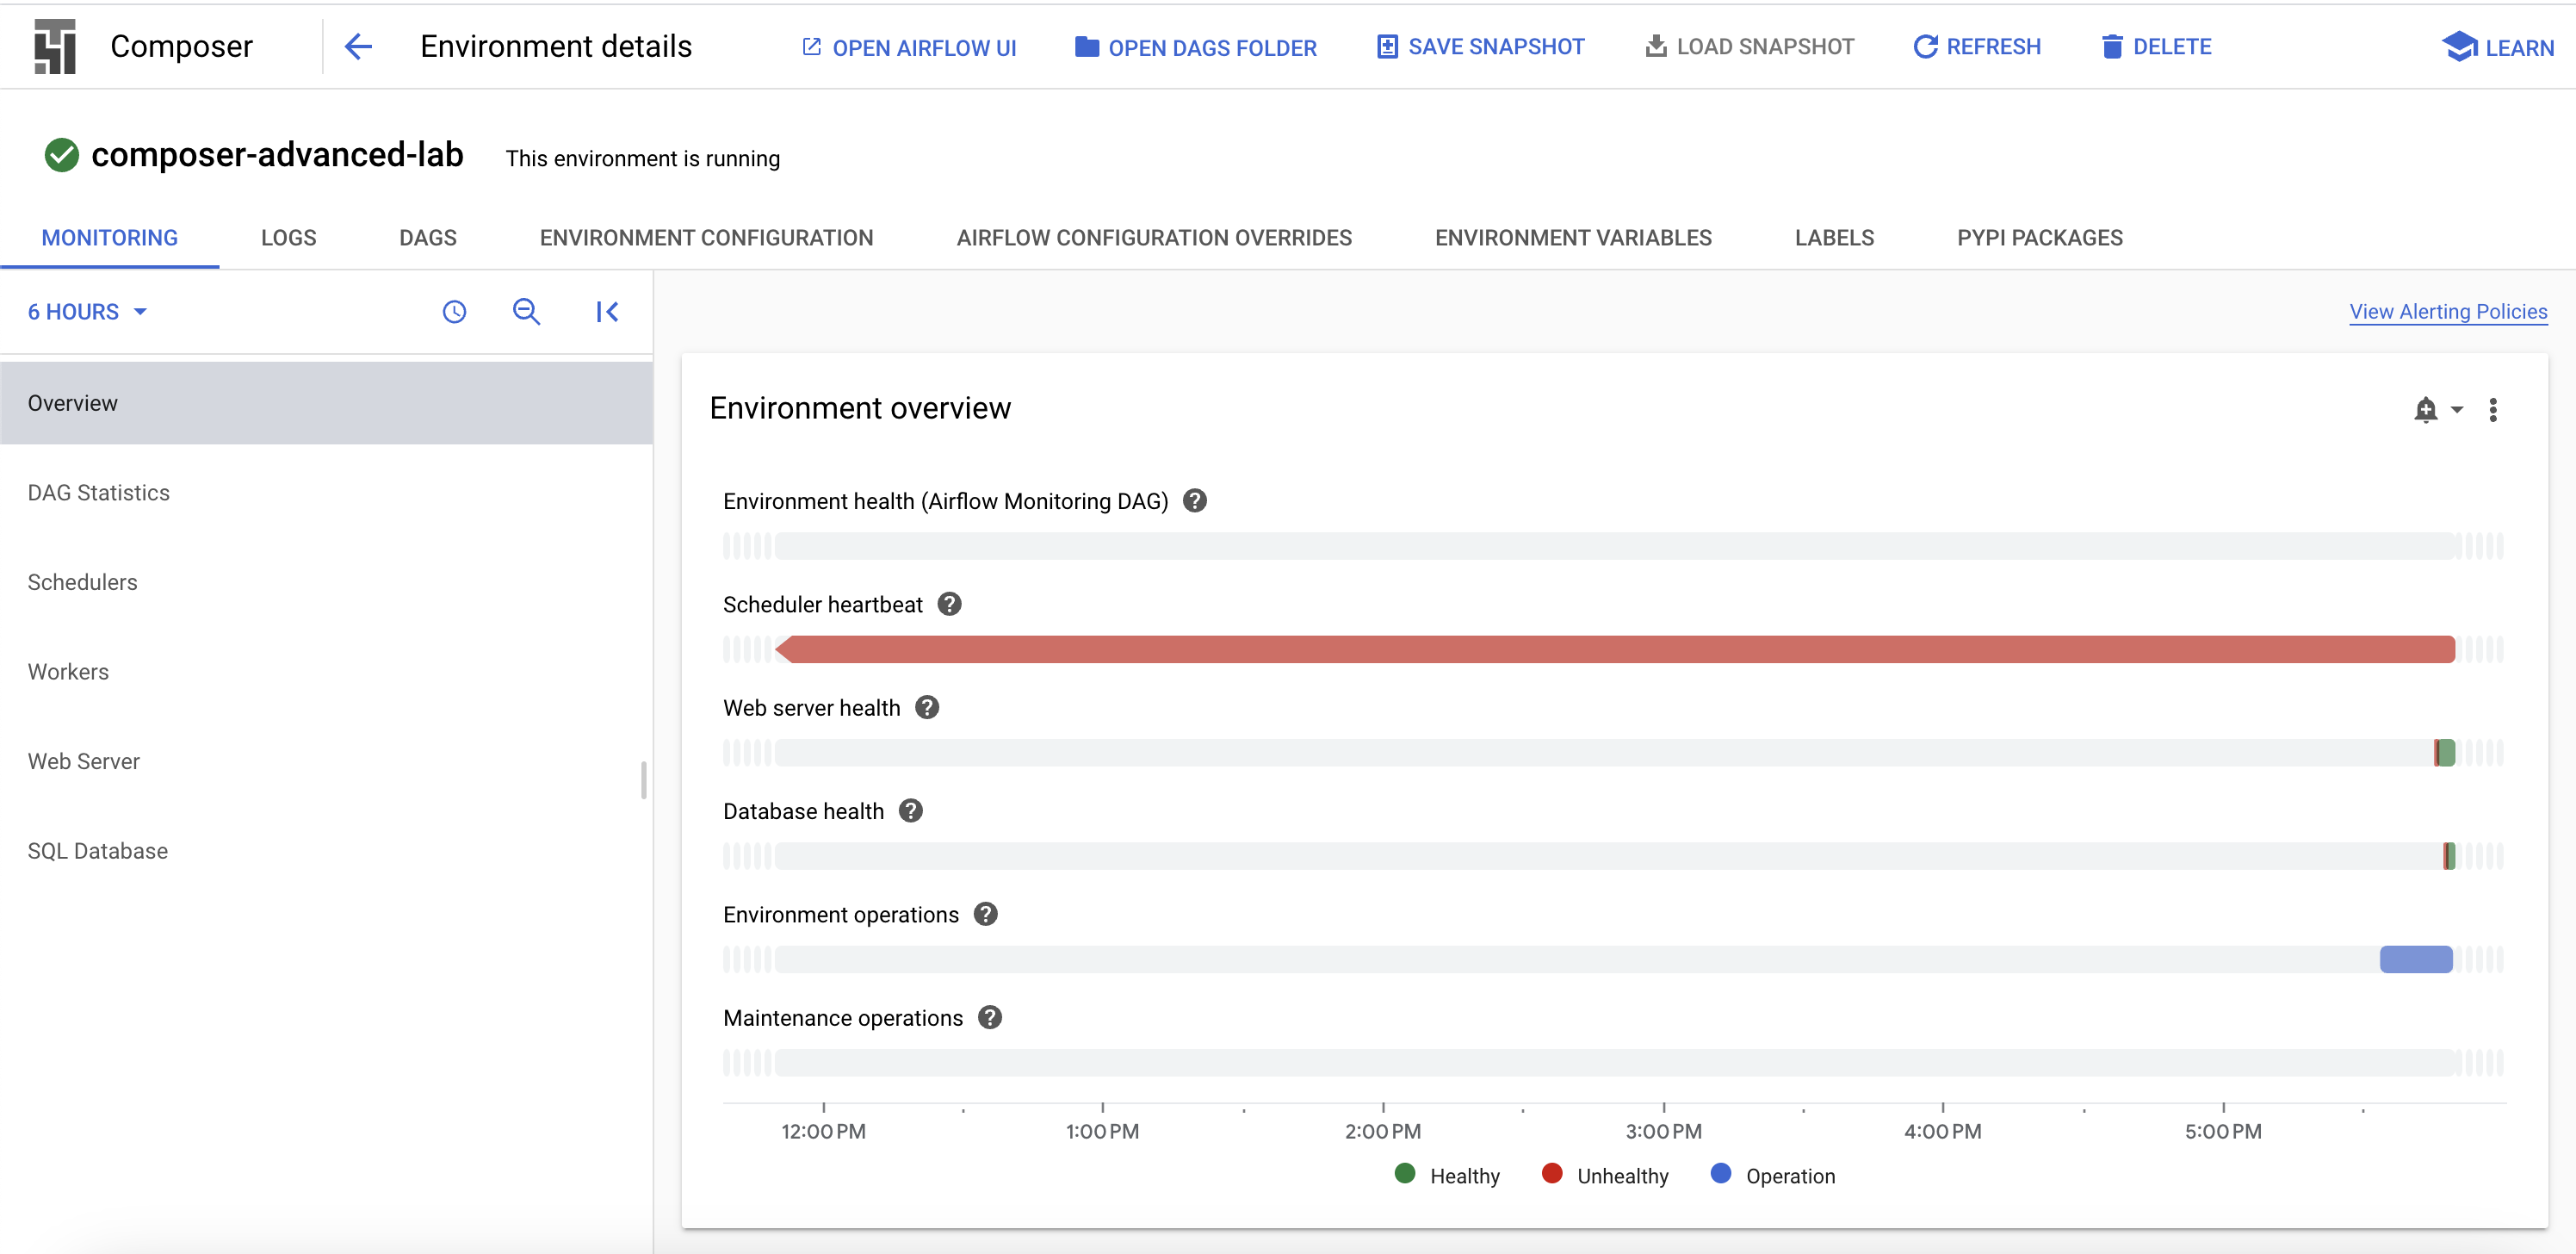
Once your environment has been created, click the name of the environment to see its details.
The Environment details page provides information, such as the Airflow web UI URL, Google Kubernetes Engine cluster ID, name of the Cloud Storage bucket connected to the DAGs folder.
The next steps should be completed in Cloud Shell.
Creating a virtual environment
Python virtual environments are used to isolate package installation from the system.
- Install the
virtualenvenvironment:
- Build the virtual environment:
- Activate the virtual environment.
Task 7. Create a variable for the DAGs Cloud Storage bucket
- In Cloud Shell, run the following to copy the name of the DAGs bucket from your Environment Details page and set a variable to refer to it in Cloud Shell:
You will be using this variable a few times during the lab.
Task 8. Set Airflow variables
Airflow variables are an Airflow-specific concept that is distinct from environment variables. In this step, you'll set the following three Airflow variables used by the DAG we will deploy: table_list_file_path, gcs_source_bucket, and gcs_dest_bucket.
| Key | Value | Details |
|---|---|---|
table_list_file_path |
/home/airflow/gcs/dags/bq_copy_eu_to_us_sample.csv | CSV file listing source and target tables, including dataset |
gcs_source_bucket |
{UNIQUE ID}-us | Cloud Storage bucket to use for exporting BigQuery tabledest_bbucks from source |
gcs_dest_bucket |
{UNIQUE ID}-eu | Cloud Storage bucket to use for importing BigQuery tables at destination |
The next gcloud composer command executes the Airflow CLI sub-command variables. The sub-command passes the arguments to the gcloud command line tool.
To set the three variables, you will run the composer command once for each row from the above table. The form of the command is this:
(ERROR: gcloud crashed (TypeError): 'NoneType' object is not callable). This is a known issue with using gcloud composer environments run with the 410.0.0 version of gcloud. Your variables will still be set accordingly despite the error message.
-
ENVIRONMENT_NAMEis the name of the environment. -
LOCATIONis the Compute Engine region where the environment is located. The gcloud composer command requires including the--locationflag or setting the default location before running the gcloud command. -
KEYandVALUEspecify the variable and its value to set. Include a space two dashes space (--) between the left-sidegcloudcommand with gcloud-related arguments and the right-side Airflow sub-command-related arguments. Also include a space between theKEYandVALUEarguments. using thegcloud composer environments runcommand with the variables sub-command in
Run these commands in Cloud Shell, replacing gcs_source_bucket and gcs_dest_bucket by the names of the buckets you created on Task 2.
To see the value of a variable, run the Airflow CLI sub-command variables with the get argument or use the Airflow UI.
For example, run the following:
Task 9. Upload the DAG and dependencies to Cloud Storage
- Copy the Google Cloud Python docs samples files into your Cloud shell:
- Upload a copy of the third party hook and operator to the plugins folder of your Composer DAGs Cloud Storage bucket:
- Next, upload the DAG and config file to the DAGs Cloud Storage bucket of your environment:
Cloud Composer registers the DAG in your Airflow environment automatically, and DAG changes occur within 3-5 minutes. You can see task status in the Airflow web interface and confirm the DAG is not scheduled as per the settings.
Task 10. Explore the Airflow UI
To access the Airflow web interface using the Cloud Console:
- Go back to the Composer Environments page.
- In the Airflow webserver column for the environment, click the Airflow link.

- Click on your lab credentials.
- The Airflow web UI opens in a new browser window. Data will still be loading when you get here. You can continue with the lab while this is happening.
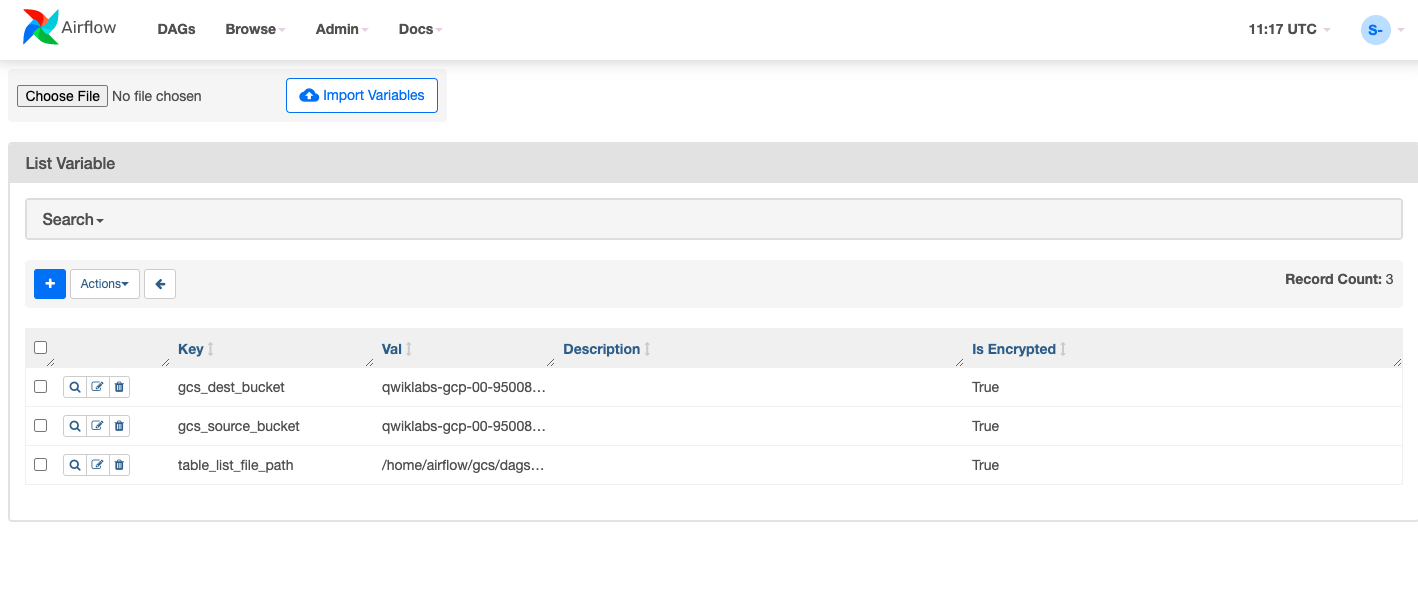
Viewing variables
The variables you set earlier are persisted in your environment.
- View the variables by selecting Admin >Variables from the Airflow menu bar.
Trigger the DAG to run manually
-
Click on the DAGs tab and wait for the links to finish loading.
-
To trigger the DAG manually, click the play button for
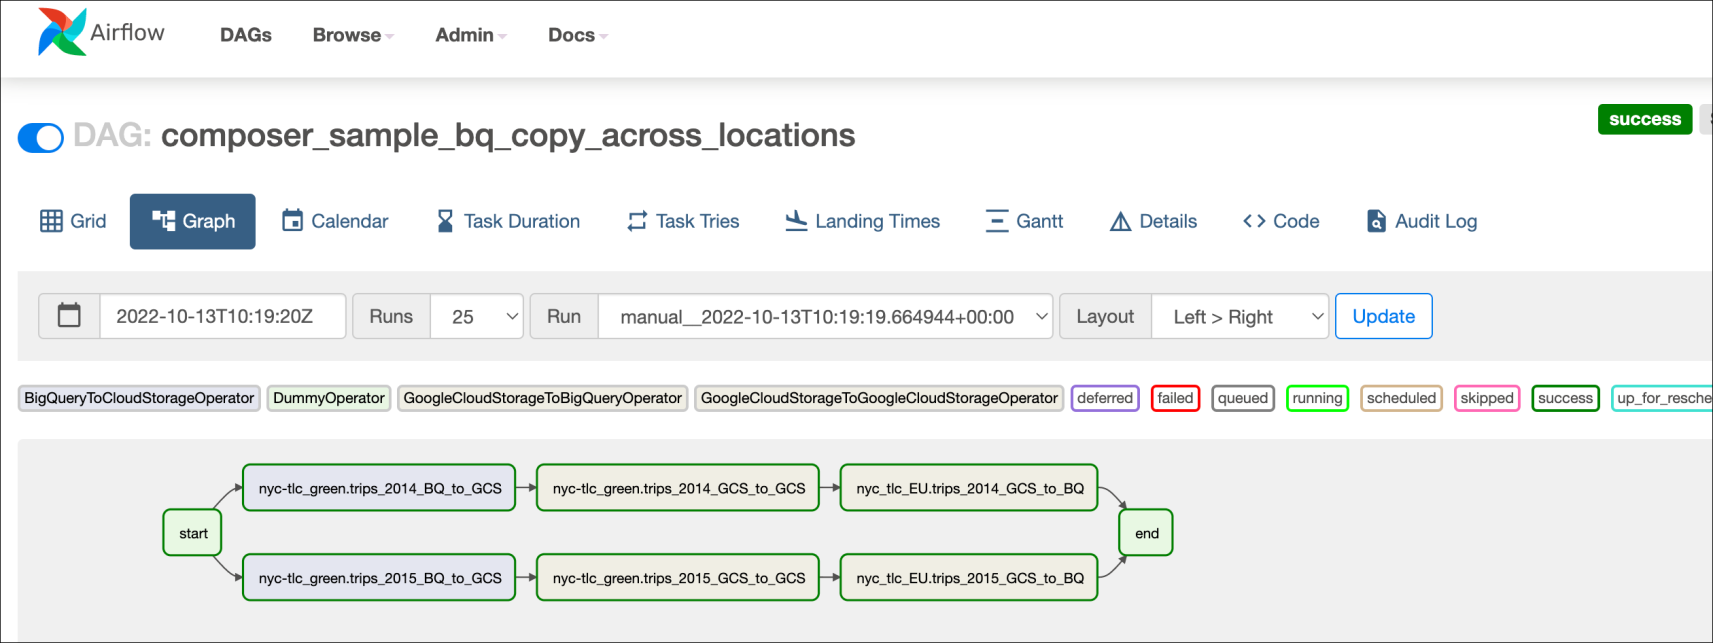
composer_sample_bq_copy_across_locations:

- Click Trigger DAG to confirm this action.
Click Check my progress to verify the objective.
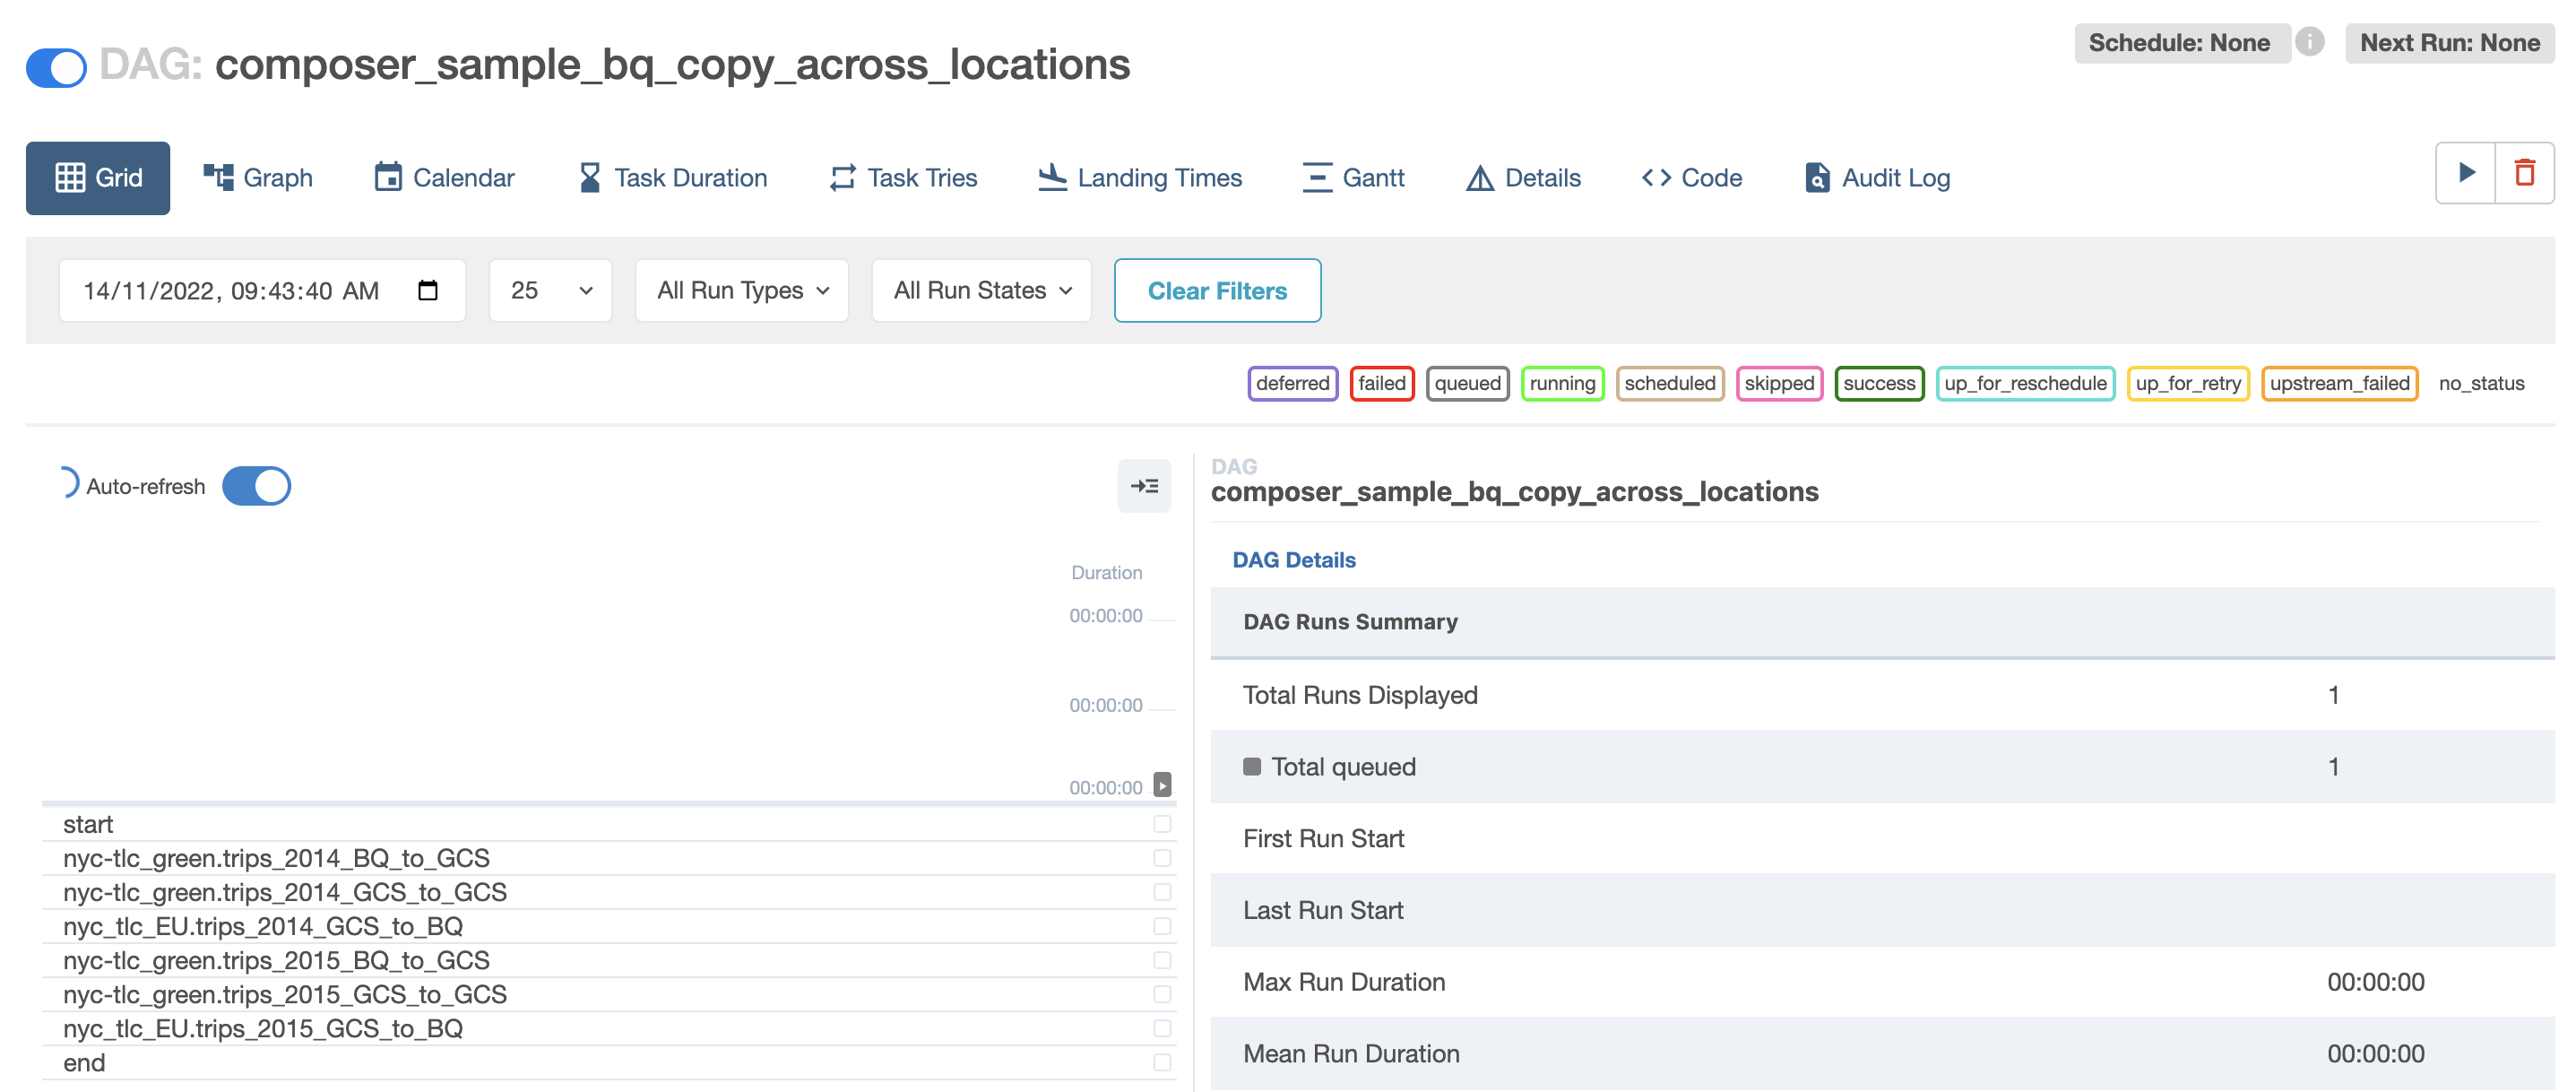
Exploring DAG runs
When you upload your DAG file to the DAGs folder in Cloud Storage, Cloud Composer parses the file. If no errors are found, the name of the workflow appears in the DAG listing, and the workflow is queued to run immediately if the schedule conditions are met, in this case, None as per the settings.
The Runs status turns green once the play button is pressed:

- Click the name of the DAG to open the DAG details page. This page includes a graphical representation of workflow tasks and dependencies.
- Now, in the toolbar, click Graph, then mouseover the graphic for each task to see its status. Note that the border around each task also indicates the status (green border = running; red = failed, etc.).
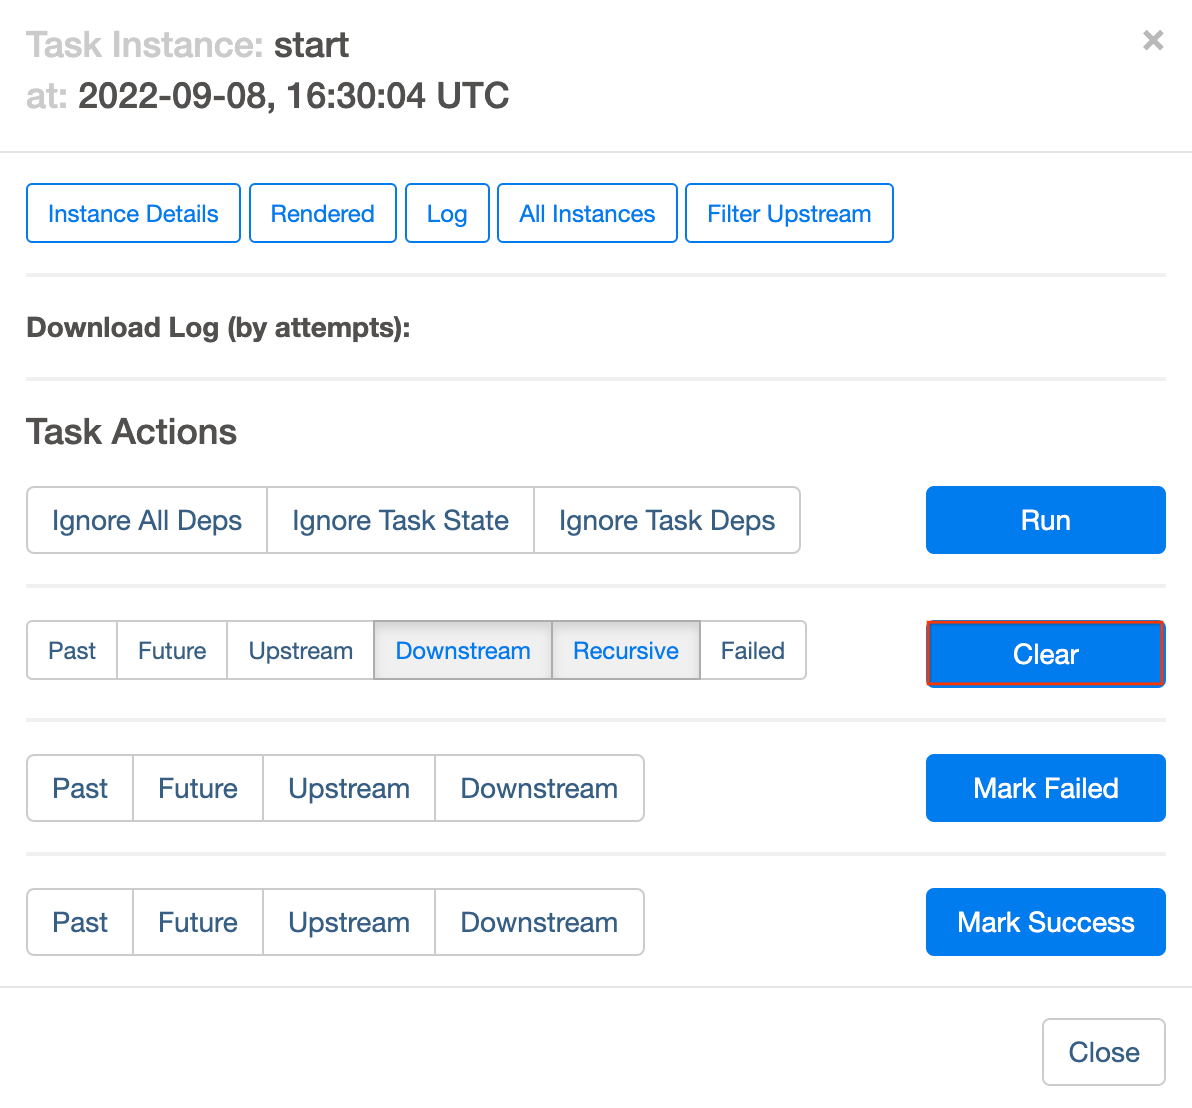
To run the workflow again from the Graph view:
- In the Airflow UI Graph View, click the start graphic.
- Click Clear to reset all the tasks and then click OK to confirm.
Refresh your browser while the process is running to see the most recent information.
Task 11. Validate the results
Now check the status and results of the workflow by going to these Cloud Console pages:
- The exported tables were copied from the US bucket to the EU Cloud Storage bucket. Click on Cloud Storage to see the intermediate Avro files in the source (US) and destination (EU) buckets.
- The list of tables were imported into the target BigQuery Dataset. Click on BigQuery, then click on your project name and the nyc_tlc_EU dataset to validate the tables are accessible from the dataset you created.
Delete Cloud Composer Environment
-
Return to the Environments page in Composer.
-
Select the checkbox next to your Composer environment.
-
Click DELETE.
-
Confirm the pop-up by clicking DELETE again.
Congratulations!
You copied tables programmatically from US to EU! This lab is based on this blog post by David Sabater Dinter.
Next steps
- Learn more about using Airflow at the Airflow website or the Airflow Github project.
- There are lots of other resources available for Airflow, including a discussion group.
- Sign up for an Apache JIRA account and re-open any issues that you care about in the Apache Airflow JIRA project.
- For information about the Airflow UI, see Accessing the web interface.
Google Cloud training and certification
...helps you make the most of Google Cloud technologies. Our classes include technical skills and best practices to help you get up to speed quickly and continue your learning journey. We offer fundamental to advanced level training, with on-demand, live, and virtual options to suit your busy schedule. Certifications help you validate and prove your skill and expertise in Google Cloud technologies.
Manual Last Updated April 4, 2024
Lab Last Tested April 4, 2024
Copyright 2024 Google LLC All rights reserved. Google and the Google logo are trademarks of Google LLC. All other company and product names may be trademarks of the respective companies with which they are associated.