Punkty kontrolne
Create required resources with the fully automated deployment
/ 100
Connect to Cloud SQL from an Application in Google Kubernetes Engine
GSP449

Overview
In this lab you will learn how easy it is to connect an application in Google Kubernetes Engine (GKE) to a Cloud SQL instance using the Cloud SQL Proxy container as a sidecar container. You will deploy a GKE cluster and a Cloud SQL Postgres instance and use the Cloud SQL Proxy container to allow communication between them.
While this lab is focused on connecting to a Cloud SQL instance with a Cloud SQL Proxy container, the concepts are the same for any Google Cloud managed service that requires API access.
This lab was created by GKE Helmsman engineers to help you gain a better understanding of Cloud SQL through a proxy container. You can view this demo on Github on the gke-networking-demos page. Any and all contributions to the assets is encouraged!
What you'll learn
In this lab, you'll learn how to:
- Protect your database from unauthorized access by using an unprivileged service account on your GKE nodes.
- Put privileged service account credentials into a container running on GKE.
- Use the Cloud SQL Proxy to offload the work of connecting to your Cloud SQL instance and reduce your applications knowledge of your infrastructure.
Unprivileged service accounts
All Google Kubernetes Engine nodes are assigned the default Compute Engine service account. This service account is fairly high privilege and has access to many Google Cloud services. Because of the way the Cloud SDK is setup, software that you write will use the credentials assigned to the compute engine instance on which it is running.
Since you don't want all of your containers to have the privileges that the default Compute Engine service account has, you need to make a least-privilege service account for your GKE nodes and then create more specific (but still least-privilege) service accounts for your containers.
Privileged service accounts in containers
The only two ways to get service account credentials are through:
- Your host instance (which you don't want)
- A credentials file
This lab will show you how to get the credentials file into your container running on GKE so your application has the privileges it needs.
Cloud SQL Proxy
The Cloud SQL Proxy allows you to offload the burden of creating and maintaining a connection to your Cloud SQL instance to the Cloud SQL Proxy process. Doing this allows your application to be unaware of the connection details and simplifies your secret management. The Cloud SQL Proxy comes pre-packaged by Google as a Docker container that you can run alongside your application container in the same GKE pod.
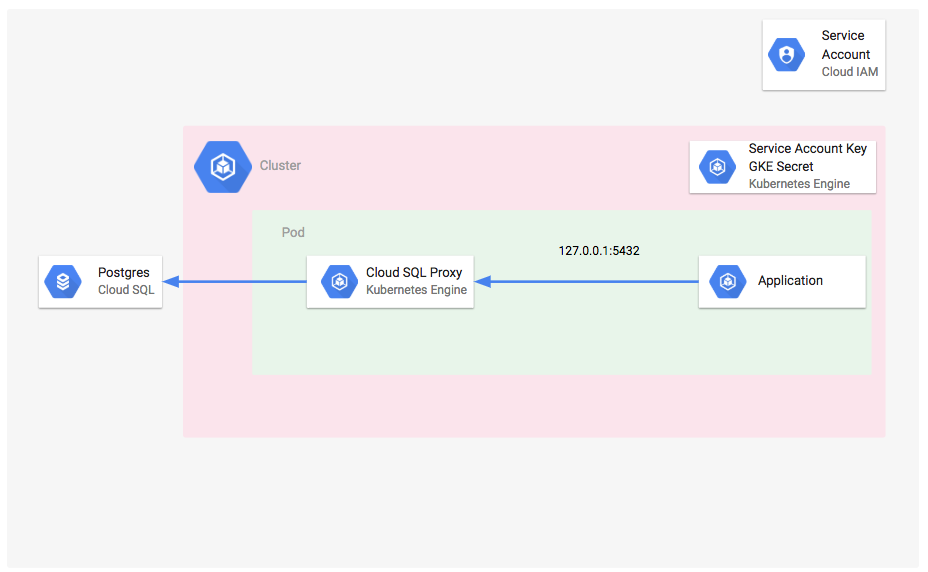
Architecture
The application and its sidecar container are deployed in a single Kubernetes (k8s) pod running on the only node in the GKE cluster. The application communicates with the Cloud SQL instance via the Cloud SQL Proxy process listening on localhost.
The k8s manifest builds a single-replica Deployment object with two containers, pgAdmin and Cloud SQL Proxy. There are two secrets installed into the GKE cluster: the Cloud SQL instance connection information and a service account key credentials file, both used by the Cloud SQL Proxy containers Cloud SQL API calls.
The application doesn't have to know anything about how to connect to Cloud SQL, nor does it have to have any exposure to its API. The Cloud SQL Proxy process takes care of that for the application. It's important to note that the Cloud SQL Proxy container is running as a 'sidecar' container in the pod.
Setup and requirements
Before you click the Start Lab button
Read these instructions. Labs are timed and you cannot pause them. The timer, which starts when you click Start Lab, shows how long Google Cloud resources will be made available to you.
This hands-on lab lets you do the lab activities yourself in a real cloud environment, not in a simulation or demo environment. It does so by giving you new, temporary credentials that you use to sign in and access Google Cloud for the duration of the lab.
To complete this lab, you need:
- Access to a standard internet browser (Chrome browser recommended).
- Time to complete the lab---remember, once you start, you cannot pause a lab.
How to start your lab and sign in to the Google Cloud console
-
Click the Start Lab button. If you need to pay for the lab, a pop-up opens for you to select your payment method. On the left is the Lab Details panel with the following:
- The Open Google Cloud console button
- Time remaining
- The temporary credentials that you must use for this lab
- Other information, if needed, to step through this lab
-
Click Open Google Cloud console (or right-click and select Open Link in Incognito Window if you are running the Chrome browser).
The lab spins up resources, and then opens another tab that shows the Sign in page.
Tip: Arrange the tabs in separate windows, side-by-side.
Note: If you see the Choose an account dialog, click Use Another Account. -
If necessary, copy the Username below and paste it into the Sign in dialog.
{{{user_0.username | "Username"}}} You can also find the Username in the Lab Details panel.
-
Click Next.
-
Copy the Password below and paste it into the Welcome dialog.
{{{user_0.password | "Password"}}} You can also find the Password in the Lab Details panel.
-
Click Next.
Important: You must use the credentials the lab provides you. Do not use your Google Cloud account credentials. Note: Using your own Google Cloud account for this lab may incur extra charges. -
Click through the subsequent pages:
- Accept the terms and conditions.
- Do not add recovery options or two-factor authentication (because this is a temporary account).
- Do not sign up for free trials.
After a few moments, the Google Cloud console opens in this tab.

Activate Cloud Shell
Cloud Shell is a virtual machine that is loaded with development tools. It offers a persistent 5GB home directory and runs on the Google Cloud. Cloud Shell provides command-line access to your Google Cloud resources.
- Click Activate Cloud Shell
at the top of the Google Cloud console.
When you are connected, you are already authenticated, and the project is set to your Project_ID,
gcloud is the command-line tool for Google Cloud. It comes pre-installed on Cloud Shell and supports tab-completion.
- (Optional) You can list the active account name with this command:
- Click Authorize.
Output:
- (Optional) You can list the project ID with this command:
Output:
gcloud, in Google Cloud, refer to the gcloud CLI overview guide.
Set your region and zone
Certain Compute Engine resources live in regions and zones. A region is a specific geographical location where you can run your resources. Each region has one or more zones.
Run the following to set a region and zone for your lab (you can use the region/zone that's best for you):
Copy the demo
- Run the following to copy the files for this lab:
- Go into the directory for this lab:
Task 1. Deployment
Deployment is fully automated. The script you will deploy takes the following parameters, in order:
- A username for your Cloud SQL instance
- A username for the pgAdmin console
- USER_PASSWORD - the password to login to the Postgres instance
- PG_ADMIN_CONSOLE_PASSWORD - the password to login to the pgAdmin UI
-
You can create any username for the Cloud SQL instance and use any email for the pgAdmin console; the example here uses "dbadmin" and your temporary student email.
-
Save your student account in a variable:
- Run the following to deploy the script and create the 2 usernames; you will be asked to create a password for
dbadminand$PG_EMAIL(your student@qwiklabs.net account) in the output:
The passwords will be used again later in the lab; they don't need to be difficult.
During the deployment, create.sh will run the following scripts:
-
enable_apis.sh- enables the GKE API and Cloud SQL Admin API. -
postgres_instance.sh- creates the Cloud SQL instance and additional Postgres user. Note that gcloud will timeout when waiting for the creation of a Cloud SQL instance so the script manually polls for its completion instead. -
service_account.sh- creates the service account for the Cloud SQL Proxy container and creates the credentials file. -
cluster.sh- Creates the GKE cluster. -
configs_and_secrets.sh- creates the GKE secrets and configMap containing credentials and connection string for the Cloud SQL instance. -
pgadmin_deployment.sh- creates the pgAdmin4 pod.
create.shscript.
Next, use load balancer to expose the pod in order to connect to the instance, then delete the services when finished to avoid unauthorized access.
- Run the following to get the Pod ID:
- Expose the pod via load balancer:
- Get the service IP address:
Output:
-
In the Cloud console, from the Navigation menu > SQL, click on the Instance ID.
-
In the left menu, click on Connections and then on Networking.
-
With the Public IP box checked, click on Add a Network.
-
Name the network, then give it public access:
-
Click Done.
-
Click Save.
-
Open a new tab and connect to pgAdmin in your browser the using th pgAdmin <SVC_IP>:
- Sign in to the pgAdmin UI with the following:
- <PGADMIN_USERNAME> (your temporary student@qwiklabs.net account) in the "Email Address" field
- <PG_ADMIN_CONSOLE_PASSWORD> that you defined earlier
-
Return to the Cloud console, and the SQL page. Click on the Overview tab.
-
Copy the Public IP address.
-
In the pgAdmin console, from the left pane click Servers, then click Add New Server.
-
On the General tab, give your server a name, then click on the Connection tab.
-
Use the <DATABASE_USER_NAME>(dbadmin) and <USER_PASSWORD> you created earlier to connect to 127.0.0.1:5432:
- Host name: paste the public IP address you copied
-
Username:
<DATABASE_USER_NAME>(dbadmin) -
Password:
<USER_PASSWORD>you created
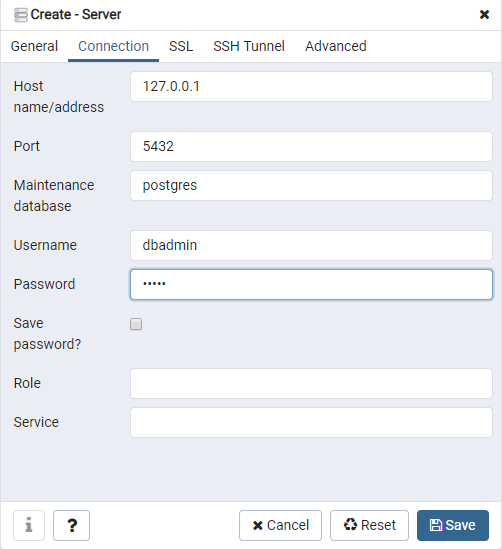
- Click Save.
Test completed task
Click Check my progress to verify your performed task. If you have successfully created required resources with the fully automated deployment, you will see an assessment score.
Task 2. Validation
Validation is fully automated. The validation script checks for the existence of the Cloud SQL instance, the GKE cluster, and the running pod. All of these resources should exist after the deployment script completes.
- In Cloud Shell, validate these three deployments by executing:
The script takes the parameters INSTANCE_NAME: The name of the existing Cloud SQL instance.
A successful output looks like this:
Task 3. Teardown
Teardown is fully automated. The teardown script deletes every resource created in the deployment script.
- In order to teardown, run:
The script takes the parameter INSTANCE_NAME: The name of the existing Cloud SQL instance.
teardown.sh runs the following scripts:
-
delete_resources.sh- deletes everything but the Cloud SQL instance -
delete_instance.sh- deletes the Cloud SQL instance
Task 4. Troubleshooting in your own environment
When creating a Cloud SQL instance you get the error:
Resolution
You cannot reuse an instance name for up to a week after you have deleted an instance. For more information, refer to Delete instances.
Congratulations!
You connected an application in Google Kubernetes Engine to a Cloud SQL instance using the Cloud SQL Proxy container as a sidecar container. You then deployed a GKE cluster and a Cloud SQL Postgres instance and used the Cloud SQL Proxy container to allow communication between them.
Next steps / Learn more
Kubernetes Installation instructions to deploy a containerized application for multiple platforms.
Manual Last Updated February 13, 2024
Lab Last Tested October 17, 2023
Copyright 2024 Google LLC. This software is provided as-is, without warranty or representation for any use or purpose. Your use of it is subject to your agreement with Google.