Checkpoints
Outbound connectivity
/ 33
Inbound connectivity
/ 33
East-west segmentation
/ 34
Protecting Google Compute resources with FortiGate
This lab was developed with our partner, Fortinet. Your personal information may be shared with Fortinet, the lab sponsor, if you have opted in to receive product updates, announcements, and offers in your Account Profile.
GSP462

Overview
This lab is intended for network administrators implementing network traffic inspection in Google Cloud using FortiGate next-gen firewalls. You will learn the reference HA architecture and configure inbound, outbound and east-west traffic inspection using a FortiGate next-gen firewall cluster.
Using FortiGates in public cloud helps to protect cloud resources against intrusion, detect compromised hosts, and increases visibility of network traffic.
Objectives
In this lab you learn how to:
- Redirect inbound traffic to a frontend VM running in Google Cloud behind FortiGate
- Secure outbound traffic from Google Cloud to Internet
- Secure east-west traffic between VMs running in Google Cloud
Architecture
The lab starts with all cloud resources pre-deployed to match the FortiGate recommended architecture described below. Although all cloud resources are deployed and do not require any additional configuration, the FortiGates have only the following elements configured:
- HA clustering
- health probe responders (including ELB public IP as secondary IP on port1 interface)
- health probe static routes on port2
- SDN connector
- licensing
and require additional configuration necessary to provide the desired functionality.
Setup and requirements
Before you click the Start Lab button
Read these instructions. Labs are timed and you cannot pause them. The timer, which starts when you click Start Lab, shows how long Google Cloud resources will be made available to you.
This hands-on lab lets you do the lab activities yourself in a real cloud environment, not in a simulation or demo environment. It does so by giving you new, temporary credentials that you use to sign in and access Google Cloud for the duration of the lab.
To complete this lab, you need:
- Access to a standard internet browser (Chrome browser recommended).
- Time to complete the lab---remember, once you start, you cannot pause a lab.
How to start your lab and sign in to the Google Cloud console
-
Click the Start Lab button. If you need to pay for the lab, a pop-up opens for you to select your payment method. On the left is the Lab Details panel with the following:
- The Open Google Cloud console button
- Time remaining
- The temporary credentials that you must use for this lab
- Other information, if needed, to step through this lab
-
Click Open Google Cloud console (or right-click and select Open Link in Incognito Window if you are running the Chrome browser).
The lab spins up resources, and then opens another tab that shows the Sign in page.
Tip: Arrange the tabs in separate windows, side-by-side.
Note: If you see the Choose an account dialog, click Use Another Account. -
If necessary, copy the Username below and paste it into the Sign in dialog.
{{{user_0.username | "Username"}}} You can also find the Username in the Lab Details panel.
-
Click Next.
-
Copy the Password below and paste it into the Welcome dialog.
{{{user_0.password | "Password"}}} You can also find the Password in the Lab Details panel.
-
Click Next.
Important: You must use the credentials the lab provides you. Do not use your Google Cloud account credentials. Note: Using your own Google Cloud account for this lab may incur extra charges. -
Click through the subsequent pages:
- Accept the terms and conditions.
- Do not add recovery options or two-factor authentication (because this is a temporary account).
- Do not sign up for free trials.
After a few moments, the Google Cloud console opens in this tab.

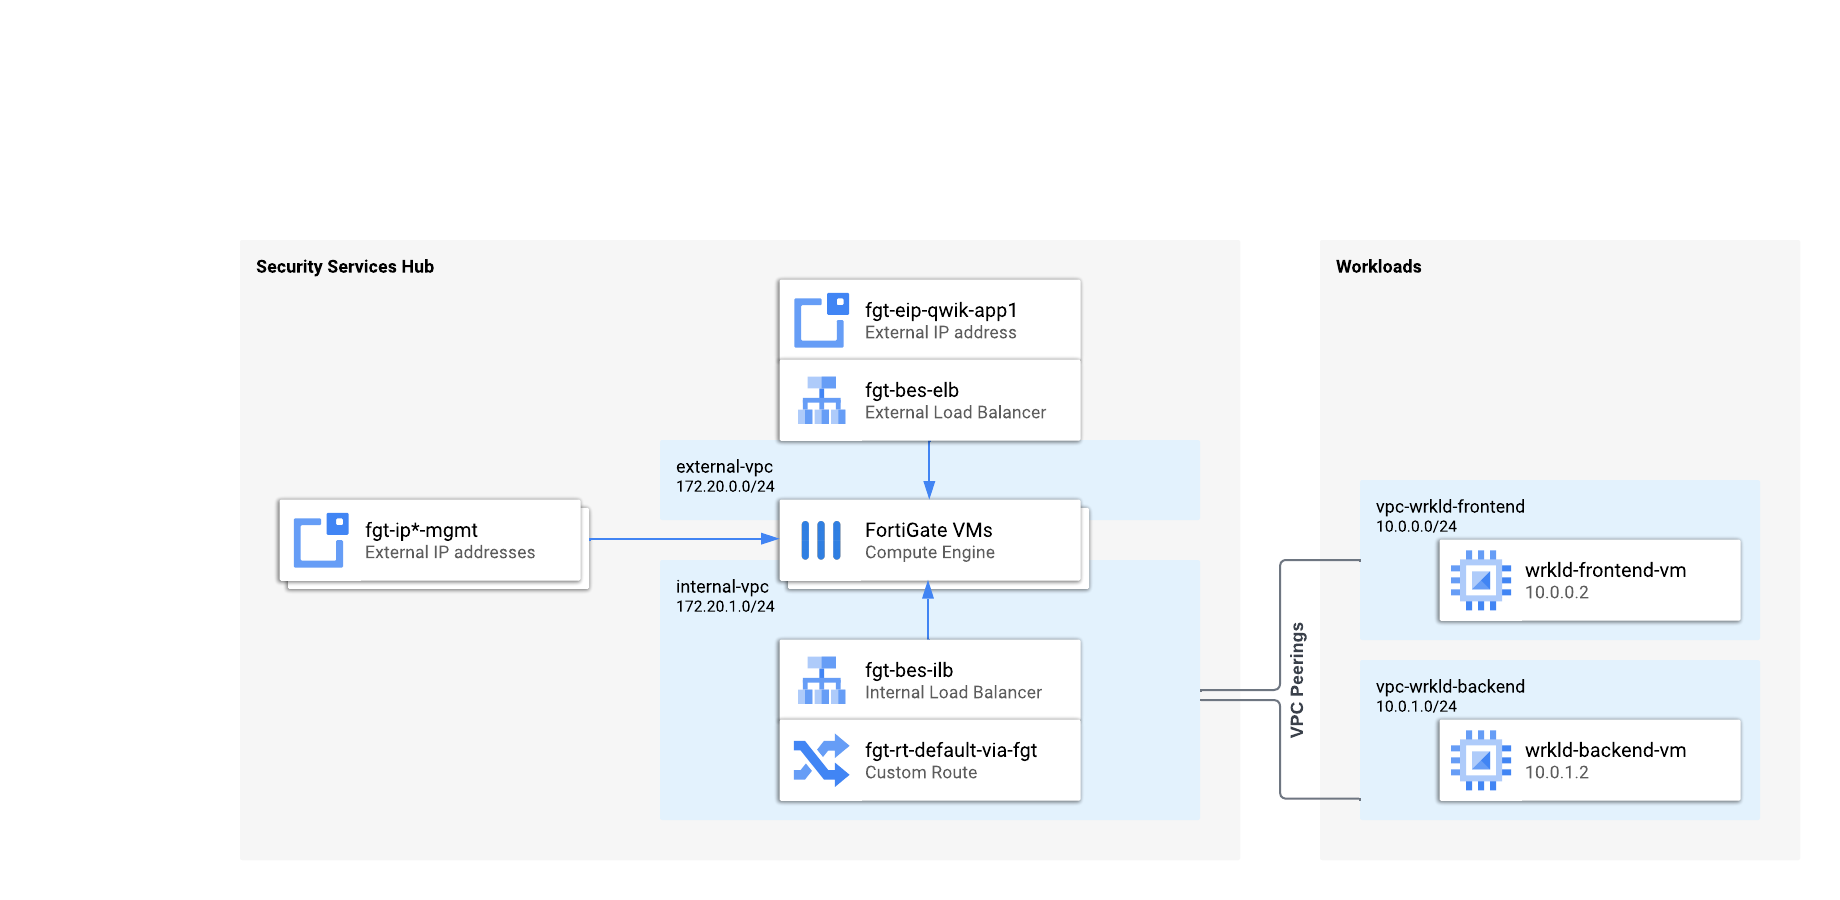
FortiGate reference architecture for Google Cloud leverages 2 common "building blocks": active-passive HA cluster in load balancer sandwich, and hub-and-spoke with VPC peering and custom route export.
Active-passive HA cluster
High availability clusters are deployed between 2 separate availability zones of the same region to elevate the SLA of the solution to 99.99%. FortiGates are usually deployed in an active-passive pair leveraging Fortinet's proprietary FGCP protocol for configuration and state synchronization. Traffic from the Internet is directed to the currently active VM instance using an external load balancer to be matched against access policy, inspected against malicious payload and redirected using a Virtual IP to the destination server (in case of this lab - frontend VM). Packets from VPC Network is routed to FortiGates using internal load balancer as the next hop.
Hub and spoke with VPC peering
While the VPC Peering itself is non-transitive (two VPC networks can communicate only if directly peered), it's different if peering is combined with custom route and a routing NVA (network virtual appliance). A custom route created in the hub VPC with next hop set to FortiGate (or ILB fronting a FortiGate cluster) can be exported to all peered VPCs using export custom route property. The route imported to peered spoke VPCs will apply to all traffic leaving the spoke VPC sending it to the FortiGate appliance. Note that the route table is evaluated only once when the packet is leaving its source, it is not re-evaluated once the packet crosses the peering (so it's not affected by a peered subnet route in the hub VPC when on the way to FortiGate). It is important to note that the default route in spoke VPCs would take precedence over the route imported via the peering and thus has to be deleted.
This lab's resources (VM instances and VPC networks) are distributed across two Google Cloud projects - IDs of both will be listed on the left once the lab starts and provisions. You might find it convenient to open two consoles - one for each project. You can use the provided buttons to do so.
FortiGate console
FortiGate virtual appliances can be managed using the web GUI available over HTTPS protocol on the default port, or using the command line interface, in the GUI or via SSH. Configuration of the FortiGate HA cluster is managed only using the primary (active) instance and automatically replicated to the secondary (passive) instance. The secondary instance management console can be optionally accessed using its public IP address to verify clustering and replication statuses.
Task 1: Initial lab configuration
First connection and setting password
- Open FortiGate management console
in your browser. - Accept the initial password information.
- Log in using admin as username and
as initial password (by default password is set to the primary VM instance id). - Change password to your own and login again.
- You can skip dashboard configuration by clicking Later.
Configure FortiGate route to workload VPCs
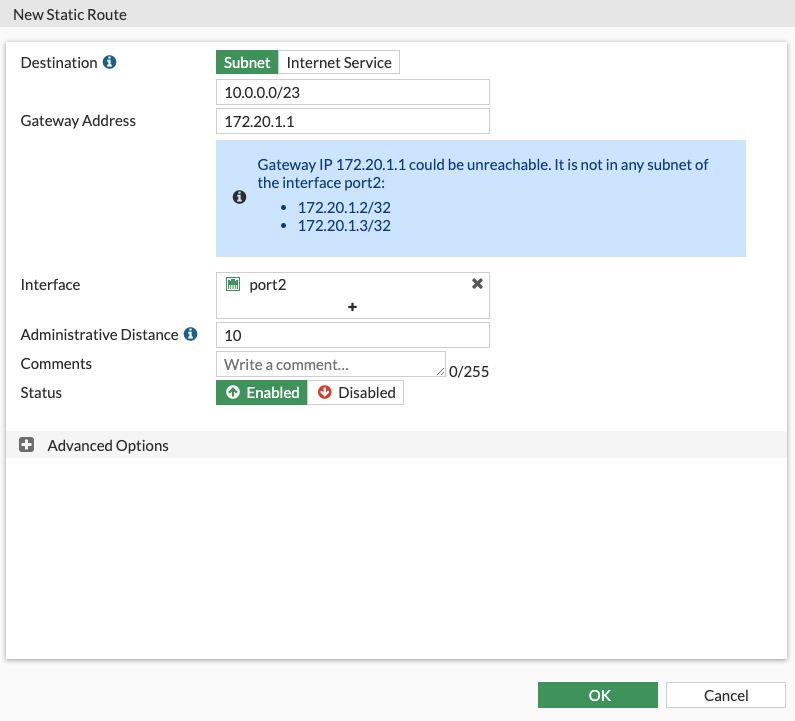
While the cloud network infrastructure is pre-configured for this lab, you still need to adjust FortiGates routing configuration to indicate the route to workload VPCs (frontend and backend):
- In FortiGate web console choose Network > Static Routes from left menu and click Create New
- For destination provide CIDRs of both workload subnets. They can be aggregated to 10.0.0.0/23
- For Gateway Address provide local subnet gateway: 172.20.1.1
- For Interface select port2
- Ignore warning about possible gateway unreachability
- Click OK to add the route
If it's not clear for you what the "workload subnets" are and what are their addresses go back to the Overview > Architecture section.
Task 2: Outbound traffic
Workload servers are already deployed, but they cannot finish their bootstrapping without connectivity with Internet. In this step you enable and inspect outbound traffic from workload VMs in peered networks to Internet.
- Connect to primary FortiGate management (all configuration will be done on primary and automatically replicated to secondary instance).
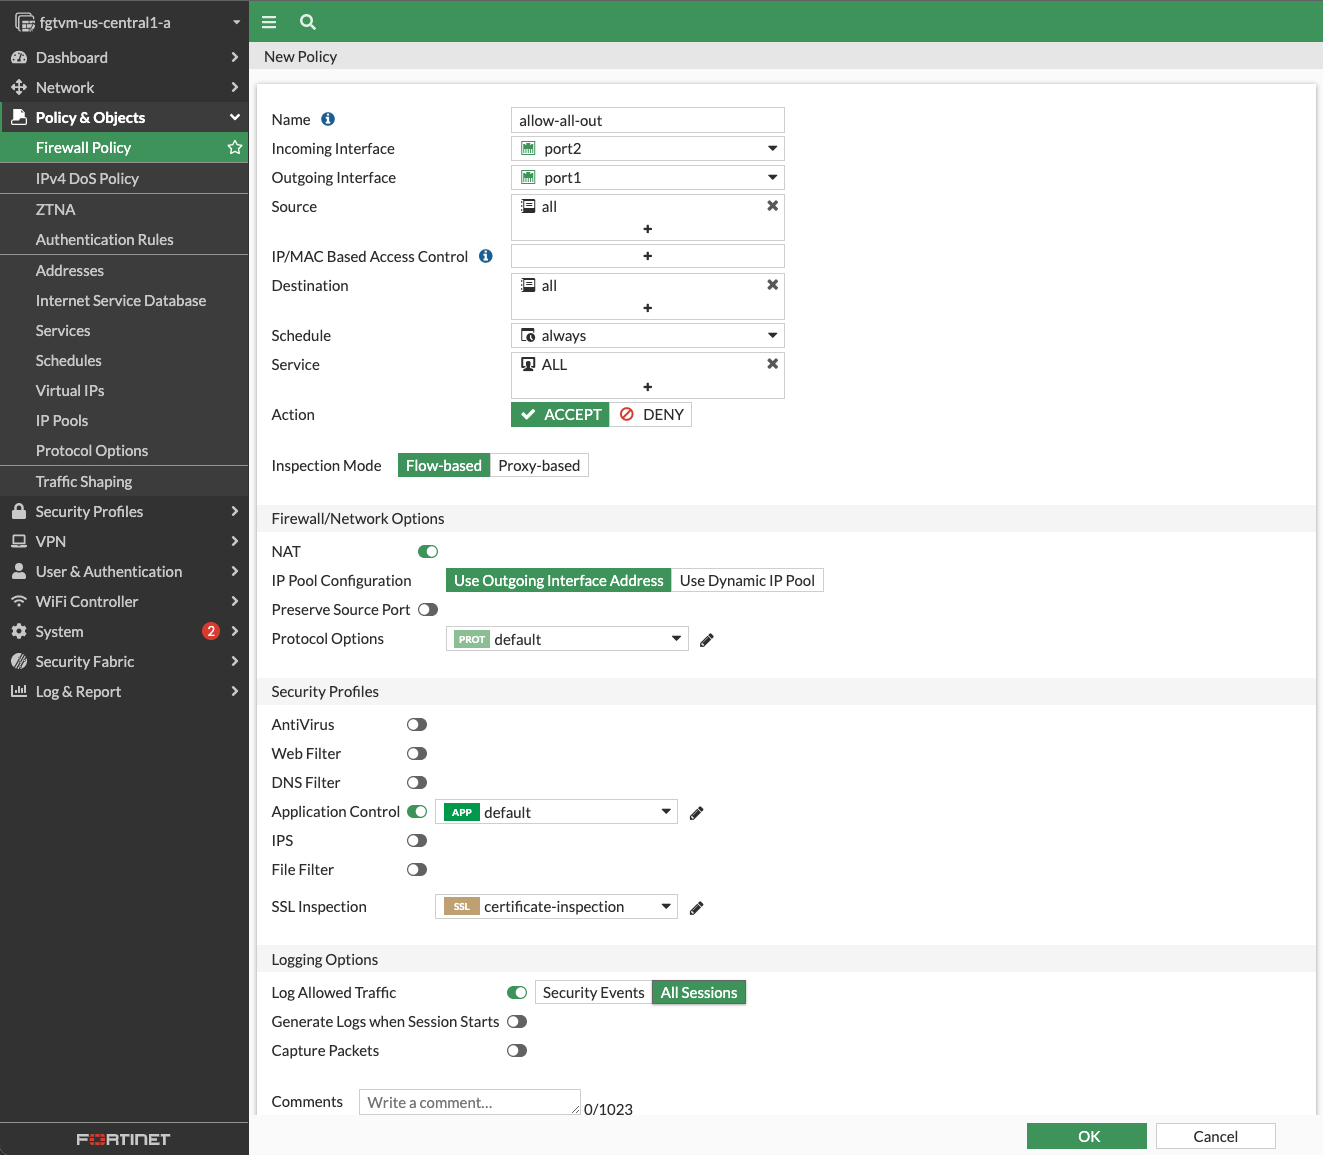
- Create a firewall policy allowing all traffic from port2 to port1:
- From the left menu select Policy & Objects > Firewall Policy
- Click Create New button at the top
- Provide name for the new policy
- For Incoming interface choose port2 and for Outgoing choose port1
- For Source, Destination and Service choose all
- In Security Profiles enable Application Control
- In SSL Inspection select certificate-inspection
- At the bottom change Log Allowed Traffic from Security Events to All Sessions
- Save the new policy by clicking OK
-
Go to the Workloads Cloud console. Make sure you are in the
project. -
Use the Navigation Menu to the left to get to Compute Engine and look at the instances. Stop and start frontend-vm and backend-vm instances using STOP and START/RESUME buttons at the top of the instance details page in Cloud console
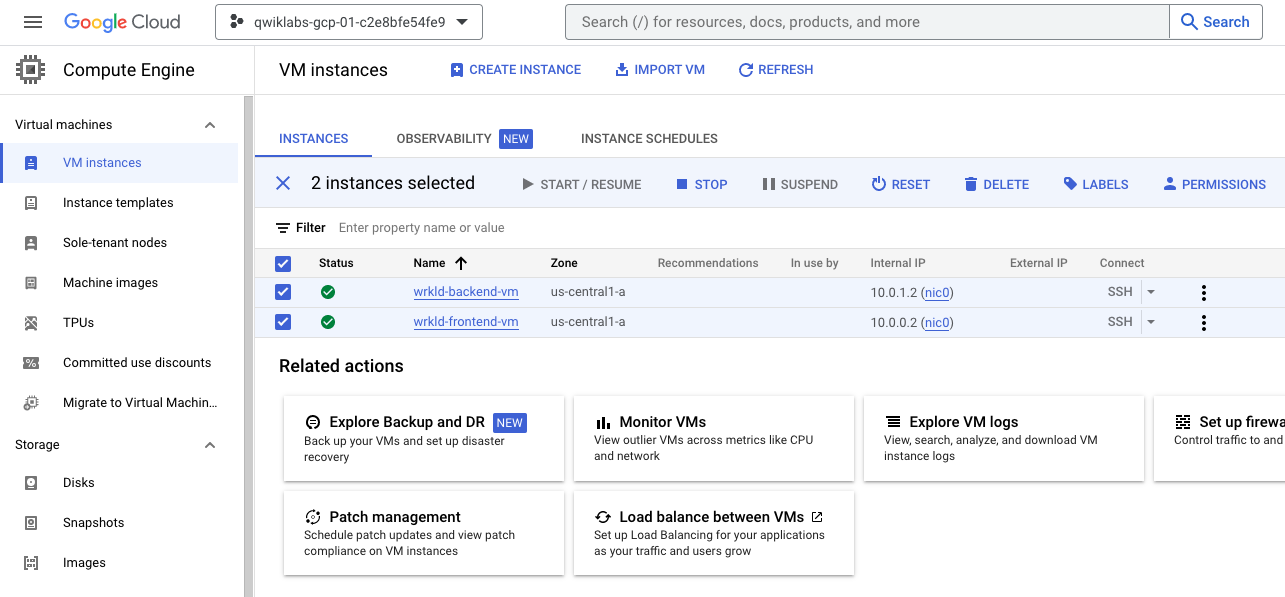
- In the FortiGate web console Log & Report > Forward Traffic you should see traffic coming from 10.0.0.2 and 10.0.1.2 to multiple services including Ubuntu update.
Task 3: Inbound traffic
In this step you enable access from Internet to a web application frontend VM via FortiGate. In production environment you use a farm of compute resources (VMs or serverless) behind an internal load balancer. For the sake of simplicity this lab uses two standalone VMs to emulate frontend and backend farms.
In a cloud environment protected by a firewall no other VM is directly available from Internet. You can enforce this policy using Organization Policy constraints constraints/compute.vmExternalIpAccess, but using constraints is beyond the scope of this lab.
- Inspect your external load balancer. It has been already deployed with one frontend IP address:
- Open the Security Hub Cloud console. Make sure you have selected the
project. - Go to Network services > Load balancing
- Find and open details of the load balancer with name starting by fgtbes-elb
- Make sure exactly one backend is indicated as healthy
- Write down the public IP address found in Frontend section - you will need it later
- Open the Security Hub Cloud console. Make sure you have selected the
- Connect to primary FortiGate
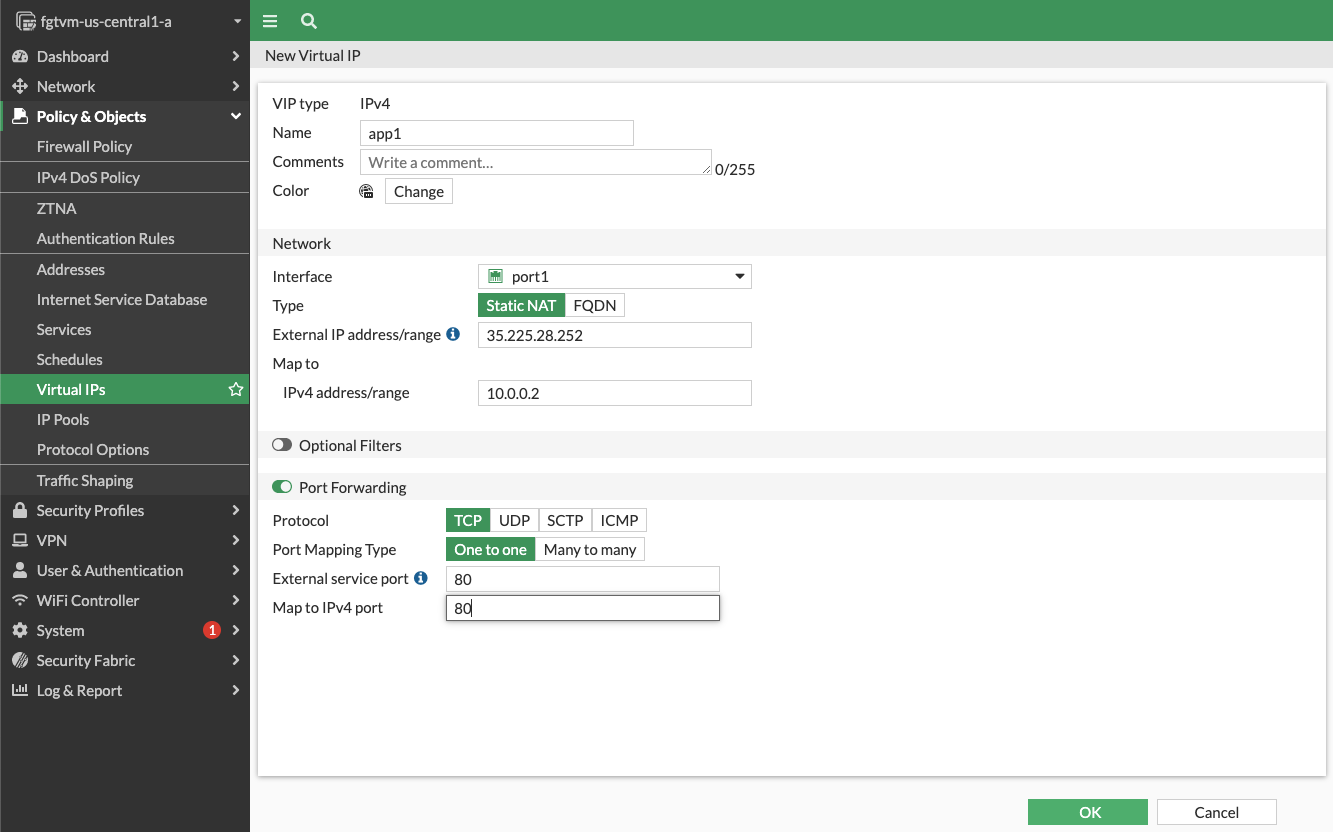
- Your frontend server is available at 10.0.0.2. Create a Virtual IP (VIP) mapping ELB frontend IP to 10.0.0.2 and limit to port 80:
- In FortiGate GUI go to Policy & Objects, open VirtualIPs, and click Create New (Virtual IP) button at the top
- Name your VIP
- For Interface select port1
- For External IP address/range provide ELB public IP you wrote down earlier
- For Map to enter the frontend server private IP: 10.0.0.2
- Enable Port Forwarding
- As both External service port and Map to IPv4 port provide the HTTP port number: 80
- Confirm the configuration of new Virtual IP by clicking OK
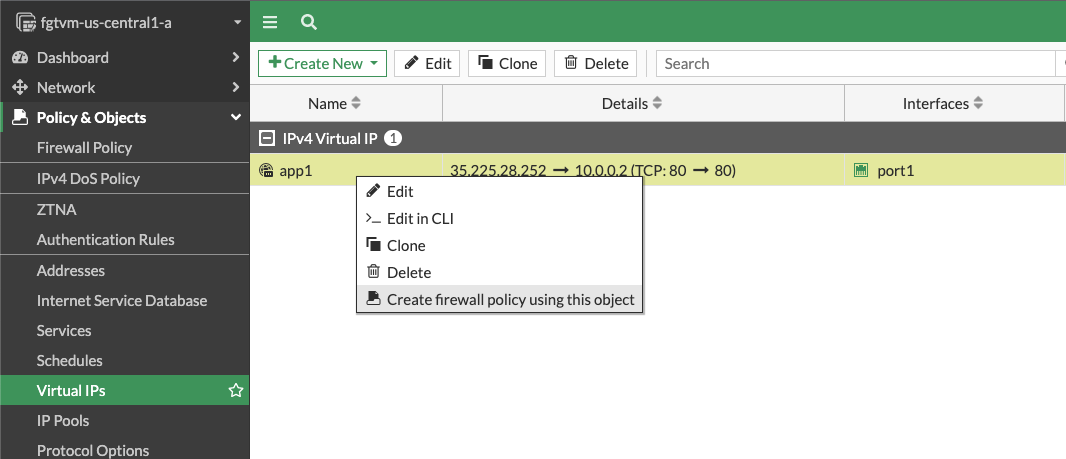
- Right-click on the VIP and select Create firewall policy using this object from context menu
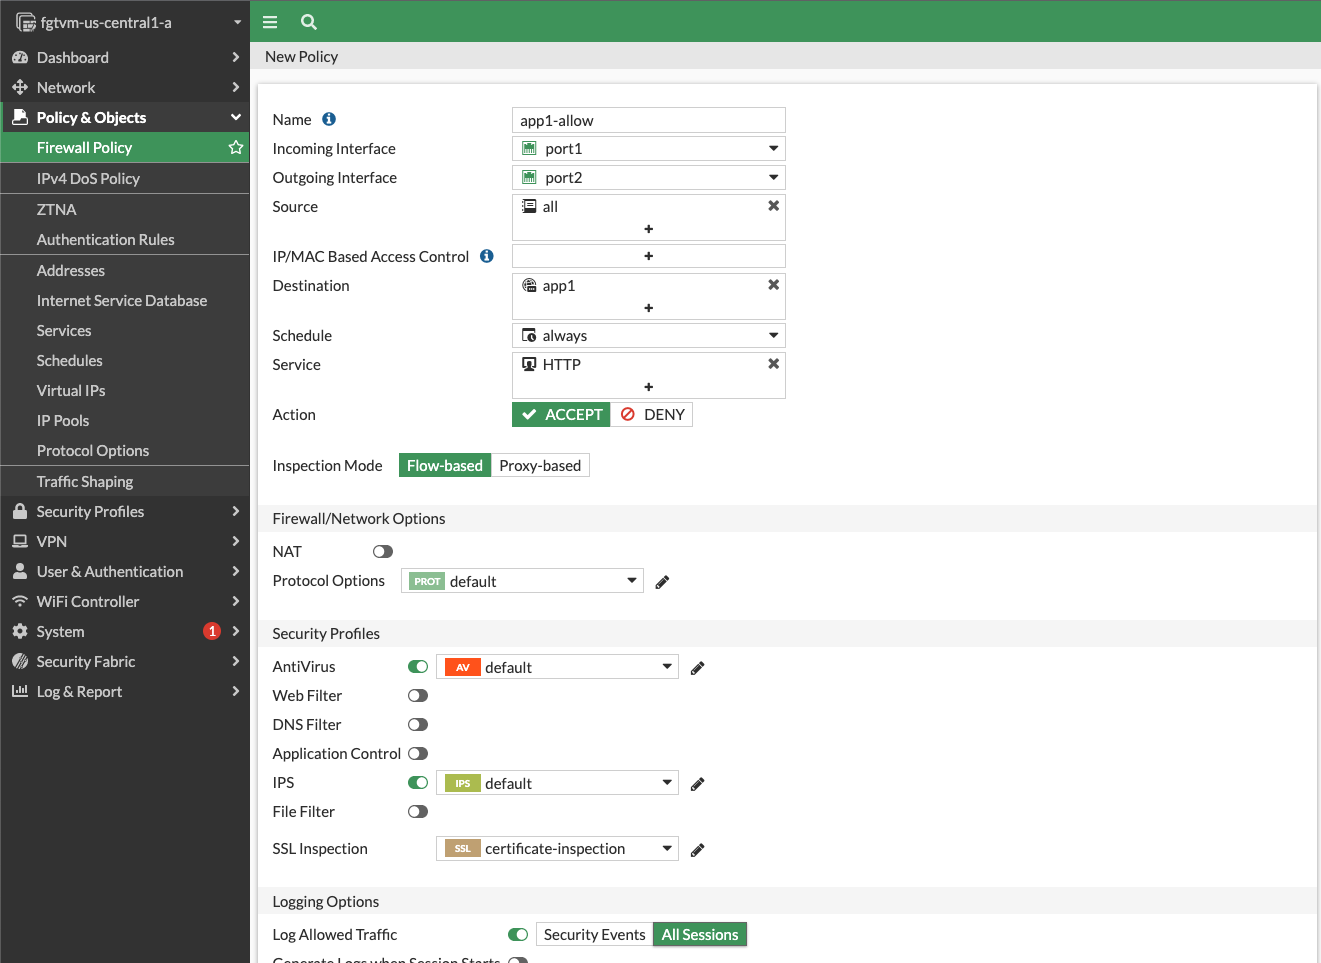
- Fill in missing firewall policy fields:
- Provide a firewall policy name
- For Outgoing interface select port2
- For Source select all
- For Service select HTTP
- Disable NAT
- For Security Profiles enable IPS
- For SSL Inspection select certificate-inspection
- For Log Allowed Traffic select All Sessions
- Open new tab in your web browser and try connecting to ELB public IP over HTTP protocol (http://ELB_ADDRESS/). Make sure your browser does not use HTTPS protocol - configuring HTTPS offloading is beyond the scope of this lab. After few seconds you should receive a 504 Gateway Time-out message indicating you have reached the frontend proxy server but the connection between frontend and backend server failed. You will enable connectivity between frontend proxy and backend server in Task 4.
Task 4: East-west connections
Some applications might require traffic inspection between application tiers (eg. using IPS - Intrusion Prevention System). Note that in Google Cloud you must deploy different application tiers into different VPC networks. Due to the nature of Google Cloud networking only traffic leaving a VPC can be redirected to a network virtual appliance for inspection.
In this step you enable secure connectivity between VMs in frontend and backend VPC networks. You use Fortinet Fabric Connector to build a firewall rule based on metadata rather than using static CIDRs.
-
Connect to primary FortiGate
-
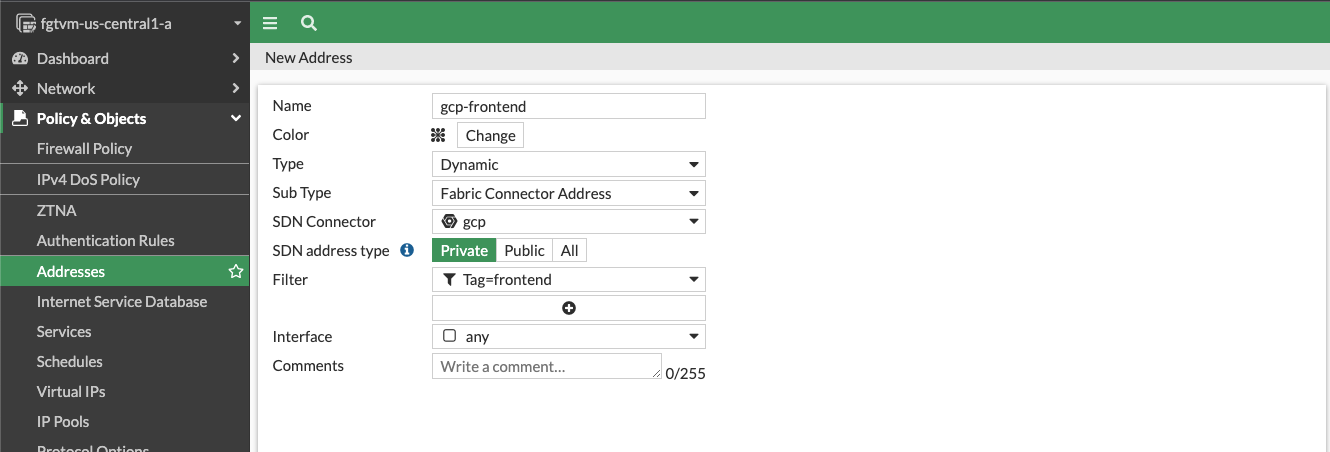
Use left menu to navigate to Policy & Objects > Addresses and create dynamic addresses for frontend and backend network tags:
- Use Create New button to create a new address
- Provide gcp-frontend as name
- For Type select Dynamic
- SDN Connector for Google Cloud was already pre-configured as gcp. Select it in the SDN Connector field
- For Filter field replace the default by Tag=frontend
- Save new address by clicking OK
-
Repeat steps above to create a new address for the backend network tag
-
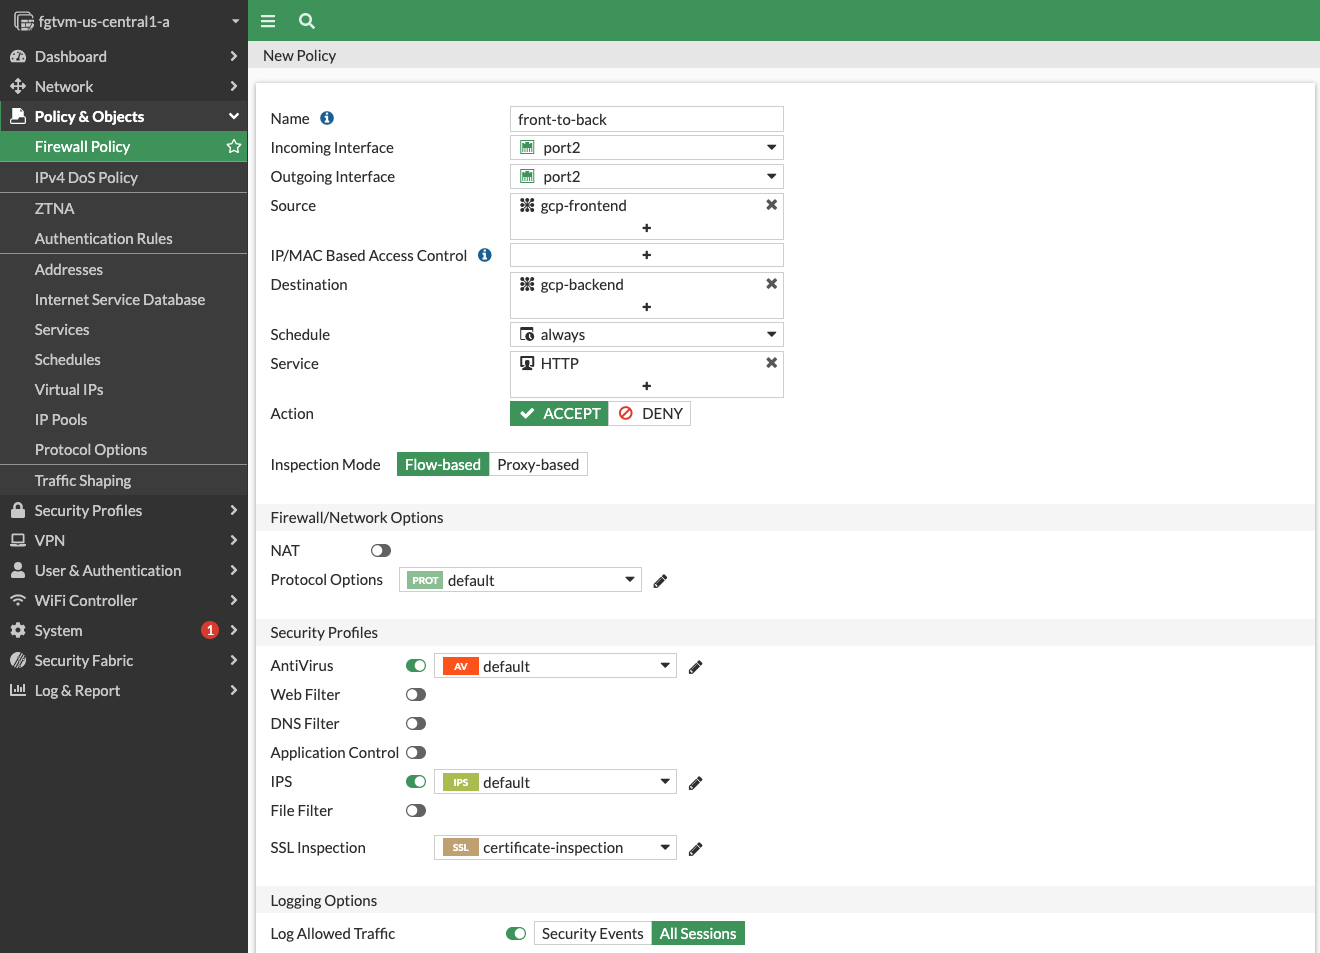
Create a firewall policy allowing traffic from frontend to backend with port2 as both source and destination interface
- In Policy & Objects > Firewall Policy click Create New button at the top
- Name the policy
- For both Incoming Interface and Outgoing Interface select port2 as both frontend and backend are peered with the internal VPC of the firewall
- For Source select gcp-frontend
- For Destination select gcp-backend
- For Service select HTTP
- Disable NAT
- For Security Profiles enable Antivirus and IPS
- Enable logging of all sessions
- Save the policy by clicking OK
-
Use your web browser to connect to ELB public IP address over HTTP protocol. You should receive a It works! message (if you see the default nginx page or 502 error - wait few seconds and refresh the page).
-
Click Try getting EICAR button to attempt downloading a harmless EICAR test virus file. Your attempt will be blocked by FortiGate. You can verify details about detected incident in FortiGate Forward Traffic log.
Congratulations
You completed this lab and learned how to use FortiGate to protect inbound and outbound traffic between the Internet and Google Cloud as well as inspect traffic between VMs in different VPC Networks. Click the End Lab button at the top left to close the lab.
Google Cloud training and certification
...helps you make the most of Google Cloud technologies. Our classes include technical skills and best practices to help you get up to speed quickly and continue your learning journey. We offer fundamental to advanced level training, with on-demand, live, and virtual options to suit your busy schedule. Certifications help you validate and prove your skill and expertise in Google Cloud technologies.
Manual Last Updated: November 01, 2023
Lab Last Tested: November 01, 2023
Copyright 2023 Google LLC All rights reserved. Google and the Google logo are trademarks of Google LLC. All other company and product names may be trademarks of the respective companies with which they are associated.