arrow_back

Terraform を使用した Infrastructure as Code

参加 ログイン
Test and share your knowledge with our community!
done
Get access to over 700 hands-on labs, skill badges, and courses

Terraform を使用した Infrastructure as Code

Lab 1時間 universal_currency_alt クレジット: 1 show_chart 入門
Test and share your knowledge with our community!
done
Get access to over 700 hands-on labs, skill badges, and courses

概要

このラボでは、Terraform を使用して Google Cloud リソースを作成、管理、破棄します。最初に、Google Cloud をプロバイダとして定義します。

次に、ネットワークを指定せずに VM インスタンスを作成し、Terraform が構成コードをどのように解析するかを確認します。その後、コードを編集してネットワークを追加し、Google Cloud 上に VM インスタンスを作成します。

さらに、VM インスタンスを更新する方法を学習します。既存の構成を編集してタグを追加してから、マシンタイプを編集します。そして、Terraform コマンドを実行し、作成したリソースを破棄します。

目標

このラボでは、次のタスクの実行方法について学びます。

  • Terraform がインストールされていることを確認する
  • Google Cloud をプロバイダとして定義する
  • Terraform を使用して Google Cloud リソースを作成、変更、破棄する

タスク 1. Cloud コンソールにログイン

各ラボでは、新しい Google Cloud プロジェクトとリソースセットを一定時間無料で利用できます。

  1. Qwiklabs にシークレット ウィンドウでログインします。

  2. ラボのアクセス時間(例: 1:15:00)に注意し、時間内に完了できるようにしてください。
    一時停止機能はありません。必要な場合はやり直せますが、最初からになります。

  3. 準備ができたら、[ラボを開始] をクリックします。

  4. ラボの認証情報(ユーザー名パスワード)をメモしておきます。この情報は、Google Cloud Console にログインする際に使用します。

  5. [Google Console を開く] をクリックします。

  6. [別のアカウントを使用] をクリックし、このラボの認証情報をコピーしてプロンプトに貼り付けます。
    他の認証情報を使用すると、エラーが発生したり、料金の請求が発生したりします。

  7. 利用規約に同意し、再設定用のリソースページをスキップします。

タスク 2. Terraform のインストールを確認する

  1. Google Cloud のメニューで Cloud Shell をアクティブにするアイコン(Cloud Shell をアクティブにする)をクリックします。表示されたダイアログ ボックスで [続行] をクリックします。

  2. プロンプトが表示されたら、[続行] をクリックします。

  3. 次のコマンドを実行して Terraform がインストールされていることを確認します。

注: Terraform のバージョンが最新ではないという警告が表示されても問題ありません。このラボの手順では Terraform v1.0.5 以降を使用します。 terraform --version 注: 入手可能な最新バージョンの Terraform は Terraform のウェブサイトからダウンロードできます。Terraform はサポート対象のプラットフォームおよびアーキテクチャ別にバイナリ パッケージとして配布されています。Cloud Shell では Linux 64 ビット用のファイルを使用します。

出力は次のようになります(コピーしないでください。これは出力例です)。

Terraform v1.2.2

Terraform は、Cloud Shell にプリインストールされています。Terraform はすでにインストールされているので、すぐにインフラストラクチャを作成できます。

タスク 3. Google Cloud プロバイダを追加する

  1. 次のコマンドで compute というディレクトリを作成します。
mkdir compute
  1. 次のコマンドで main.tf ファイルを作成します。
touch main.tf
  1. Cloud Shell のツールバーで [エディタを開く] をクリックします。[新しいウィンドウで開く] をクリックすると、別のタブでエディタを開いたままにできます。

  2. main.tf ファイルに次のコードをコピーします。

terraform { required_providers { google = { source = "hashicorp/google" } } } provider "google" { project = "{{{project_0.project_id | Project ID}}}" region = "{{{project_0.default_region | Region}}}" zone = "{{{project_0.default_zone | Zone}}}" }
  1. [File] > [Save] をクリックします。
  2. Cloud Shell に切り替えて、terraform init コマンドを実行します。
terraform init

出力は次のようになります(コピーしないでください。これは出力例です)。

Initializing the backend... Initializing provider plugins... - Finding hashicorp/google versions matching "4.15.0"... - Installing hashicorp/google v4.15.0... - Installed hashicorp/google v4.15.0 (signed by HashiCorp) Terraform has created a lock file .terraform.lock.hcl to record the provider selections it made above. Include this file in your version control repository so that Terraform can guarantee to make the same selections by default when you run "terraform init" in the future. Terraform has been successfully initialized!

タスク 4. インフラストラクチャを構築する

ネットワーク パラメータを指定せずに Compute インスタンスを作成し、Terraform がそのような構成をどう処理するかを見ていきます。

  1. エディタ ウィンドウに切り替えます。main.tf ファイルに次のコードブロックを入力します。
resource "google_compute_instance" "terraform" { name = "terraform" machine_type = "e2-micro" boot_disk { initialize_params { image = "debian-cloud/debian-11" } } }
  1. [File] > [Save] をクリックして main.tf ファイルを保存します。

  2. 次のコマンドを実行して、Compute Engine が作成されるかどうかをプレビューします。

terraform plan
  1. 次のエラーが発生して構成が失敗します。Compute Engine を構成するにはネットワークを指定する必要があるからです。
│ Error: Insufficient network_interface blocks │ │ on main.tf line 15, in resource "google_compute_instance" "terraform": │ 15: resource "google_compute_instance" "terraform" { │ │ At least 1 "network_interface" blocks are required.
  1. 今度は google_compute_instance ブロックに次のコード セグメントを追加することで、ネットワークを追加します。
network_interface { network = "default" access_config { } }

main.tf ファイルの最後のコードは次のようになります。

terraform { required_providers { google = { source = "hashicorp/google" } } } provider "google" { project = "{{{project_0.project_id | Project ID}}}" region = "{{{project_0.default_region | Region}}}" zone = "{{{project_0.default_zone | Zone}}}" } resource "google_compute_instance" "terraform" { name = "terraform" machine_type = "e2-micro" boot_disk { initialize_params { image = "debian-cloud/debian-11" } } network_interface { network = "default" access_config { } } }
  1. [File] > [Save] をクリックして main.tf ファイルを保存します。
  2. 次に、terraform plan コマンドを実行して、Compute Engine が作成されるかどうかをプレビューします。
terraform plan

プロンプトが表示されたら、[Authorize] をクリックします。

出力は次のようになります(コピーしないでください。これは出力例です)。

Terraform used the selected providers to generate the following execution plan. Resource actions are indicated with the following symbols: + create Terraform will perform the following actions: # google_compute_instance.terraform will be created + resource "google_compute_instance" "terraform" { + can_ip_forward = false + cpu_platform = (known after apply) + current_status = (known after apply) + deletion_protection = false ... Plan: 1 to add, 0 to change, 0 to destroy.
  1. 次のコマンドを実行して目的の変更を適用します。
terraform apply
  1. yes」と入力して、計画したアクションを確定します。

出力は次のようになります(コピーしないでください。これは出力例です)。

... Apply complete! Resources: 1 added, 0 changed, 0 destroyed. 注: エラーが発生した場合は、前のステップに戻って main.tf ファイルに入力したコードが正しいことを確認してください。

[進行状況を確認] をクリックして、Compute Engine が作成されていることを確認します。
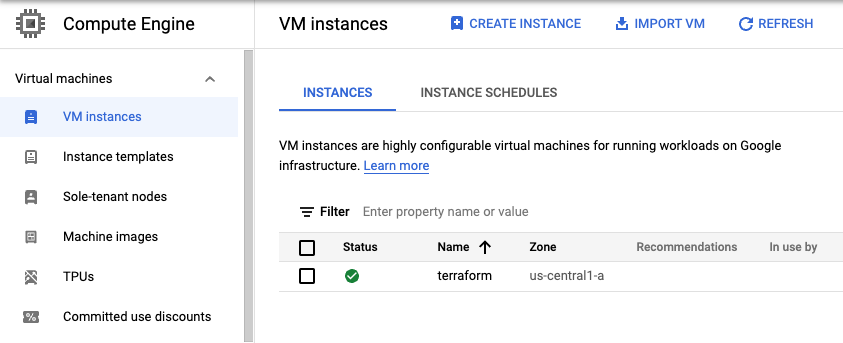
インフラストラクチャを構築する

Cloud コンソールで確認する

Cloud コンソールで、リソースが作成されていることを確認します。

  1. Cloud コンソールのナビゲーション メニューナビゲーション メニュー)で、[Compute Engine] > [VM インスタンス] をクリックします。

  2. Terraform インスタンスが作成されていることを確認します。 terraform_instance

タスク 5. インフラストラクチャを変更する

このタスクでは、次の 2 種類の方法でインフラストラクチャを変更します。
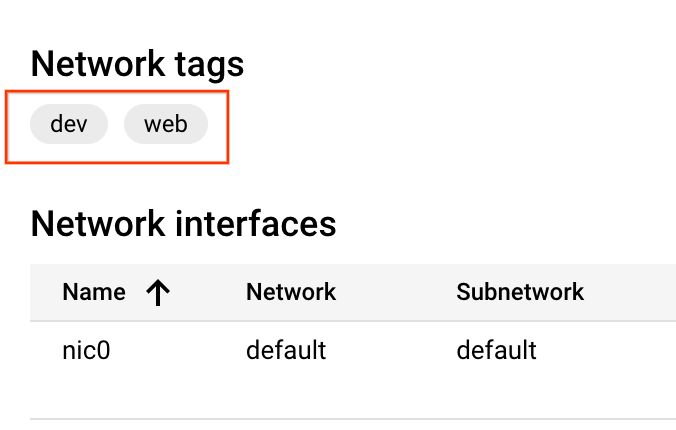
  • ネットワーク タグの追加
  • machine-type の編集

Compute リソースにタグを追加

Terraform では、リソースを作成するだけでなく、作成したリソースに変更を加えることもできます。

  1. 次のように、先ほど作成したインスタンスに tags 引数を追加します。
resource "google_compute_instance" "terraform" { name = "terraform" machine_type = "e2-micro" tags = ["web", "dev"] # ... }
  1. terraform plan を実行します。
terraform plan
  1. terraform apply を実行してインスタンスを更新します。
terraform apply

出力は次のようになります(コピーしないでください。これは出力例です)。

Terraform used the selected providers to generate the following execution plan. Resource actions are indicated with the following symbols: ~ update in-place Terraform will perform the following actions: # google_compute_instance.terraform will be updated in-place ~ resource "google_compute_instance" "terraform" { id = "projects/qwiklabs-gcp-00-da04aeabe9ab/zones/us-central1-c/instances/terraform" name = "terraform" ~ tags = [ + "dev", + "web", ] # (17 unchanged attributes hidden) # (4 unchanged blocks hidden) } Plan: 0 to add, 1 to change, 0 to destroy.

接頭辞「~」は、リソースがインプレースで更新されることを意味します。

  1. プロンプトに対して「yes」と入力すると、インスタンスにタグが追加されます。

[進行状況を確認] をクリックして、タグが追加されたことを確認します。 Compute リソースにタグを追加

VM を停止せずにマシンタイプを編集

稼働中の VM に対してマシンタイプを変更することはできません。稼働中の VM に対するマシンタイプの変更が Terraform でどのように処理されるかを見ていきましょう。

  1. main.tf を開き、次のように Terraform インスタンスの machine_type 引数を e2-micro から e2-medium に変更します。
resource "google_compute_instance" "terraform" { name = "terraform" machine_type = "e2-medium" tags = ["web", "dev"] # ... }
  1. terraform plan を実行します。
terraform plan
  1. terraform apply をもう一度実行してインスタンスを更新します。
terraform apply

terraform apply は失敗し、次の警告が表示されます(コピーしないでください。これは出力例です)

╷ │ Error: Changing the machine_type, min_cpu_platform, service_account, enable_display, shielded_instance_config, scheduling.node_affinities or network_interface.[#d].(network/subnetwork/subnetwork_project) or advanced_machine_features on a started instance requires stopping it. To acknowledge this, please set allow_stopping_for_update = true in your config. You can also stop it by setting desired_status = "TERMINATED", but the instance will not be restarted after the update. │ │ with google_compute_instance.terraform, │ on main.tf line 31, in resource "google_compute_instance" "terraform": │ 31: resource "google_compute_instance" "terraform" {
  1. 稼働中の VM に対して machine-type を変更することはできません。machine_type を更新する前に必ず VM を停止するために、次のように allow_stopping_for_update 引数を true に設定します。
resource "google_compute_instance" "terraform" { name = "terraform" machine_type = "e2-medium" tags = ["web", "dev"] boot_disk { initialize_params { image = "debian-cloud/debian-11" } } network_interface { network = "default" access_config { } } allow_stopping_for_update = true }
  1. terraform plan を実行します。
terraform plan
  1. terraform apply をもう一度実行してインスタンスを更新します。
terraform apply
  1. プロンプトが表示されたら「yes」と入力します。

  2. Cloud コンソールで [VM インスタンス] に移動し、作成した Terraform インスタンスをクリックして、machine-type が変更され、タグが追加されたことを確認します。 machine_type network_tags

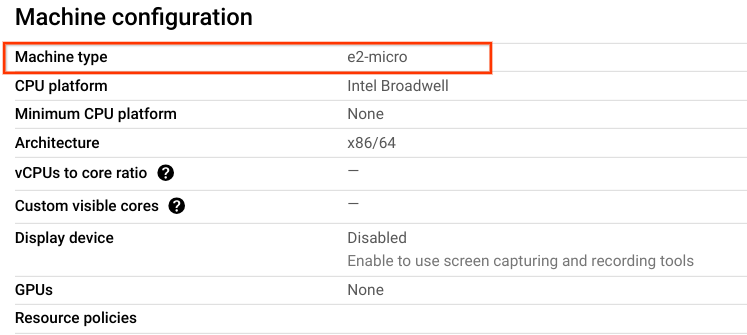
[進行状況を確認] をクリックして、Compute Engine Terraform のマシンタイプが e2-medium であることを確認します。 インフラストラクチャの machine-type を変更する

タスク 6. インフラストラクチャを破棄する

インフラストラクチャの構築方法と変更方法について学びました。複数リソースを作成しリソース間の依存関係を示す方法に進む前に、Terraform で管理するインフラストラクチャを完全に破棄する方法について学びましょう。

  1. 次のコマンドを実行します。「yes」と入力すると、このプランを実行してインフラストラクチャを破棄します。
terraform destroy

-」接頭辞は、インスタンスとネットワークが破棄されることを示します。

  1. Cloud コンソールで [VM インスタンス] に移動すると、Terraform インスタンスが存在しないことを確認できます。

[進行状況を確認] をクリックして、インフラストラクチャを破棄したことを確認します。 インフラストラクチャを破棄する

お疲れさまでした

このラボでは、以下の操作について学習しました。

  • Terraform のインストールを確認する
  • Google Cloud をプロバイダとして定義する
  • Terraform を使用して Google Cloud リソースを作成、変更、破棄する

ラボを終了する

ラボが完了したら、[ラボを終了] をクリックします。ラボで使用したリソースが Google Cloud Skills Boost から削除され、アカウントの情報も消去されます。

ラボの評価を求めるダイアログが表示されたら、星の数を選択してコメントを入力し、[送信] をクリックします。

星の数は、それぞれ次の評価を表します。

  • 星 1 つ = 非常に不満
  • 星 2 つ = 不満
  • 星 3 つ = どちらともいえない
  • 星 4 つ = 満足
  • 星 5 つ = 非常に満足

フィードバックを送信しない場合は、ダイアログ ボックスを閉じてください。

フィードバックやご提案の送信、修正が必要な箇所をご報告いただく際は、[サポート] タブをご利用ください。

Copyright 2020 Google LLC All rights reserved. Google および Google のロゴは Google LLC の商標です。その他すべての企業名および商品名はそれぞれ各社の商標または登録商標です。