检查点
Create a standard maven repository
/ 30
Create a remote repository
/ 20
Create a virtual repository
/ 30
Securing Container Builds
GSP1185

Overview
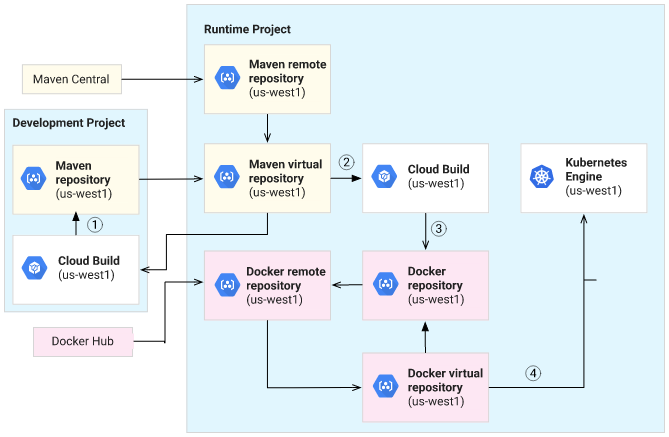
Artifact Registry enables you to store different artifact types, create multiple repositories in a single project, and associate a specific region or multi-region with each repository. There are several repository modes. Each mode serves a different purpose. The following diagram shows one of many possible ways you can use repositories in different modes together. The diagram shows a workflow across two Google Cloud projects. In a development project, developers build a Java application. In a separate runtime project, another build creates a container image with the application for deployment to Google Kubernetes Engine.
In this lab, you learn how to perform the following tasks.
- Use Standard Repositories for deploying your private packages
- Use Remote Repositories to cache maven central packages
- Use Virtual Repositories to combine multiple upstream repos in one config
Setup and Requirements
Before you click the Start Lab button
Read these instructions. Labs are timed and you cannot pause them. The timer, which starts when you click Start Lab, shows how long Google Cloud resources will be made available to you.
This hands-on lab lets you do the lab activities yourself in a real cloud environment, not in a simulation or demo environment. It does so by giving you new, temporary credentials that you use to sign in and access Google Cloud for the duration of the lab.
To complete this lab, you need:
- Access to a standard internet browser (Chrome browser recommended).
- Time to complete the lab---remember, once you start, you cannot pause a lab.
How to start your lab and sign in to the Google Cloud Console
-
Click the Start Lab button. If you need to pay for the lab, a pop-up opens for you to select your payment method. On the left is a panel populated with the temporary credentials that you must use for this lab.
-
Copy the username, and then click Open Google Console. The lab spins up resources, and then opens another tab that shows the Sign in page.
Tip: Open the tabs in separate windows, side-by-side.
-
In the Sign in page, paste the username that you copied from the left panel. Then copy and paste the password.
Important: You must use the credentials from the left panel. Do not use your Google Cloud Training credentials. If you have your own Google Cloud account, do not use it for this lab (avoids incurring charges).
-
Click through the subsequent pages:
- Accept the terms and conditions.
- Do not add recovery options or two-factor authentication (because this is a temporary account).
- Do not sign up for free trials.


After a few moments, the Cloud Console opens in this tab.
Activate Cloud Shell
Cloud Shell is a virtual machine that is loaded with development tools. It offers a persistent 5GB home directory and runs on the Google Cloud. Cloud Shell provides command-line access to your Google Cloud resources.
In the Cloud Console, in the top right toolbar, click the Activate Cloud Shell button.

Click Continue.

It takes a few moments to provision and connect to the environment. When you are connected, you are already authenticated, and the project is set to your PROJECT_ID. For example:

gcloud is the command-line tool for Google Cloud. It comes pre-installed on Cloud Shell and supports tab-completion.
You can list the active account name with this command:
(Output)
(Example output)
You can list the project ID with this command:
(Output)
(Example output)
Workspace Setup
- In Cloud Shell, set your project ID and project number. Save them as
PROJECT_IDandPROJECT_NUMBERvariables:
- Enable the Artifact Registry API:
- Clone the repo needed for this lab, and then go to the
container-analysisdirectory:
Task 1. Standard repositories
Standard Repositories provide a way to store your private packages and share them across your other applications
- Run the following command to create a standard maven repository for Java artifacts:
Click Authorize if the Cloud Shell authorization prompt appears.
-
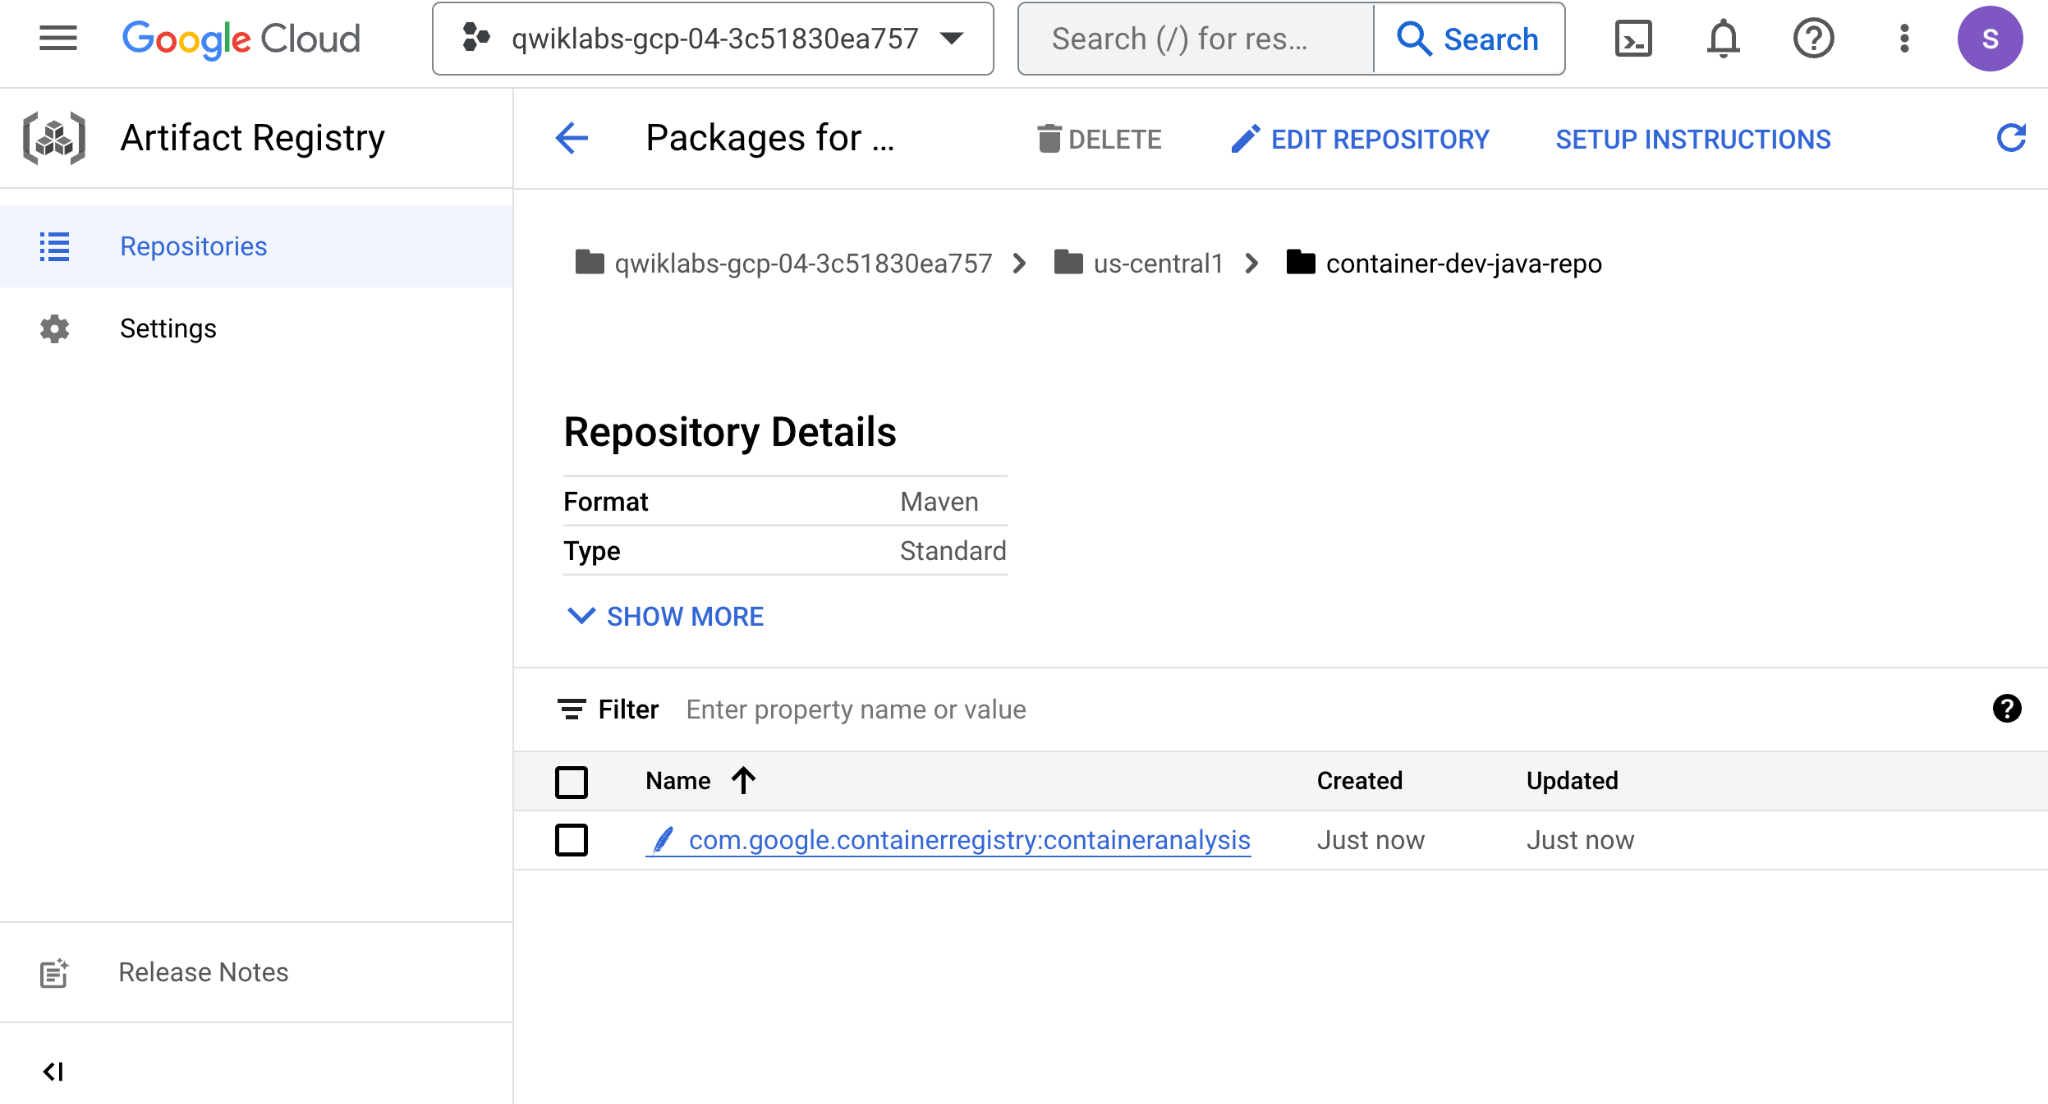
In the Cloud Console go to Artifact Registry > Repositories and notice your newly created Maven repository named
container-dev-java-repo. If you click on it you can see that it's empty at the moment. -
Review the repo in the terminal:
Should return a response similar to the following
Click Check my progress to verify the objective.
Task 2. Configure Maven for Artifact Registry
- Run the following command to print the repository configuration to add to your Java project:
The previous command returns xml to be added into your projects pom.xml.
- The repositories section specifies where Maven may download remote artifacts for use by the current project.
- The distributionManagement section specifies which remote repository the project will push to when it is deployed.
- The extensions section adds in artifactregistry-maven-wagon which enables the Authentication and transport layer needed for connecting to Artifact Registry
- Note: Extensions can exist in pom.xml or extensions.xml. In cases where the project depends on a parent project, those dependencies are accessed before the rest of the entries in the pom.xml are loaded. To ensure the parent has access to the extension, it can be placed in an extensions.xml file which is loaded before the pom.xml thus making it available for the parent dependencies.
- Run the following command in Cloud Shell to open the Editor in the current directory:
- Copy the three sections then open the
pom.xmlin Cloud Shell Editor and add the returned settings to the bottom of the file just inside the closingprojecttag.
Example: (your project names will be different in your URLs)
With Artifact Registry configured in Maven, you can now use Artifact Registry to store Java jars for use by other projects in your organization.
- Run the following command to upload your Java package to Artifact Registry:
If you want to run this command again, make sure to increase the version in the pom.xml.
- In the Cloud console go to Artifact Registry > Repositories. Click into
container-dev-java-repoand check that thehello-worldbinary artifact is there:
Task 3. Remote repositories
Remote Repositories provide the ability to cache third party packages for increased reliability and security.
- Run the following command to create a remote repository for Maven Central artifacts:
- In the Cloud console go to Artifact Registry > Repositories. Click into
maven-central-cacheand notice it's been created and is currently empty.
Click Check my progress to verify the objective.
- Review the repo in the terminal:
- Run the following command to print the repository configuration to add to your Java project:
-
Add the repository section into your pom.xml. Be sure not to copy the outer <repositories> tag from the output.
-
Change the ID of the newly added repository to "central" to ensure each repository entry has a unique ID.
Example: (your project names will be different in your URLs)
- Run the following commands in your terminal to create an
extensions.xmlfor your project, To use the core extensions mechanism ensuring Maven can resolve parent or plugin dependencies from Artifact Registry.
- Run the following command to compile your application using the Remote Repository:
- In the Cloud console go to Artifact Registry > Repositories. Click into
maven-central-cacheand check that the binary artifacts cached there:

Task 4. Virtual repositories
Virtual Repositories act as an interface for multiple repositories to be accessed through a single configuration. This simplifies client configuration for consumers of your artifacts and increases security by mitigating dependency confusion attacks.
- Create a policy file
- Create the virtual repository
Click Check my progress to verify the objective.
- Run the following command to print the repository configuration to add to your Java project:
- Replace the entire repositories section in your pom with the one virtual repositories section from the output.
Example: (your project names will be different in your URLs)
Pull dependencies from the Virtual Repository
Since the Virtual repository is a pass through and won't store any actual packages, to clearly demonstrate the process you'll delete the maven-central-cache repo you created earlier and recreate it, to start again with an empty repository
- Run the following commands to recreate the cache repository
-
You can review the empty repo in the console. Cloud console > Artifact Registry > Repositories
-
Now exercise the virtual repository by building your project with the following command:
- Review the packages in the console. Cloud Console > Artifact Registry > Repositories. Click into
maven-central-cacheand check that the binary artifacts were configured to pull from the virtual repo but were ultimately pulled from themaven-central-cache.
Congratulations!
You've learned how to use several repository modes and the various purposes those repositories serve.
—
Next steps / Learn more
- For details on authentication and configuration, review the product documentation.
Google Cloud Training & Certification
...helps you make the most of Google Cloud technologies. Our classes include technical skills and best practices to help you get up to speed quickly and continue your learning journey. We offer fundamental to advanced level training, with on-demand, live, and virtual options to suit your busy schedule. Certifications help you validate and prove your skill and expertise in Google Cloud technologies.
Manual Last Updated December 06, 2023
Lab Last Tested December 06, 2023
Copyright 2023 Google LLC All rights reserved. Google and the Google logo are trademarks of Google LLC. All other company and product names may be trademarks of the respective companies with which they are associated.