체크포인트
Create test data for the Firestore Database
/ 50
Import test data into the Firestore Database
/ 50
Importing Data to a Firestore Database
GSP642

Overview
Twelve years ago, Lily started the Pet Theory chain of veterinary clinics. The Pet Theory chain has expanded rapidly over the last few years. However, their old appointment scheduling system is not able to handle the increased load, so Lily is asking you to build a cloud-based system that scales better than the legacy solution.
Pet Theory's Ops team is a single person, Patrick, so they need a solution that doesn't require lots of ongoing maintenance. The team has decided to go with serverless technology.
Ruby has been hired as a consultant to help Pet Theory make the transition to serverless. After comparing serverless database options, the team decides to go with Cloud Firestore. Since Firestore is serverless, capacity doesn't have to be provisioned ahead of time which means that there is no risk of running into storage or operations limits. Firestore keeps your data in sync across client apps through real-time listeners and offers offline support for mobile and web, so a responsive app can be built that works regardless of network latency or Internet connectivity.
In this lab you will help Patrick upload Pet Theory's existing data to a Cloud Firestore database. He will work closely with Ruby to accomplish this.
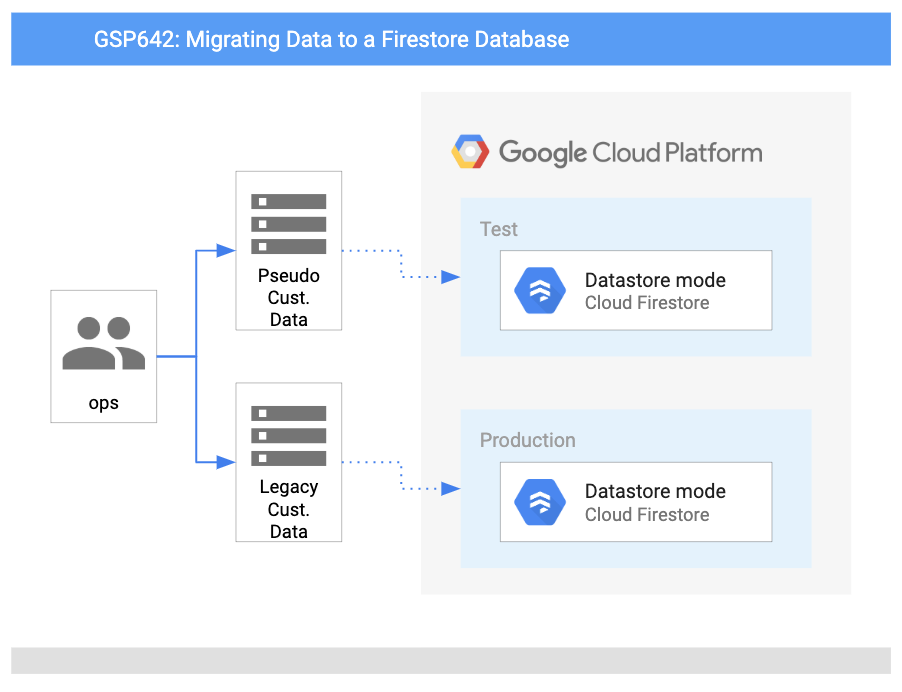
Architecture
This diagram gives you an overview of the services you will be using and how they connect to one another:
Objectives
In this lab, you will learn how to:
- Set up Firestore in Google Cloud.
- Write database import code.
- Generate a collection of customer data for testing.
- Import the test customer data into Firestore.
Prerequisites
This is a introductory level lab. This assumes familiarity with the Cloud Console and shell environments. Experience with Firebase will be helpful, but is not required.
You should also be comfortable editing files. You can use your favorite text editor (like nano, vi, etc.) or you can launch the code editor from Cloud Shell, which can be found in the top ribbon:

Once you're ready, scroll down and follow the steps below to set up your lab environment.
Setup and requirements
Before you click the Start Lab button
Read these instructions. Labs are timed and you cannot pause them. The timer, which starts when you click Start Lab, shows how long Google Cloud resources will be made available to you.
This hands-on lab lets you do the lab activities yourself in a real cloud environment, not in a simulation or demo environment. It does so by giving you new, temporary credentials that you use to sign in and access Google Cloud for the duration of the lab.
To complete this lab, you need:
- Access to a standard internet browser (Chrome browser recommended).
- Time to complete the lab---remember, once you start, you cannot pause a lab.
How to start your lab and sign in to the Google Cloud console
-
Click the Start Lab button. If you need to pay for the lab, a pop-up opens for you to select your payment method. On the left is the Lab Details panel with the following:
- The Open Google Cloud console button
- Time remaining
- The temporary credentials that you must use for this lab
- Other information, if needed, to step through this lab
-
Click Open Google Cloud console (or right-click and select Open Link in Incognito Window if you are running the Chrome browser).
The lab spins up resources, and then opens another tab that shows the Sign in page.
Tip: Arrange the tabs in separate windows, side-by-side.
Note: If you see the Choose an account dialog, click Use Another Account. -
If necessary, copy the Username below and paste it into the Sign in dialog.
{{{user_0.username | "Username"}}} You can also find the Username in the Lab Details panel.
-
Click Next.
-
Copy the Password below and paste it into the Welcome dialog.
{{{user_0.password | "Password"}}} You can also find the Password in the Lab Details panel.
-
Click Next.
Important: You must use the credentials the lab provides you. Do not use your Google Cloud account credentials. Note: Using your own Google Cloud account for this lab may incur extra charges. -
Click through the subsequent pages:
- Accept the terms and conditions.
- Do not add recovery options or two-factor authentication (because this is a temporary account).
- Do not sign up for free trials.
After a few moments, the Google Cloud console opens in this tab.

Activate Cloud Shell
Cloud Shell is a virtual machine that is loaded with development tools. It offers a persistent 5GB home directory and runs on the Google Cloud. Cloud Shell provides command-line access to your Google Cloud resources.
- Click Activate Cloud Shell
at the top of the Google Cloud console.
When you are connected, you are already authenticated, and the project is set to your Project_ID,
gcloud is the command-line tool for Google Cloud. It comes pre-installed on Cloud Shell and supports tab-completion.
- (Optional) You can list the active account name with this command:
- Click Authorize.
Output:
- (Optional) You can list the project ID with this command:
Output:
gcloud, in Google Cloud, refer to the gcloud CLI overview guide.
Task 1. Set up Firestore in Google Cloud
Patrick's task is to upload Pet Theory's existing data to a Cloud Firestore database. He will work closely with Ruby to accomplish this goal. Ruby receives a message from Patrick in IT...
|
Patrick, IT Administrator |
Hi Ruby, Our first step in going serverless is creating a Firestore database with Google Cloud. Can you help with this task? I am not very familiar with setting this up. Patrick |
|
Ruby, Software Consultant |
Hey Patrick, Sure, I would be happy to help with that. I'll send you some resources to get started, let's get in touch once you're done creating the database. Ruby |


Help Patrick set up a Firestore database through the Cloud Console.
-
In the Cloud Console, go to the Navigation menu and select Firestore.
-
Click +Create Database.
-
Select the Native mode option and click Continue.
- Native Mode is good for letting lots of users access the same data at the same time (plus, it has features like real-time updates and direct connection between your database and a web/mobile client
- Datastore Mode puts an emphasis on high throughput (lots of reads and writes).
- In the Region dropdown, select
region and then click Create Database.
On completion of the task, Ruby emails Patrick...
|
Ruby, Software Consultant |
Hey Patrick, Great work setting up the Firestore database! To manage database access, we will use a Service Account that has been automatically created with the necessary privileges. We are now ready to migrate from the old database to Firestore. Ruby |
|
Patrick, IT Administrator |
Hey Ruby, Thanks for the help, setting up the Firestore database was straightforward. I hope the database import process will be easier than it is with the legacy database, which is quite complex and requires a lot of steps. Patrick |

Task 2. Write database import code
The new Cloud Firestore database is in place, but it's empty. The customer data for Pet Theory still only exists in the old database.
Patrick sends a message to Ruby...
|
Patrick, IT Administrator |
Hi Ruby, My manager would like to begin migrating the customer data to the new Firestore database. I have exported a CSV file from our legacy database, but it's not clear to me how to import this data into Firestore. Any chance you can lend me a hand? Patrick |
|
Ruby, Software Consultant |
Hey Patrick, Sure, let's set up a meeting to discuss what needs to be done. Ruby |

As Patrick said, the customer data will be available in a CSV file. Help Patrick create an app that reads customer records from a CSV file and writes them to Firestore. Since Patrick is familiar with Javascript, build this application with the Node.js JavaScript runtime.
- In Cloud Shell, run the following command to clone the Pet Theory repository:
- Use the Cloud Shell Code Editor (or your preferred editor) to edit your files. From the top ribbon of your Cloud Shell session, click Open Editor, it will open a new tab. If prompted, click Open in a new window to launch the code editor:
- Then change your current working directory to
lab01:
In the directory you can see Patrick's package.json. This file lists the packages that your Node.js project depends on and makes your build reproducible, and therefore easier to share with others.
An example package.json is shown below:
Now that Patrick has his source code imported, he gets in touch with Ruby to see what packages he needs to make the migration work.
|
Patrick, IT Administrator |
Hi Ruby, The code I use for the legacy database is pretty basic, it just creates a CSV ready for the import process. Anything I need to download before I get started? Patrick |
|
Ruby, Software Consultant |
Hi Patrick, I would suggest using one of the many @google-cloud Node packages to interact with Firestore. We should then only need to make small changes to the existing code since the heavy lifting has been taken care of. Ruby |
To allow Patrick's code to write to the Firestore database, you need to install some additional peer dependencies.
- Run the following command to do so:
- To enable the app to write logs to Cloud Logging, install an additional module:
After successful completion of the command, the package.json will be automatically updated to include the new peer dependencies, and will look like this.
Now it's time to take a look at the script that reads the CSV file of customers and writes one record in Firestore for each line in the CSV file. Patrick's original application is shown below:
It takes the output from the input CSV file and imports it into the legacy database. Next, update this code to write to Firestore.
- Open the file
pet-theory/lab01/importTestData.js.
To reference the Firestore API via the application, you need to add the peer dependency to the existing codebase.
- Add the following Firestore dependency on line 3 of the file:
Ensure that the top of the file looks like this:
Integrating with the Firestore database can be achieved with a couple of lines of code. Ruby has shared some template code with you and Patrick for exactly that purpose.
- Add the following code underneath line 34, or after the
if (process.argv.length < 3)conditional:
The above code snippet declares a new database object, which references the database created earlier in the lab. The function uses a batch process in which each record is processed in turn and given a document reference based on the identifier added. At the end of the function, the batch content is committed (written) to the database.
- Update the
importCsvfunction to add the function call to writeToFirestore and remove the call to writeToDatabase. It should look like this:
- Add logging for the application. To reference the Logging API via the application, add the peer dependency to the existing codebase. Add the following line just below the other require statements at the top of the file:
Ensure that the top of the file looks like this:
- Add a few constant variables and initialize the Logging client. Add those just below the above lines in the file (~line 5), like this:
- Add code to write the logs in
importCsvfunction just below the line "console.log(Wrote ${records.length} records);" which should look like this:
After these updates, your importCsv function code block should look like the following:
Now when the application code is running, the Firestore database will be updated with the contents of the CSV file. The function importCsv takes a filename and parses the content on a line by line basis. Each line processed is now sent to the Firestore function writeToFirestore, where each new record is written to the "customer" database.
Task 3. Create test data
Time to import some data! Patrick contacts Ruby about a concern he has about running a test with real customer data...
|
Patrick, IT Administrator |
Hi Ruby, I think it would be better if we don't use customer data for testing. We need to maintain customer privacy, but also need to have some confidence that our data import script works correctly. Can you think of an alternative way to test? Patrick |
|
Ruby, Software Consultant |
Hey Patrick, Fair point, Patrick. This is a tricky area, as customer data may include personal identifiable information, also called PII. I'll share some starter code with you to create pseudo customer data. We can then use this data to test the import script. Ruby |

Help Patrick get this pseudo-random data generator up and running.
- First, install the "faker" library, which will be used by the script that generates the fake customer data. Run the following command to update the dependency in
package.json:
- Now open the file named createTestData.js with the code editor and inspect the code. Ensure it looks like the following:
- Add Logging for the codebase. On line 3, add the following reference for the Logging API module from the application code:
The top of the file should now look like this:
- Now, add a few constant variables and initialize the Logging client. Add those just below the
conststatements:
- Add code to write the logs in the createTestData function just below the line "console.log(
Created file ${fileName} containing ${recordCount} records.);" which will look like this:
- After updating, the
createTestDatafunction code block should look like this:
- Run the following command in Cloud Shell to create the file
customers_1000.csv, which will contain 1000 records of test data:
You should receive a similar output:
- Open the file
customers_1000.csvand verify that the test data has been created.
Test completed task
Click Check my progress to verify your performed task. If you have successfully created a sample test data for the Firestore Database, you will see an assessment score.
Task 4. Import the test customer data
- To test the import capability, use both the import script and the test data created earlier:
You should receive a similar output:
- If you get an error that resembles the following:
Run the following command to add the csv-parse package to your environment:
- Then run the command again. You should receive the following output:
Over the past couple of sections you have seen how Patrick and Ruby have created test data and a script to import data into Firestore. Patrick now feels more confident about loading customer data into the Firestore database.
Test completed task
Click Check my progress to verify your performed task. If you have successfully imported sample test data into the Firestore Database, you will see an assessment score.
Task 5. Inspect the data in Firestore
With a little help from you and Ruby, Patrick has now successfully migrated the test data to the Firestore database. Open up Firestore and see the results!
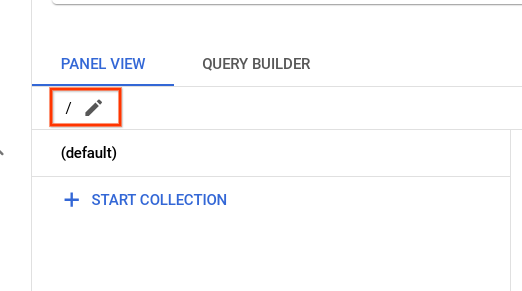
- Return to your Cloud Console tab. In the Navigation menu click on Firestore. Once there, click on the pencil icon.
-
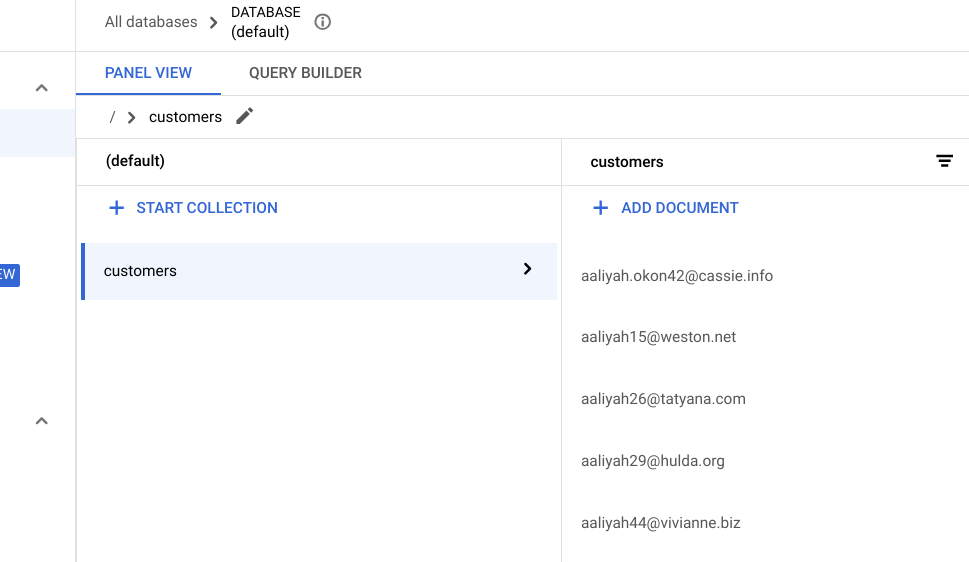
Type in
/customersand press Enter. -
Refresh your browser tab and you should see the following list of customers successfully migrated:
Congratulations!
Throughout the course of this lab, you received hands-on practice with Firestore. After generating a collection of customer data for testing, you ran a script that imported the data into Firestore. You then learned how to manipulate data in Firestore through the Cloud Console.
Google Cloud training and certification
...helps you make the most of Google Cloud technologies. Our classes include technical skills and best practices to help you get up to speed quickly and continue your learning journey. We offer fundamental to advanced level training, with on-demand, live, and virtual options to suit your busy schedule. Certifications help you validate and prove your skill and expertise in Google Cloud technologies.
Manual Last Updated February 28, 2024
Lab Last Tested February 28, 2024
Copyright 2024 Google LLC All rights reserved. Google and the Google logo are trademarks of Google LLC. All other company and product names may be trademarks of the respective companies with which they are associated.