Prüfpunkte
Deploy the VPC network and firewall
/ 100
Change firewall rules using Terraform and Cloud Shell
 IMPORTANT:
 Make sure to complete this hands-on lab on a desktop/laptop only.
 There are only 5 attempts permitted per lab.
 As a reminder – it is common to not get every question correct on your first try, and even to need to redo a task; this is part of the learning process.
 Once a lab is started, the timer cannot be paused. After 1 hour and 30 minutes, the lab will end and you’ll need to start again.
 For more information review the Lab technical tips reading.
Activity overview
Firewall rules play a crucial role in cloud network security because they control which traffic is allowed to enter and leave your cloud environment. The nature of cloud networking is ever changing and complex. Organizations' needs change, new cloud resources are added or removed, and new vulnerabilities are discovered. This means that you'll need to continually adjust and maintain the configuration of firewall rules to adapt with these changes.
Tracking and managing critical updates in your cloud environment can be challenging. Luckily, you can manage the configuration of your cloud resources by leveraging infrastructure as code (IaC). IaC is the provisioning and managing of infrastructure through using reusable scripts. It can be used to automate workflows such as updating firewall rules.
Terraform and Cloud Shell make it easy to manage and update firewall rules efficiently. By writing desired firewall rules in Terraform configuration files and executing Terraform commands in Cloud Shell, you can ensure that your network security policies remain consistent and version-controlled. This approach will help you maintain and track changes over time.
In this lab, you'll learn how to clone a Terraform repository and deploy a VPC network and firewall.
Scenario
Cymbal Bank's new banking application is ready to be deployed. It needs to be hosted on a Virtual Private Cloud (VPC). Your team lead, Chloe, would like to define and provision the application's network infrastructure using Terraform. Terraform can be used to securely provision cloud infrastructure in a way that's repeatable and consistent. This way, you can easily and quickly make any required changes. You have been tasked with using Terraform to create a network and firewall rules.
Here’s how you'll do this task: First, you’ll activate the Cloud Shell. Then, you’ll clone the Terraform repo. Finally, you’ll deploy the VPC network and firewall.
Setup
Before you click Start Lab
Read these instructions. Labs are timed and you cannot pause them. The timer, which starts when you click Start Lab, shows how long Google Cloud resources will be made available to you.
This practical lab lets you do the activities yourself in a real cloud environment, not in a simulation or demo environment. It does so by giving you new, temporary credentials that you use to sign in and access Google Cloud for the duration of the lab.
To complete this lab, you need:
- Access to a standard internet browser (Chrome browser recommended).
- Time to complete the lab---remember, once you start, you cannot pause a lab.
How to start your lab and sign in to the Google Cloud console
-
Click the Start Lab button. On the left is the Lab Details panel with the following:
- Time remaining
- The Open Google Cloud console button
- The temporary credentials that you must use for this lab
- Other information, if needed, to step through this lab
Note: If you need to pay for the lab, a pop-up opens for you to select your payment method. -
Click Open Google Cloud console (or right-click and select Open Link in Incognito Window) if you are running the Chrome browser. The Sign in page opens in a new browser tab.
Tip: You can arrange the tabs in separate, side-by-side windows to easily switch between them.
Note: If the Choose an account dialog displays, click Use Another Account. -
If necessary, copy the Google Cloud username below and paste it into the Sign in dialog. Click Next.
You can also find the Google Cloud username in the Lab Details panel.
- Copy the Google Cloud password below and paste it into the Welcome dialog. Click Next.
You can also find the Google Cloud password in the Lab Details panel.
- Click through the subsequent pages:
- Accept the terms and conditions
- Do not add recovery options or two-factor authentication (because this is a temporary account)
- Do not sign up for free trials
After a few moments, the Console opens in this tab.

Task 1. Clone the Terraform repo
In this task, you'll clone the Terraform example repository using the Cloud Shell terminal. The Terraform example contains the configuration file, which you'll use to provision the firewall rules.
- In the Google Cloud console, click the Activate Cloud Shell
- Click Continue.

It should only take a few moments to provision and connect to the Cloud Shell environment.
- Copy the following command into the Cloud Shell terminal:
This command clones the Terraform example directory.
- Press ENTER.
This command performs the following actions:
- Clones the
terraform-google-modules. - Prints the
motdfile name. - Switches to the
firewall_basicdirectory. - Checks the cloned files, for example
tutorial.md. - Opens
main.tfin Cloud Shell Editor.
Once the cloning is complete, you’ll be at the ~/cloudshell_open/docs-examples/firewall_basic location in the terminal. Your Cloud Shell prompt should display similar output to the following example:
- Copy the following command into the Cloud Shell terminal to list the contents of the directory:
You should notice that several files in the directory have been downloaded: backing_file.tf, main.tf, motd, and tutorial.md.
- Copy the following command into the Cloud Shell terminal to analyze the configuration of the firewall rule:
- Press ENTER.
The main.tf file is the configuration file that defines the resources that Terraform will create. Two resources will be created: a firewall rule google_compute_firewall named test-firewall-${local.name_suffix} with rules to allow ICMP and TCP traffic from ports 80, 8080, and 1000-2000 and a VPC network google_compute_network named test-network-${local.name_suffix}. The variable ${local.name_suffix} is a local variable that automatically generates unique names for resources.
Task 2. Deploy the VPC network and firewall
In this task, you'll deploy a new VPC network and a new firewall rule. This task provides hands-on experience with building a VPC network and subnets.
- Copy the following command into the Cloud Shell terminal.
This command sets the project ID.
-
Press ENTER.
-
Copy the following command into the Cloud Shell terminal:
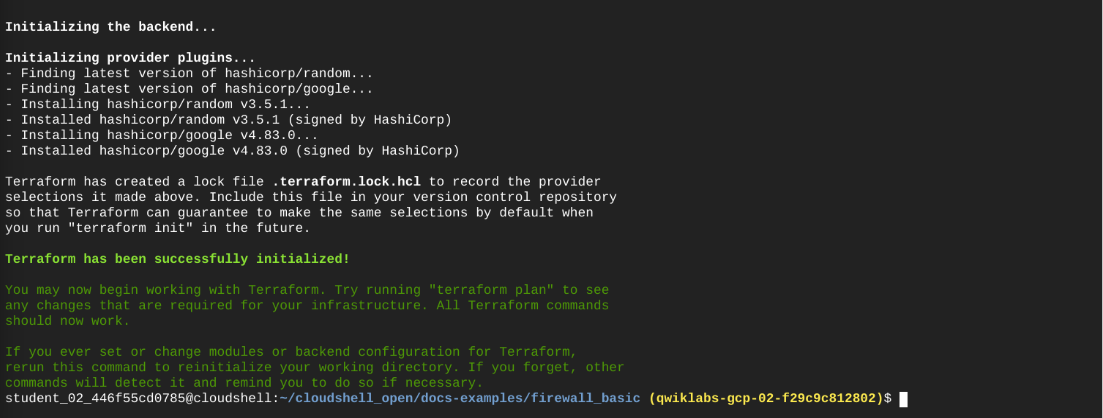
This command initializes the Terraform script.
- Press ENTER.
The output should return a message stating that the Terraform has been successfully initialized. Take a moment to examine the output. You'll notice that Terraform will create a new firewall and VPC network:
- Once the initialization is complete, copy the following command into the Cloud Shell terminal:
This command applies the changes and deploys the Terraform script.
- Press ENTER.
- The command prompt will prompt you to Enter a value. Type "yes", and press ENTER.
This will start creating the VPC network and firewall rules.
Once it’s completed, the output should return the following message:
This means that the VPC and firewall have been successfully deployed.
Click Check my progress to verify that you have completed this task correctly.
Task 3. Verify the deployment of the resources
In this task, you'll verify that the newly created VPC and firewall rules have been successfully deployed.
- In the Google Cloud console, from the Navigation menu (
), select VPC network > VPC networks. The VPC networks page opens.
- You should notice two VPC networks, default and the newest one you just created, test-network. Click test-network to access the VPC network details.
- Click Firewalls. Use the expand arrow to expand vpc-firewall-rules. Under Protocols and ports and Action you should notice the firewall rules are the same rules as defined in the configuration file: Allow and tcp:80, 1000-2000, 8080 icmp.
Conclusion
Great work!
You've successfully built a VPC network and subnet using Terraform and the Cloud Shell. This lab provides the foundation to developing advanced automated solutions that can be given to system administrators to use with Terraform.
By creating the VPC network and firewall, you have gained a better understanding of how it enables you to automate the process of provisioning and modifying firewall rules. This helps establish consistency across various environments, while also helping reduce the chance of human error.
End your lab
Before you end the lab, make sure you’re satisfied that you’ve completed all the tasks. When you're ready, click End Lab and then click Submit.
Ending the lab will remove your access to the lab environment, and you won’t be able to access the work you've completed in it again.
Copyright 2024 Google LLC All rights reserved. Google and the Google logo are trademarks of Google LLC. All other company and product names may be trademarks of the respective companies with which they are associated.