检查点
Create a custom role
/ 50
Grant a role to a user
/ 50
Create a role in Google Cloud IAM
 IMPORTANT:
 Make sure to complete this hands-on lab on a desktop/laptop only.
 There are only 5 attempts permitted per lab.
 As a reminder – it is common to not get every question correct on your first try, and even to need to redo a task; this is part of the learning process.
 Once a lab is started, the timer cannot be paused. After 1 hour and 30 minutes, the lab will end and you’ll need to start again.
 For more information review the Lab technical tips reading.
Activity overview
IAM, or Identity and Access Management, is a collection of processes and technologies that help organizations manage digital identities in their environment. With IAM, access control is managed by defining the identity of users and their roles in relation to available resources. Resource access permissions are not granted directly to individual users. Instead, users are assigned to roles that are then given to authenticated principals. While the term "members" was used in the past, IAM now refers to these individuals as principals, although some APIs still use the previous terminology. There are three types of IAM roles in Google Cloud:
-
Basic roles: Roles historically available in the Google Cloud console. These roles are Owner, Editor, and Viewer.
-
Predefined roles: Roles that give finer-grained access control than the basic roles. For example, the predefined role Pub/Sub Publisher (roles/pubsub.publisher) provides access to only publish messages to a Pub/Sub topic.
-
Custom roles: Roles that you create to tailor permissions to the needs of your organization when predefined roles don't meet your needs.
In this lab, you’ll learn how to create and manage Identity and Access Management (IAM) custom roles.
Scenario
As part of its migration plan, Cymbal Bank is incrementally deploying its workflows to the cloud. One of these deployments includes a database which stores sensitive customer billing and invoice data. Before this database can be deployed, it needs to go through a comprehensive third-party audit. The auditors need access to this database to complete this audit. They need to be granted the appropriate permissions necessary to complete their job. Your team lead, Chloe, has tasked you with leveraging IAM to implement access control to this database for the audit group.
IAM is a fundamental component of cloud security and it will play a pivotal role in your task. The members of the audit team will require designated roles with restricted access, exclusively for viewing and listing the database contents. Your task, as outlined by your team lead, entails the precise configuration of user access to align with these strict requirements.
Here’s how you'll do this task: First, you’ll create a role and assign the required permissions. Next, you’ll assign the new role you have created to a user. Finally, you’ll verify that the role you created has been granted.
Setup
Before you click Start Lab
Read these instructions. Labs are timed and you cannot pause them. The timer, which starts when you click Start Lab, shows how long Google Cloud resources will be made available to you.
This practical lab lets you do the activities yourself in a real cloud environment, not in a simulation or demo environment. It does so by giving you new, temporary credentials that you use to sign in and access Google Cloud for the duration of the lab.
To complete this lab, you need:
- Access to a standard internet browser (Chrome browser recommended).
- Time to complete the lab---remember, once you start, you cannot pause a lab.
How to start your lab and sign in to the Google Cloud console
-
Click the Start Lab button. On the left is the Lab Details panel with the following:
- Time remaining
- The Open Google Cloud console button
- The temporary credentials that you must use for this lab
- Other information, if needed, to step through this lab
Note: If you need to pay for the lab, a pop-up opens for you to select your payment method. -
Click Open Google console (or right-click and select Open Link in Incognito Window) if you are running the Chrome browser. The lab Sign in page opens in a new browser tab.
Tip: You can arrange the tabs in separate, side-by-side windows to easily switch between them.
Note: If the Choose an account dialog displays, click Use Another Account. -
If necessary, copy the Google Cloud username 1 below and paste it into the Sign in dialog. Click Next.
You can also find the Google Cloud username 1 in the Lab Details panel.
- Copy the Google Cloud password below and paste it into the Welcome dialog. Click Next.
You can also find the Google Cloud password in the Lab Details panel.
- Click through the subsequent pages:
- Accept the terms and conditions
- Do not add recovery options or two-factor authentication (because this is a temporary account)
- Do not sign up for free trials
After a few moments, the Cloud Console opens in this tab.

Task 1. Create a custom role
Applying the principle of least privilege is integral to IAM. It ensures that users are only given the permissions they need to perform their tasks. Custom roles provide a way to tailor permissions to an organization's needs, making sure that users do not have broad and excessive permissions.
In this task, you'll create a custom role for the audit team at Cymbal. You'll then grant the custom role restricted access for viewing the database contents.
-
In the Google Cloud console, in the Navigation menu (
), click IAM & Admin > Roles. The Roles page opens.
-
On the Explorer bar, located near the top of the Roles page, click + Create Role.
-
In the Create Role dialog, specify the following settings and leave the remaining settings as their defaults:
| Property | Value (type or select) |
|---|---|
| Title | Audit Team Reviewer |
| Description | Custom role, allowing the audit team to conduct its review activities. This role grants read-only access to Firebase database resources. |
| ID | CustomRole |
| Role launch stage | General Availability |
Each custom role can be given a role launch stage which reflects the different phases of a role's development, testing, and deployment. These stages help users understand the current state of a role and its suitability for various use cases.
There are several launch stages in Google Cloud. The three primary role launch stages you should know about are:
Alpha: Roles in the Alpha stage are typically experimental and may undergo significant changes. They are not recommended for production environments. Users can provide feedback on alpha roles to influence their development.
Beta: Roles in the Beta stage are more mature than alpha roles but might still receive updates and improvements based on user feedback. They are considered suitable for certain non-production scenarios but may not be fully stable.
General Availability (GA): Roles that have reached General Availability have undergone thorough development, testing, and refinement. They are considered stable, reliable, and suitable for widespread use in production environments. GA roles have been extensively reviewed and are intended to provide consistent and dependable behavior.
-
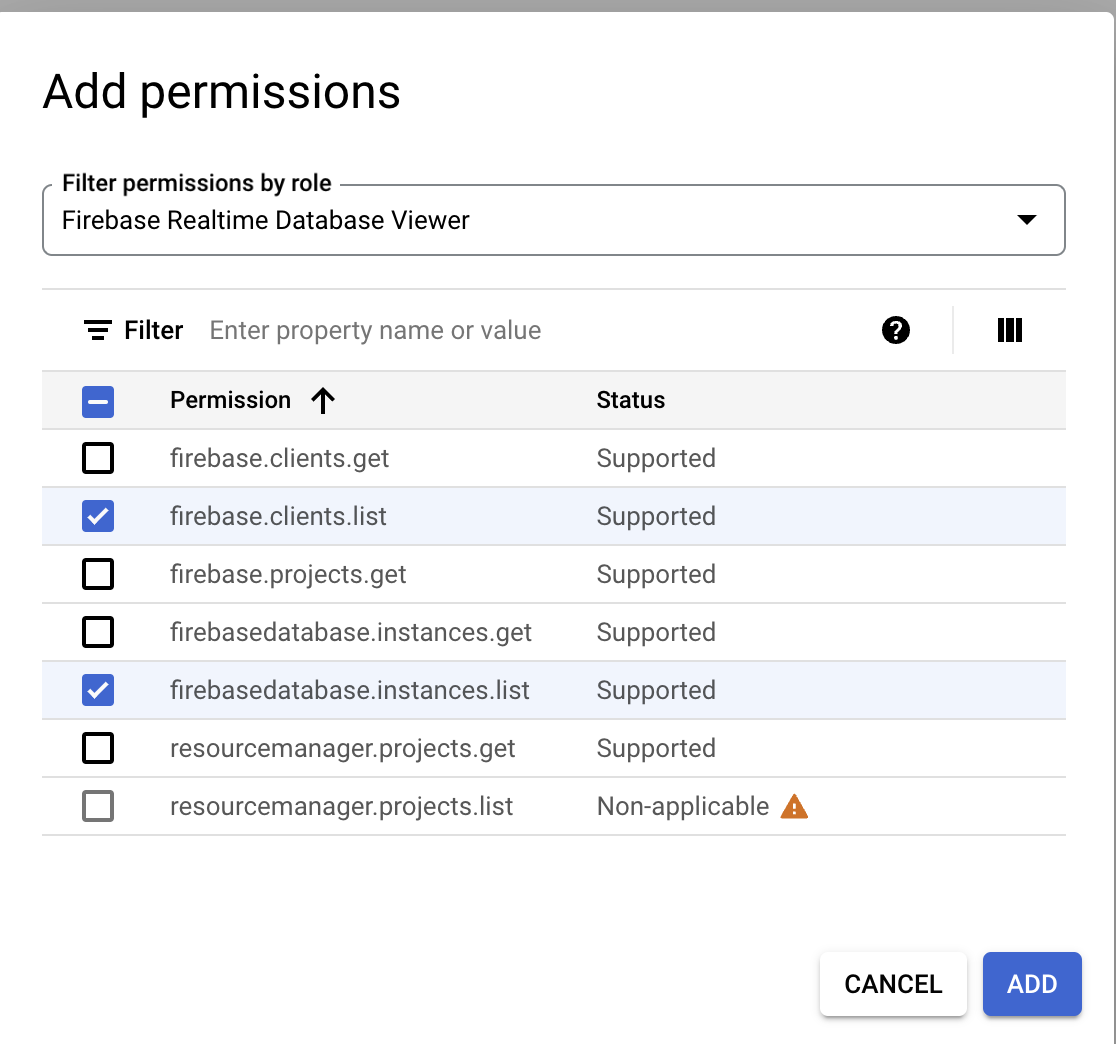
Click the + Add permissions. The Add permissions dialog box opens.
-
In the Filter permissions by role field, type Firebase Realtime.
-
In the results drop-down field, select the Firebase Realtime Database Viewer checkbox.
-
Click OK.
-
Under Filter, select the firebase.clients.list and firebasedatabase.instances.list checkboxes to add these permissions to the custom role.
-
Click Add.
-
In the Create Role dialog, click Create.
The new role should now be created and added to the existing roles in the project.
Click Check my progress to verify that you have completed this task correctly.
Task 2. Grant a role to a user
In this task, you'll assign the custom role you created in Task 1 to an existing user.
-
In the Google Cloud console, in the Navigation menu (
-
On the View By Principals tab, click Grant access. The Grant access dialog window will open.
The Grant access dialogue box is a crucial component of the IAM system in Google Cloud. It provides you with the ability to precisely define and manage these permissions for users, groups, and service accounts.
- Copy the Google Cloud username 2:
and paste it into the New principals field.

- Expand the Select a role drop-down menu, select Custom, and then select Audit Team Reviewer. This is the role you created in the previous task.
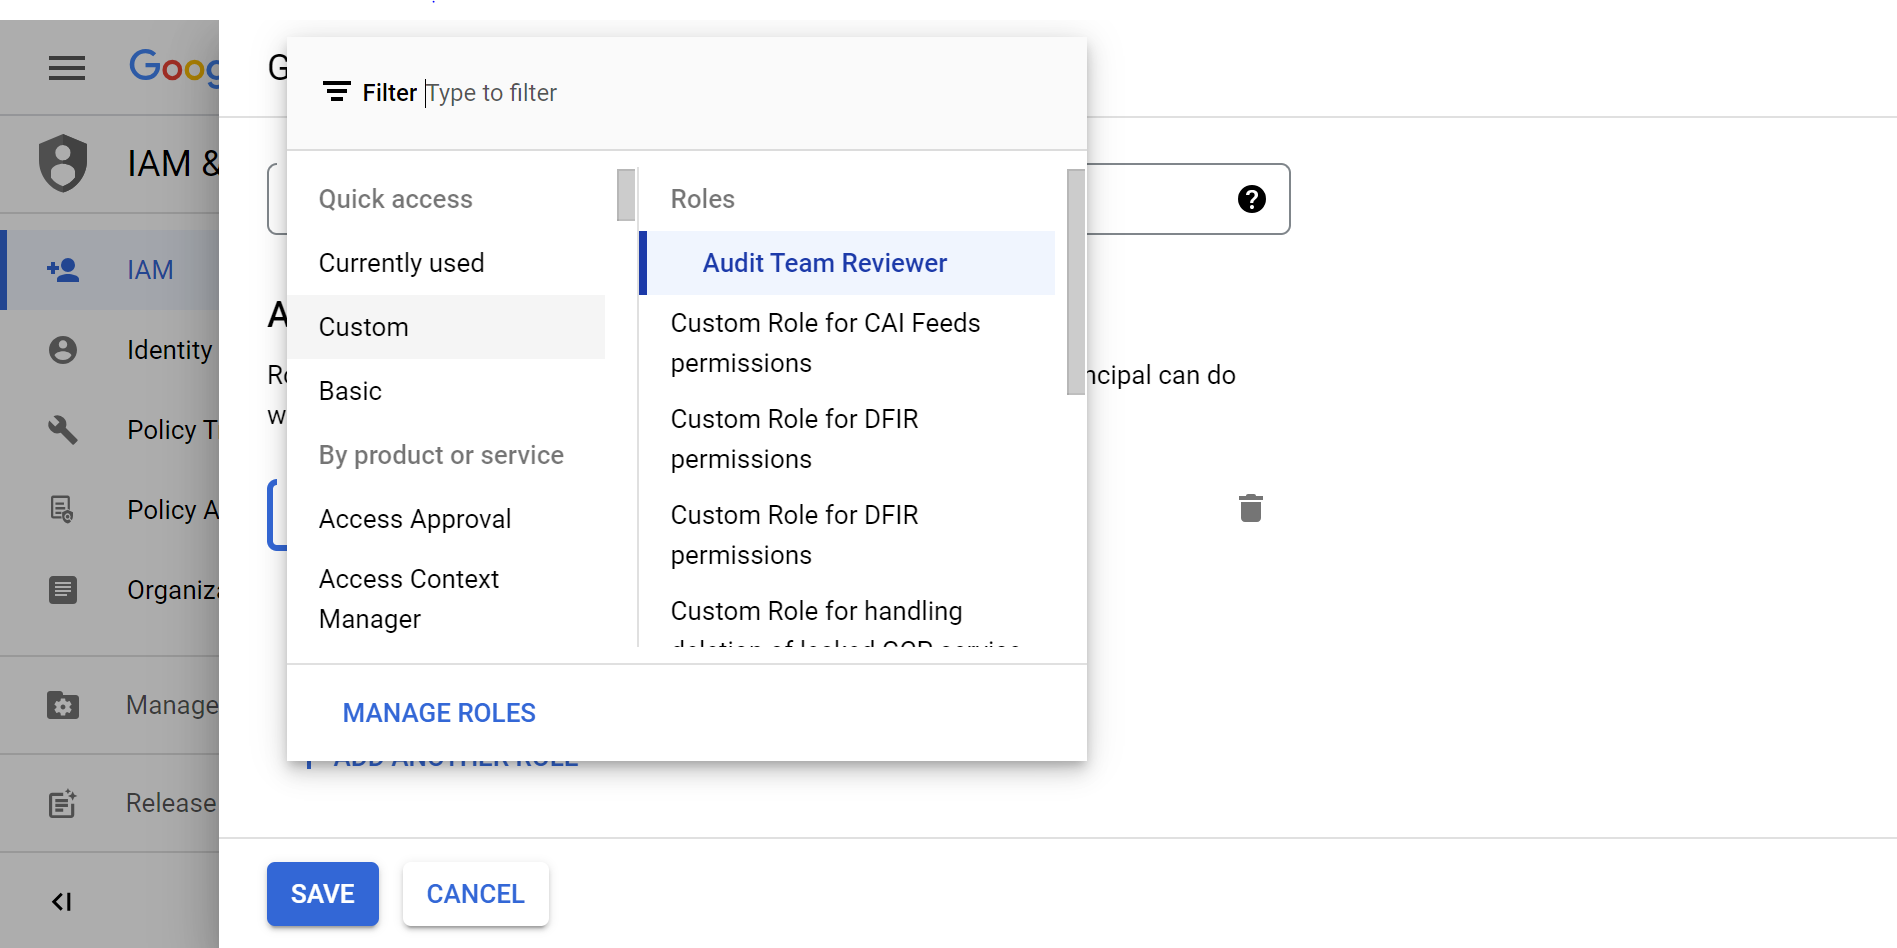
- Click Save.
The custom role should now be assigned to the user.
Click Check my progress to verify that you have completed this task correctly.
Task 3. Verify the role
So far, you've created a custom role with the appropriate permissions and granted the role to the user. Now, you'll need to check your work to verify that the user has been assigned the role you created. Ensuring that you've correctly configured settings is an integral in part of your workflow as a cloud security analyst.
In this task, you'll use Google Cloud's Policy Analyzer to create a query to check the roles granted to the user.
-
In the Google Cloud console, in the Navigation menu (
-
In the Analyze policies section, on the Custom Query tile, click Create custom query. A pop-up may appear at the top left Google Cloud menu (
-
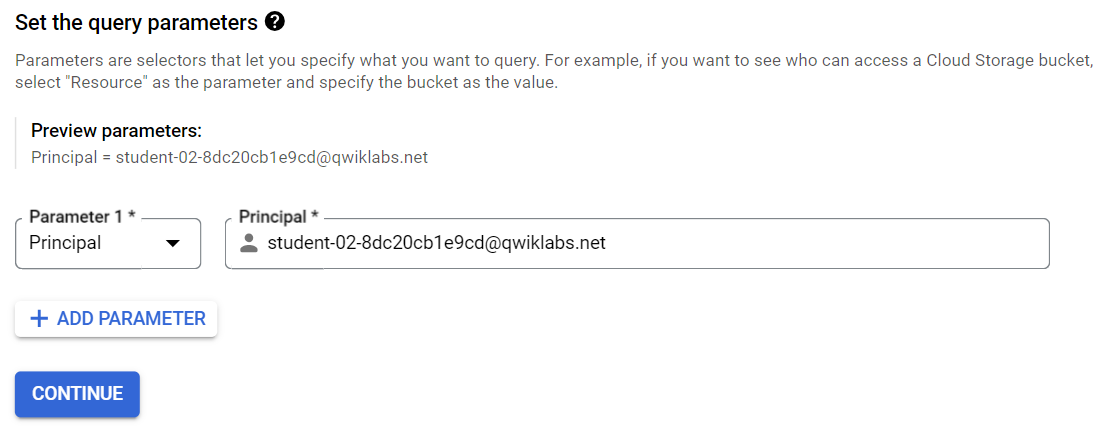
In the Set the query parameters section, expand the Parameter 1 drop-down menu and select Principal.
-
Copy the Google Cloud username 2:
and paste it into the Principal field.
-
Click Continue.
-
In the Advanced options for query results section, select the List resources within resource(s) matching your query checkbox.
-
Click Analyze and then select Run query in the drop-down menu.
The results should return the role granted to the user. Use the results to answer the following question(s).
Conclusion
Great work! You have successfully utilized IAM to create a custom role, grant access to a user for that role, and verified the permissions within Google Cloud. Cymbal Bank's audit team can now begin working on their database audit using the custom role you created.
IAM defines who has access to which resources based on their role. It is critical for managing digital identities in an organization's environment and will be integral in your work as a cloud security analyst.
By using IAM services, you are well on your way to effectively managing access and permissions to storage resources.
End your lab
Before you end the lab, make sure you’re satisfied that you’ve completed all the tasks. When you're ready, click End Lab and then click Submit.
Ending the lab will remove your access to the lab environment, and you won’t be able to access the work you've completed in it again.
Copyright 2024 Google LLC All rights reserved. Google and the Google logo are trademarks of Google LLC. All other company and product names may be trademarks of the respective companies with which they are associated.